How to insulate a brick wall from the outside cheaper. How to properly insulate a brick house? Insulation of a brick house inside
- Types of materials for insulation brick house
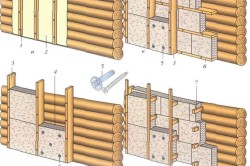
- Insulation of external brick walls
- Ventilated facades: thermal insulation and finishing
Brick houses are considered quite warm, but to achieve required level insulation, the wall thickness must be significant, and this is an extra financial expense. That is why additional insulation is used for the external walls of a brick house.
To achieve maximum heat inside a brick house, it is necessary to carry out insulation work on the external walls.
There are many options for insulation; ventilated facades are popular today, which allow you to insulate external walls and create a beautiful façade finish.
Types of materials for insulating a brick house
Exterior can be done using various materials. The selection depends on the requirements for thermal insulation, climatic conditions, selected facade finishing. For brick exterior walls the following are used:

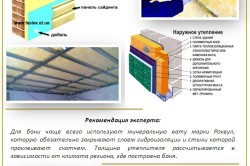
- Mineral wool is most often used for ventilated facades; its density is 20-200 kg/m³. The selection of product density depends on climatic conditions and on the requirements for thermal insulation and sound insulation of the house. But this material has strong water absorption, so additional protection against moisture is required. It is best to use mineral wool for interior brick walls.
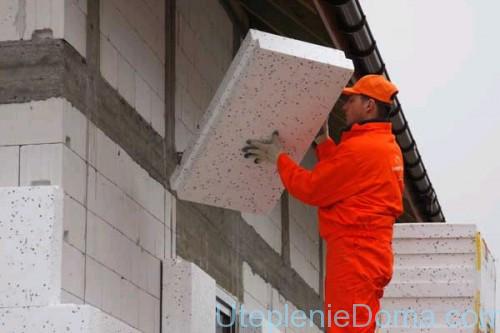
- Expanded polystyrene or polystyrene foam is the second most popular option. It is optimally suited as insulation for brick houses. The density of the material can be 11-35 kg/m³. This is quite enough to ensure a comfortable microclimate inside the building. But the material is fragile, it is necessary to protect it from impacts.
- Expanded clay is rarely used for insulating external walls; usually this option is used for basement walls and for the outside of the foundation. Expanded clay is cheap, but its performance properties are high. Insulation of walls is carried out simply; usually the material is poured into a cavity formed between the facade and finishing walls in one brick.
- Warm plaster, or wet facade, has a special appeal. No special experience is required to carry out the work. Polystyrene foam is used as the basis for thermal insulation, and a layer of plaster is applied to it. This type of wall insulation is of high quality and has many advantages. The maximum finishing layer is only 50 mm, although the weight is quite large, so reinforcement of the foundation is required. The plaster is durable, beautiful, and today manufacturers offer various options. For example, compositions with mineral, marble, granite chips.
- Insulation of a brick house can be carried out using cork slabs. However, the degree of flammability of the material is high; cork is most suitable for internal insulation.
- Insulation of a brick house is also possible with cellulose wool. Ecowool is not that expensive, installation can be dry or wet. The mass is blown into the wall cavity formed between the brickwork and the sheathing. Despite its many advantages, this method is best used for interior work.
Thus, 2 options are best suited for exterior wall decoration: mineral wool and polystyrene foam (or foam) boards. They have necessary qualities, installation is quick.
Return to contents
Insulation of external brick walls
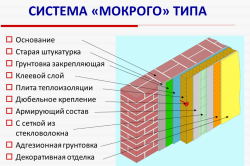
Installation of a “wet” façade.
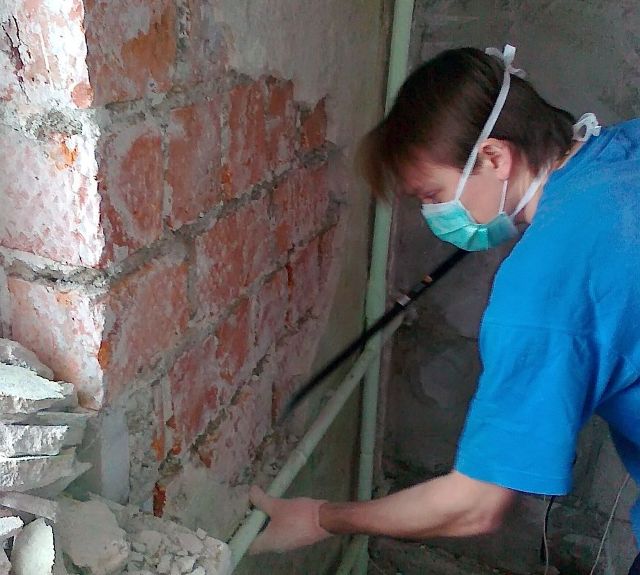
External insulation of the walls of a brick house also includes thermal insulation of the basement side and external foundation walls. Before you start work, you need to carefully inspect the walls to determine whether damaged elements need to be replaced. All construction waste is carefully removed and the brick is dried. Once the outer walls are prepared, work can begin.
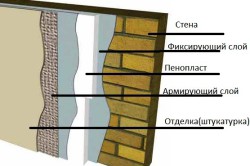
The wet façade is most often used for insulation. The basis for thermal insulation of brick walls in in this case extruded polystyrene foam or special foam is used. First, the surface of the wall is plastered to remove all unevenness. The coating should be even and smooth. When the layer of preparatory plaster has dried, the wall is coated with a primer. After this, you can begin laying the insulation. Plates can be attached to the wall surface in one of the following ways:
- the insulation is glued to the surface of the external walls with special glue;
- For fixation, special dowels with wide caps, the so-called umbrellas, are used.
External insulation with polystyrene foam or polystyrene foam:
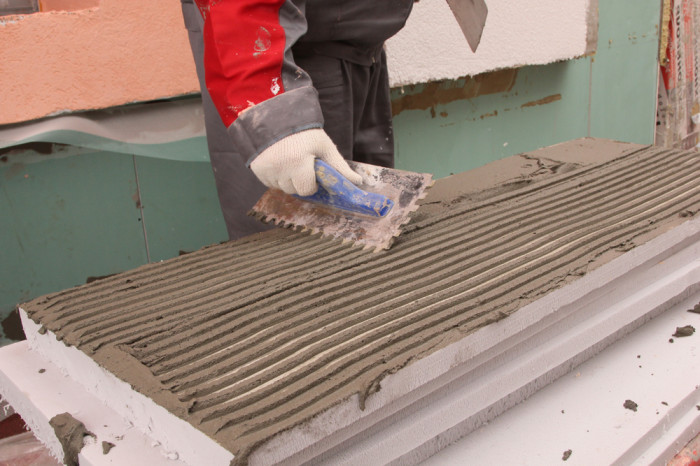
- The adhesive composition is applied in the center and along the perimeter with a narrow spatula to the surface of the wall and to the slab, carefully distributed.
- The slab is pressed tightly against the wall, the process is repeated in a similar way for other elements.
- You need to start gluing from the bottom of the wall, moving upward.
- Insulation boards are glued in a checkerboard pattern to ensure the strength of the finish.
If the slabs are additionally reinforced with dowels, then the glue is applied pointwise in small portions. The dowels are then drilled through the heat insulation slab directly into the thickness of the wall. After fastening the slabs, a special reinforcing mesh is applied to the surface and finishing plastering is performed.
To perform external insulation of a brick house, you need to prepare the following materials and tools:
- foam or polystyrene foam boards;
- plaster for the initial and finishing layers;
- primer;
- reinforcing mesh;
- glue for heat insulation or mounting dowels;
- spatula;
- container for mixing plaster, primer, adhesive composition;
- grater;
- building level;
- knife for cutting insulation.
The process of insulating a brick house from the outside
Outside - this question faces many homeowners. Material such as brick is especially popular for constructing walls in private house construction. Houses built from it can be found almost everywhere. But such a house, with all its excellent performance qualities, will still require insulation. Especially at the current cost of electricity, which is mainly used to heat houses. In such situations, an excellent solution is to provide good quality thermal insulation, with the help of which heat loss is minimized.
Types of insulation
In order for a house to turn into a comfortable place to live, it should be properly insulated. If this stage of work is carried out at the stage of building a house, you can be guaranteed to avoid many troubles that await owners of private housing in the future. If done poorly, troubles such as freezing of the walls in winter, the appearance of mold, condensation and mildew, damage to the materials from which the finishing is made, and premature destruction of the walls may occur.
There are several types of insulation:
- internal;
- external;
- intrawall.
The most popular is external insulation, which involves placing the material on the outside of the walls of the building. This provides additional protection to the walls from adverse natural phenomena. The only disadvantages of this approach are that the work is seasonal in nature, and the cost of materials will be slightly higher.
In-wall thermal insulation can only be installed at the stage of wall construction. Those who purchase ready-made housing will not be able to complete it.
Internal thermal insulation can be done at any time (it also includes insulation of the attic, floor and roof, and interfloor ceilings). But this option also has a significant drawback.
Advantages of external thermal insulation
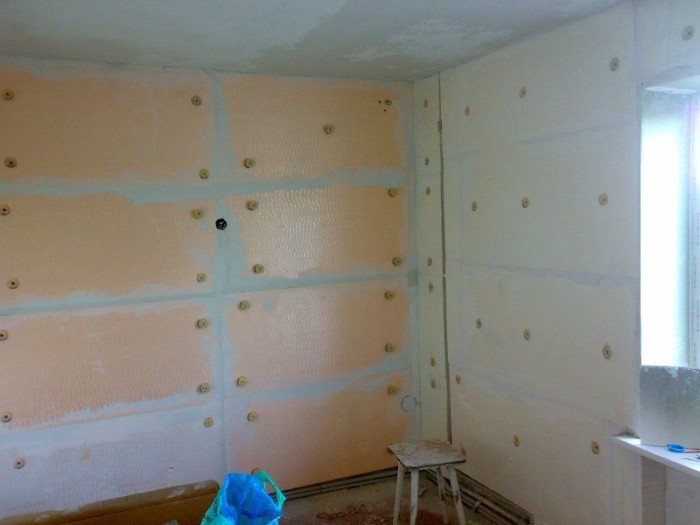
Why is it recommended to insulate walls from the outside? This circumstance is connected with the so-called dew point - when, at a certain temperature, condensation occurs on the walls of a residential building. When insulating materials (for example, foam plastic) are installed from the inside, all moisture remains under their layer, and this leads to the formation of fungus, mold and other troubles.
Of course, the material chosen as insulation will also be destroyed. Therefore, to achieve good results it will be much better to perform outside. The wall inside the house thus remains dry and warm. What is important is that with this approach the living space of the house will not be reduced.
What materials can be used to insulate a brick house from the outside?
To ensure a cozy and comfortable indoor temperature, the construction of the house must be carried out in such a way that brickwork the walls were at least 3 meters thick. This is quite difficult to implement and also irrational. The modern construction market can offer developers a variety of excellent and inexpensive materials for insulation. For example, polystyrene foam, the thickness of which is small, copes with its task perfectly and at the same time relieves the home from dampness.
You can insulate the outside walls of a brick house using the following materials:
- ecowool;
- mineral wool;
- penoizol;
- foam;
- expanded polystyrene;
- fiberglass.

The process of insulating a brick house from the outside with mineral wool
Building materials such as mineral wool are made in the form of plates. They are very simply and quickly attached to a previously prepared surface. The material is distinguished by the fact that it perfectly retains heat, is fireproof, allows air and steam to pass through well, and is quite affordable in terms of cost. Ecowool has similar properties, but its cost is less, and by providing additional impregnation with an antiseptic, you can get rid of the appearance and growth of fungus in wall voids.
Insulation with penoizol, as well as polystyrene foam, expanded polystyrene, makes it possible to preserve heat in the home as much as possible - this is perhaps the most effective way. Also, in order to insulate the walls of a brick house from the outside, you can use heat-insulating paint or plaster as an additional measure.
How to insulate a brick house from the outside
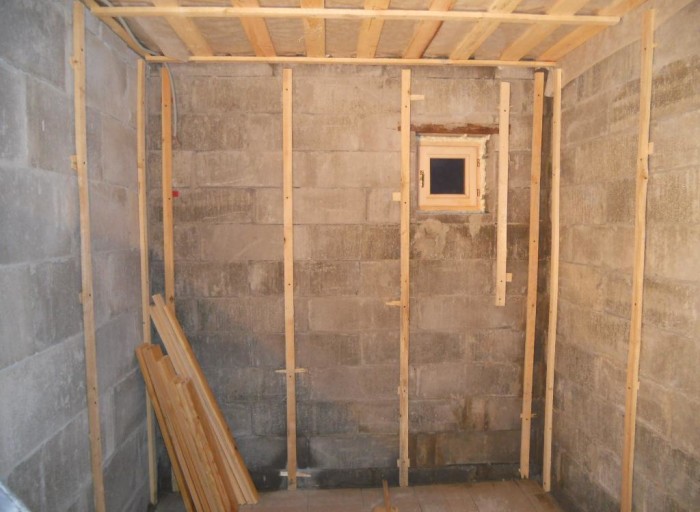
The technology for performing the work will also depend on what material is chosen for insulation. If you do it yourself, it is better to insulate it with mineral wool or polystyrene foam, polystyrene foam. Installation of polystyrene foam is so simple that even non-professionals can do it. If you carry out work on insulating brick walls from the outside with mineral wool, you first need to make a sheathing - it must be dry and even.
Foam insulation process
When using polystyrene foam, you will need to perform a number of preliminary works. First, the wall must be completely freed from any devices - these could be antennas, pipes, air conditioners or others. The previous decorative trim is removed. It is unlikely that you will need to correct unevenness in the case of a brick surface. Expanded polystyrene or foam plastic is attached directly to the wall of the building - using special adhesives.
Important! Any adhesive compositions should be checked for compatibility with the selected material.
Materials such as fiberglass, ecowool, penoizol cannot be laid without special equipment; in addition, when performing work, various nuances will need to be observed, so such operations should be entrusted to professionals. If you also apply heat-insulating paint or plaster to the walls, this will greatly increase the reliability of the thermal insulation. At first, this can help get rid of the costs associated with external decoration and provide an opportunity to save some money.
- Materials used for external wall insulation
- Preparing walls for insulation
- Insulation technology with polystyrene foam and mineral wool
- Polyurethane foam insulation technology
External insulation of a brick house is one of the ways to provide a home with comfort and add durability to it. The use of external insulation during the construction phase will eliminate freezing of the house in winter, molding of the walls, condensation on them and the appearance of fungus. Thus, the inside of the walls will remain warm and dry, and the living space of the house will not decrease due to their insulation.
Materials used for external wall insulation
Brick houses built in a temperate climate zone will be warm in winter if the thickness of their walls is over 3 m. Otherwise, insulation must be used.
All materials used for wall insulation have sound insulation properties and smooth out temperature differences from the outside and inside of the building. They provide home insulation without the greenhouse effect and protect walls from getting wet. In addition, modern insulation removes steam and moisture outside, preventing them from entering the house and not absorbing it. Currently used for various materials with certain characteristics.
Mineral wool is breathable, retains heat well, does not burn, and is inexpensive. Ecowool is even cheaper, and due to specialized impregnation, it has antiseptic properties. The use of fiberglass for insulating walls outside is more suitable for professional teams, as it requires the availability of tools and devices, as well as the implementation of a certain technology. Expanded polystyrene or penoizol are easy to use and retain heat well at home. Due to the fact that polystyrene foam or expanded polystyrene do not allow air to pass through, they are more often used in the construction of ventilated facades, which have recently become very popular.
Consequently, insulation must be selected according to financial capabilities, suitable quality of insulation and materials used for lathing and fixing the slabs.
In this case, the material of the insulation used will not in any way affect the choice of facade cladding used in the future.
Return to contents
Preparing walls for insulation
![]()
Stages of “wet facade” technology.
Having selected the necessary material, you can begin preparing the walls for insulation of a brick house, for which you need to free them from antennas, air conditioners, decorative materials and other protruding elements. Then it is necessary to prepare the surface of the walls from the outside by removing the old layer of plaster down to the bricks, paying attention to priming the surface. In cases of differences of more than 1-2 cm in levels on the wall, they must be leveled with mortar or cut down to an acceptable level.
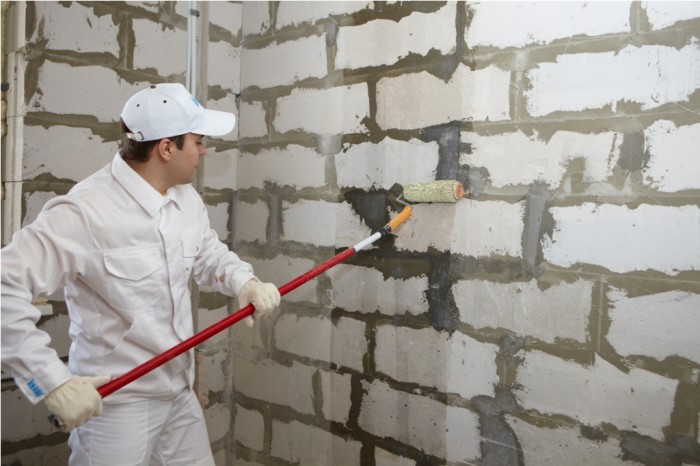
Before using the primer, the wall must be cleaned of dirt and dust, and the primer must be used with deep penetration. To facilitate installation, it is necessary to install a system of beacons and plumbs. This design will determine the plane of the outer edge of the insulation and facilitate its installation. It is mounted by tying a strong thread with plumb lines down to the very bottom onto anchors or screws installed on the upper edge of the wall, with horizontal threads tied between them. In this way, a control grid is created, which is necessary for orientation when installing a frame or heat insulator.
In this case, the insulation material will lie more evenly and will not interfere with further plastering or construction of facing structures. After this, you can begin insulating the house from the outside. It should be noted that for each type of material the installation technology is slightly different.
Return to contents
Insulation technology with polystyrene foam and mineral wool

Depending on the materials used, the process of insulating walls outside differs. When doing the work yourself, it is better to use mineral wool or expanded polystyrene sheets. It is very simple to insulate walls with these materials, and even a beginner can carry out this work with his own hands.
If you do not have the necessary financial resources at the time of construction, you can cover the outside walls with heat-insulating plaster and paint yourself. This will allow you to save a lot of money, increase the reliability of the thermal insulation of the house, and can also save you from the costs associated with external decoration for the first time.
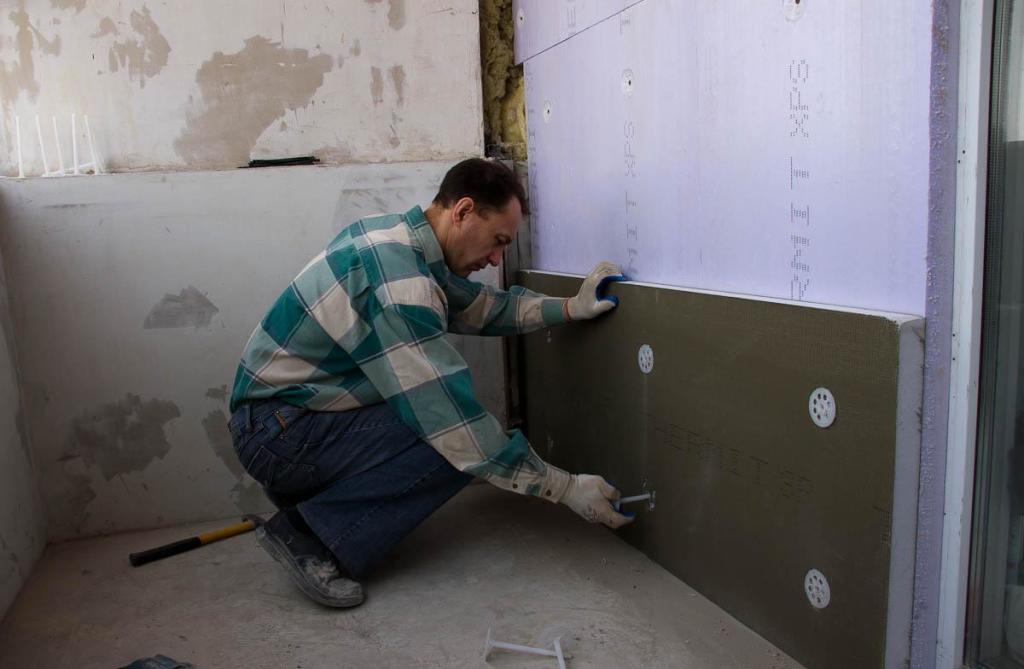
Insulation with polystyrene foam is the easiest to install and the cheapest option that you can do yourself. After preparing the walls for insulation, under the first layer of polystyrene foam boards, it is necessary to attach an even strip from below as a level, from which the gluing of the board begins. The insulation is covered with a special glue-cement over the entire area with a deviation of several centimeters from the edge so that the glue does not get on the joints.
Subsequently, the insulation is pressed with hands to a flat surface of the wall and tapped with a rubber hammer, which is necessary to evenly distribute the cement along the wall and increase the adhesion of the sheets to the wall.
Then, holes are drilled in the corners and center of the sheet without waiting for the cement to harden. Special chops are installed into the holes made, into which “umbrellas” are hammered so that they do not protrude beyond the plane of the insulation.
The next day, the entire surface of the insulation is covered with a plastic mesh, onto which it is applied cement mixture, for protection from exposure to sunlight. If installed on top of siding insulation, a wooden or metal frame is laid between its sheets, onto which the external wall decoration is attached.
Do-it-yourself wall insulation with mineral wool is slightly different from installing expanded polystyrene. First, measure the size of the sheets mineral wool, along which the sheathing is installed. Before installing the insulation, it is necessary to secure a metal cornice with dowels at the very bottom of the wall to lay the mineral wool evenly and protect it from rodents. When doing the work yourself, it is necessary to take into account that in order to tightly fix the insulation without gaps and cracks, the width of the mineral wool sheet should be 2-3 cm larger than the sheathing. When using wooden beams for sheathing, their cross-section should not be less than 30*50.
After installing the sheathing, polymer cement glue is applied to the back side of the insulation. Start insulating with mineral wool from the bottom up, lightly pressing it against the wall. To more reliably strengthen the insulation to the wall, plastic dowels with large caps are used. They are secured using a drill and hammer. When installing mineral wool with your own hands, in order to avoid slabs coming apart, you should be careful when punching it. Then, using sanding brushes, it is necessary to level the entire surface from protrusions and imperfections.
For protection, the insulation is covered with a windproof film, which will not allow moisture to get inside. Next, the insulation and film are fixed using a stapler with slats. After carrying out all the above work on your own, you can begin cladding the walls by attaching the siding to the external slats. This will provide additional protection and improve the aesthetic appearance of the home. It should be noted that insulating with mineral wool with your own hands is not a very labor-intensive process, since the slabs are very light in weight.
Brick is one of the best building materials with an excellent set of physical characteristics.
Over time, the inherent level of thermal insulation of brick begins to decline. Therefore, brick walls require additional insulation.
For comfortable stay In a brick house, additional thermal insulation is required.
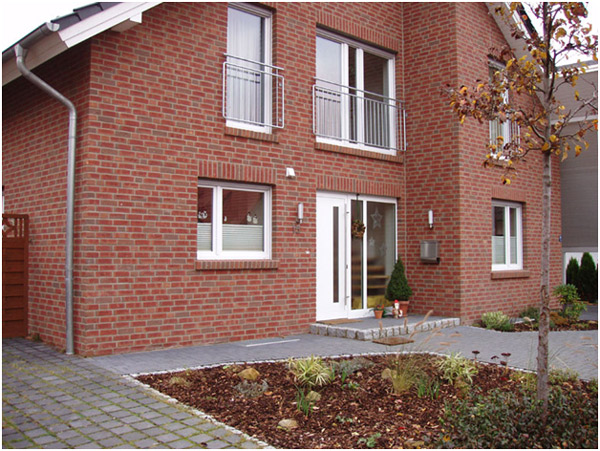
We will now discuss how to insulate the facade of a brick building.
There are currently several ways to do this work. The most common are:
- siding cladding;
- use of thermal panels;
- “wet facade” technology.
The main stages of thermal insulation with siding
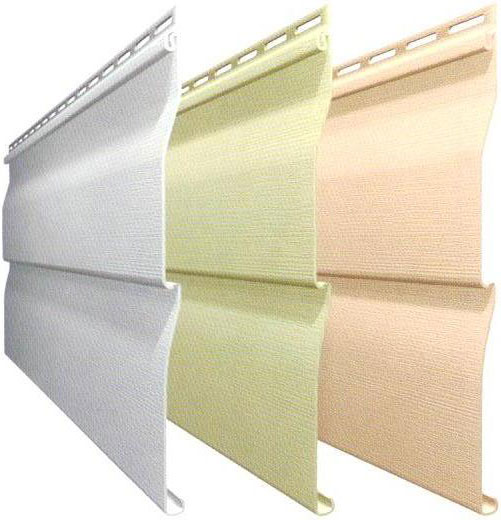
Siding is environmentally friendly, non-toxic and non-flammable. It is resistant to fading, temperature changes and shocks and scratches.
Siding panels are not a flammable material and are distinguished by a wide range and a huge offer of textures and colors. This material is also known:
- strength and long service life (it does not crack or delaminate);
- stability and uniformity of color shades throughout the entire service life;
- ease of installation and operation;
- light weight;
- frost resistance and resistance to sudden temperature changes;
- magnificent appearance.
Characterized by absolute environmental cleanliness, siding protects the facade of the house from negative impact atmospheric precipitation. It is better to use mineral wool as insulation for siding, which in addition has excellent soundproofing qualities.
![]()
Tools for installing siding: 1. Electric saw; 2. Roulette; 3. Ruler; 4. Hacksaw for metal; 5. Wood saw; 6. Hammer; 7. Punch; 8. Square; 9. Screwdriver; 10. Shilo; 11. Construction knife; 12. Tin scissors; 13. Plumb; 14. Level; 15. Pliers; 16. Hammer; 17. Safety glasses.
In addition to siding and mineral wool, the house should be insulated using:
- wooden blocks;
- metal scissors;
- antiseptic;
- screwdriver;
- hammer drill;
- dowel-nails;
- self-tapping screws;
- roulette;
- level;
- plumb line;
- stapler;
- waterproof membrane.
The technology for insulating a façade with siding involves the creation of lathing. It should be vertical and with a minimum pitch of 30 cm. It is better to choose the material for it from coniferous wooden blocks, which must be subjected to antiseptic treatment. It is also necessary to correlate the cross-sectional diameter of the bar with the thickness of the insulation.

Due to the difference in temperatures outside and inside the house, moisture forms in the insulation. To remove it, it is necessary to create a ventilation gap between the insulation and the siding.
The sheathing is fastened to the facade using dowels. During the work, the level of the plane of the structure being created is constantly monitored. Insulation is placed in the sheathing, which is additionally covered with a moisture-proof membrane for greater reliability. The waterproofing is fastened with a construction stapler.
To create an air cushion, you need to install another one on top of the grille. The step is the same. It is enough to create a gap of 20 mm high. Otherwise, insulation will be ineffective.
The last step is installing the siding panels. Their fastening begins from the bottom of the facade and is carried out strictly perpendicular to the frame. Sometimes it turns out that the holes in the siding panels do not coincide with wooden sheathing. This problem can be solved by using a hammer drill, which lengthens the holes.
Application of thermal panels
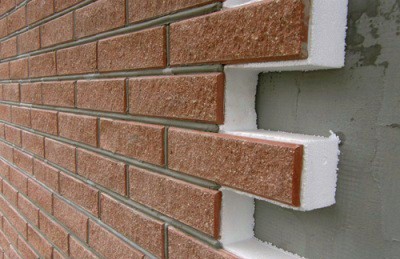
Thermal panels consist of insulation and cladding. Thus, we get quick installation of insulation without the cost of façade design.
Insulating the facade of a house with thermal panels is a fairly acceptable option for those who want to save a little on thermal insulation. This facing material is also characterized by the following excellent qualities:
- the ability to install them not only with your own hands, but also at any time of the year;
- absence of loads on the façade;
- absolutely environmentally friendly (thermal panels do not emit any harmful fumes or odors);
- service life more than 50 years;
- fast and error-free installation;
- increased moisture resistance and elasticity;
- reduction in heating costs up to 50-60% due to the absence of thermal bridges and gaps;
- the ability to hide house defects at a level of 3 cm.
“Wet facade” technology
First you need to prime the entire facade. The insulation is laid on the adhesive and dowels, then the base layer is applied. Next, the walls are primed again and decorative plaster is applied, after which the house can be painted. And only after all this work, the installation of window sills, collars around pipes and other provided structural elements is carried out.
The quality leaves much to be desired; moreover, time and external factors negatively affect the condition of load-bearing structures. Heating bills are rising, but it's not getting any warmer. It makes sense to solve such housing problems. This is especially true for brick and panel houses.
Insulation efficiency
The choice of external or internal insulation method is fundamental and requires a responsible approach. When installing an insulating barrier from the inside, the brick walls do not come into contact with the heat of the room and therefore can freeze to the limits of contact with the insulation.
This development of events negates the effect of thermal insulation, or even does not provide it at all. External insulation has the opposite effect and is therefore several times superior to its opponent. But there are circumstances in which installing insulation on the wall surface is impossible.
Reasons for carrying out work from the inside
The only argument in favor of internal insulation is:
- a ban by local authorities on work related to changing the facade of buildings (architectural monuments, buildings on central streets, etc.);
- there is an expansion joint located outside;
- a wall separates the room from an elevator shaft or other technical room where there is no access for installing insulation;
- internal insulation is provided for in the house construction project.
If there are no options to avoid indoor insulation, then it is necessary to take seriously the organization of work, from the selection of thermal insulation composites to installation technology.
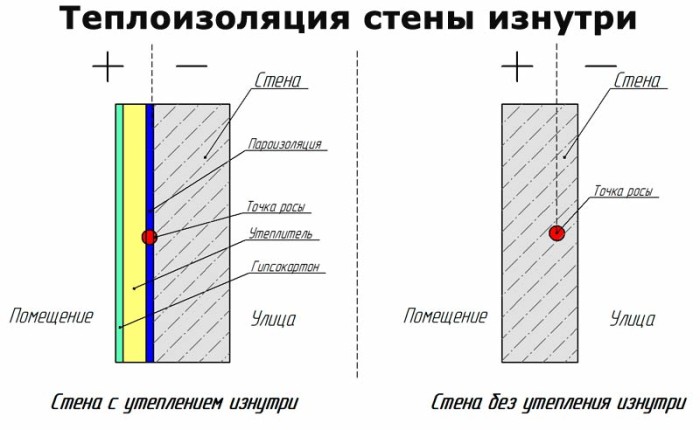
Features of internal insulation
Insulation of internal surfaces affects the position of the dew point, shifting it to the internal boundary load-bearing structure. This term denotes a conventional place on a plane where moisture is released (condensed) from the heated air in the room. It should be located no deeper than the middle section of the brick wall, but preferably as close to the outer edge as possible.

Constant dampness leads to the appearance of harmful microorganisms (mold), cracks and breaks in walls, and loss of the thermal insulation qualities of the barrier. Brickwork is most susceptible to the negative effects of moisture.
Thermal insulation interior walls, satisfying the put forward requirements, will be made in the form of a new wall, mounted closely or with an air gap. But you should be prepared for the fact that the usable area of your home will decrease. This is especially noticeable in small apartments.
Composite selection
When choosing a material for thermal insulation from the inside of a room, you must first of all proceed from the indicators of vapor permeability and moisture absorption. Next, it is worth considering that seams and joint gaps are places where moisture escapes into the room and air enters the cold surface.
What won't work
Polystyrene foam forms many seams that require additional sealing, and also has a high moisture absorption rate. From the point of view of fire safety of a residential building, it is better not to use it, since it burns and releases toxic substances.
Polyurethane foam
It has excellent moisture protection and thermal insulation, as well as good adhesion on brick surfaces. The masonry does not require special processing or leveling. The only significant drawback is the complexity of installation.

Cured polyurethane foam is unstable to mechanical stress and requires additional protection. The moisture formation boundary will be either on the inner surface of the wall or in the thickness of the insulation. But due to the good sealing properties of polyurethane, condensation is not observed.
Among the available materials, polystyrene foam produced by high-pressure extrusion is also suitable. Although it is installed with the formation of a large number of joints, it has good moisture resistance and vapor permeability, and smolders when it catches fire.
It is quite possible to install it yourself, without involving professional builders. But you should strictly adhere to the assembly technology and process stages.
Sequence of thermal insulation work
Having decided on the insulation material and installation method, you can go shopping. It is important to remember that saving on composites or changing installation technology for this purpose can lead to big troubles.
Preparatory stage
It is necessary at a temperature not lower than 20 0C and low air humidity to achieve maximum dryness of the walls. Before starting work, it is advisable to additionally dry the surfaces with a heat gun in order to dry the partition from the inside.
All generated debris and dust must be removed. A properly prepared surface should not contain anything other than load-bearing structural elements.
Places affected by fungal spores and exposed to prolonged exposure to moisture require increased attention. The fight against mold ends with the application of antiseptics and a deep penetration primer to the wall. Each applied layer must dry thoroughly.
Before using polystyrene foam, the surface is leveled with special water-repellent mixtures. The putty must dry and achieve the required strength from the inside. This is a matter of several days, and the use of heat-generating devices is not recommended.
The finished wall is covered with two layers of soil and allowed to dry. Brick structures require such careful preparation. Concrete panels are quite smooth and only need to be treated with sealants at the joints. Next comes the arrangement of the thermal insulation material.
Working with polyurethane foam
When applied, polyurethane has a liquid consistency, so a layer thicker than 2 cm must be sprayed in several stages.
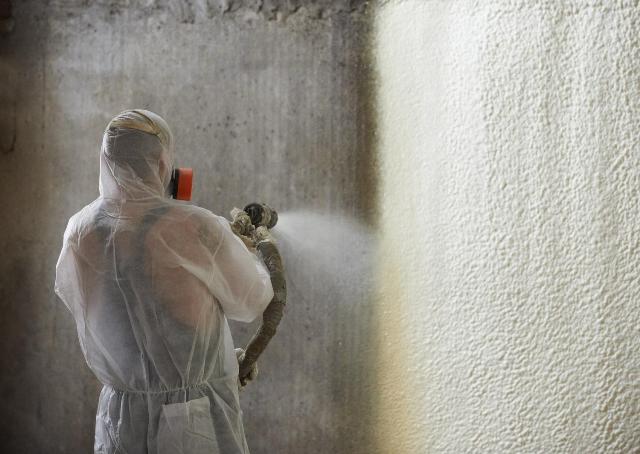
To distribute the material evenly over the layer, formwork and division of the plane into segments are used. The frame structure is unacceptable, as it violates the integrity of the coating.
Work with polystyrene foam should begin after the brickwork has been leveled and primed. And as fasteners, use mixtures with moisture-proof properties, applying them evenly to the sheet so that air “cushions” do not appear.
The resulting seams, as well as the joints of the plates, must be carefully treated with sealants. And to build a protective layer, use a special profile, previously inserted into the seam and secured to the ceiling and floor.
Protective layer
The installed insulation must dry before laying the waterproofing barrier. After this, you can begin building the protective layer to be decorated (wallpaper, tiles, painting).
The most practical option is to assemble a frame for attaching drywall; only the fixation should be carried out to adjacent walls, ceiling and floor, so as not to damage the integrity of the layer. Or half-brick masonry is done.
Extruded polystyrene foam can be puttied, covered with a reinforcing mesh, but if there were flaws in the installation, they will soon appear, and besides, the mechanical strength and practicality are inferior to plasterboard.
A correctly selected thermal insulation composite and strict adherence to installation rules will add internal warmth and comfort to the external strength of a brick house.
 Nature calendars series “The world around us”
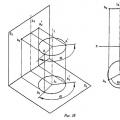 Methods for converting a complex drawing Method for replacing projection planes
 Why do you dream about a closet - interpretation of sleep