Penoplex insulation for house walls
The harsh climate in our country forces homeowners to take care of maintaining heat indoors. Intensive heating often does not help, but only provides increased fuel consumption for heating. In this case, it is necessary to take measures aimed at increasing thermal insulation inside the building. This will reduce the amount of heat loss and contribute to significant savings in gas used for heating.
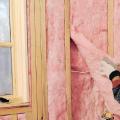
One of the popular materials for creating a protective thermal layer is penoplex, the installation technology of which makes it possible to use it on both vertical and horizontal surfaces. At the same time, efficiency is not lost in both options.
Application of penoplex
Penoplex insulation largely inherits its characteristics from its base material - expanded polystyrene. During processing, it is subjected to the extrusion method, passing a molten mass of material through a small diameter nozzle. In this way, it is possible to form a closed cellular structure of plates with isolated gas bubbles of no more than 200 microns.
Thanks to such processes, it is possible to obtain a thermal conductivity coefficient of penoplex at the level of 0.03 W/(m×°K). This helps to carry out internal or external insulation of walls with maximum heat retention inside.
The material has a significant number of positive characteristics:
- its thermal conductivity value is one of the lowest among similar materials;
- the minimum parameter for vapor permeability creates a barrier that prevents the absorption of moisture and various evaporations;
- Penoplex wall insulation is capable of withstanding high mechanical loads due to its structure, which allows certain models to be used for installation under the floor;
- installation of penoplex on the wall practically does not create additional force load on the overall structure of the house, since it has a low specific gravity, thanks to this quality it is even used for insulating balconies and loggias;
- after properly insulating a house with penoplex, it can be used for half a century, and it will withstand all temperature changes;
- External wall insulation with it is carried out quickly and easily due to the fact that it is cut with an ordinary construction knife

- exposure to most chemical reagents does not contribute to the destruction of the slab, except for gasoline, acetone, ammonia, etc.
A problematic characteristic is its flammability. This property depends on the amount of fire retardants in the composition, elements that prevent prolonged burning.
Exterior finishing

The price of penoplex - insulation for the walls of a house outside, depends on the thickness of the slabs. 100 mm protection is considered in demand, relevant for winter with temperatures of about 25-350C, and sometimes higher. For this, two layers of 50 mm are used.
In the southern regions, a smaller thickness can be used - up to 50 mm. In this case, a single-layer insulation for the walls outside is sufficient. Installation is carried out not in a strict checkered form, but in the form of interrupted seam lines, like brickwork. This will increase the strength of the structure.
The correct technology for installing penoplex on the wall, as well as the use of high-quality materials, helps ensure high efficiency. For the process, we prepare a surface that allows uniform contact across the entire plane of the slab. It is advisable to remove old plaster from the wall, which creates peeling layers and forms cracks.
All hanging protruding elements are removed from the wall:
- air conditioners;
- satellite dishes;
- lanterns;
- low tides, etc.
For the preparatory procedure, use a spatula. Protruding relief patterns of more than 3-5 mm must be removed.
Possible cracks will need to be sealed with sealant or blown out with construction foam. It is first necessary to form a depression from them with hard, clear edges by crumbling crumbling concrete or other material. We also remove possible irregularities (depressions) by applying a layer of plaster. We check the resulting plane with a plumb line and stretched cord beacons.
Two layers of primer are applied to the dry surface. Next, in the lower part, for installation on the foam walls, we fasten the horizontal profile with self-tapping screws. It helps to maintain the material in its place without sliding down the plane before the glue dries and fixation is carried out using fungi.
At the next stage, the material is cut, which will be fixed next to the windows and doorways. The slabs are cut with a construction knife.
The mixed adhesive composition is applied to the back side of the prepared slab. This insulation for the walls of a house outside is usually laid starting from the bottom rows, based on a metal support. The glue layer should be at least 6-7 mm, which will be spread with a notched trowel.
VIDEO: Insulating a loggia using Penoplex boards
After you have installed the penoplex yourself on the facade, as in the video presented, each slab is pressed with at least five fungi (plastic dowels). They are inserted into pre-drilled holes. A drill length is selected so that its entry into the wall is 50-60 mm. Accordingly, on slabs 50 mm thick you will need a tool with a working part of 100-110 mm. The entire structure should now dry for several days.
At the next stage, the seams are sealed with foam. After a day, the excess is removed with a construction knife. The outer surface is plastered using reinforcing mesh. The leveled layer can be decorated at your discretion.
Foundation insulation

For the foundation of the house, insulation is necessary almost as much as for external walls. This is due to the fact that the foundation is a huge heat-releasing surface through which heat from the house flows into the soil. To reduce heat loss and preserve the integrity of the base, foam insulation technology is used. In general, there are no special differences in installation, but there is one nuance. The slabs are always laid perpendicularly in order to completely eliminate heat loss.
To carry out installation from the outside, it is necessary to choose favorable sunny weather. However, you should not perform operations in extreme heat, so that the texture does not “float” in the sun.
Be sure to use an adhesive base to create a high-quality adhesion. Fixation solely with dowels will be ineffective, and the result obtained will be too weak.
The adhesive used for application to the back side must be intended, among other things, for working with thermal insulating materials. This will significantly extend the life of the structure.
Typical mistakes when installing insulation
And although physicists assure that a negative result is also a result, in real life this theory is not worth confirming. A negative result is the result of mistakes made. And so that they can be avoided, we present the most popular ones.
- Working with material at the wrong time. In the summer, when the temperature exceeds 25 degrees, there is a high risk that the penoplex will begin to deform. It is clear that it does not grow in your hands, but in the sheathing it will not take a rigidly fixed position, but a soft one. As the outside temperature cools, the insulation may simply fall out.
- The next mistake concerns the installation of a vapor barrier layer on the cold wall side. If you install a vapor barrier directly between the insulation and the wall, it will do no good. Condensation will accumulate with a vengeance, which will ultimately lead to the development of mold. The first layer on the side of the cold front is always waterproofing, which is precisely designed to absorb excess moisture and prevent its effect on the material.
VIDEO: How to properly plaster Penoplex with a rototband
 Construction materials and list of works
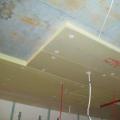 Proper insulation of a wooden ceiling in a private house
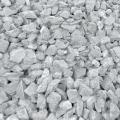 What types of crushed stone are there?