Firmware for nexus 7 tablet. New Nexus. Problems and their solutions
Probably every user wanted to reflash their device due to the annoyingness of the stock firmware. Today I will tell you how to reflash Nexus 7 2013. Please, under the cut!
First, you need to understand whether you need this and why you are flashing your device - in this situation, Nexus 7. You should always remember that by flashing your device, you can turn it into a brick. If you do everything right, everything will work out! But remember, there is always a risk!
Then the user wants to know if the warranty expires? Of course yes! If you made a serious mistake while flashing your device and took it to the service center, then people will immediately notice that you messed around somewhere. However, traces of the crime can be covered up; below I will tell you how.
1)
Let's flash it through Recovery (that is, with custom firmware)
If you decide to reflash your Nexus, then check the availability of drivers, the necessary software, and that the device is connected via USB. First, you need to get root rights.
Availability TWRP. Usually installed on Nexus via Nexus Root Toolkit.
Next you will need to select the firmware. Usually the firmware is in the .zip extension. There are tons of firmwares available for the Nexus 7 2013, so you have a choice) The most popular firmware site is xda-developers.com. Usually the developer indicates instructions for the firmware and its features. There are many more firmwares on 4pda. Some firmwares have additional .zip files. For example, in the CyanogenMod firmware there is a gapps installation package containing some parts of the system and Google services. These files are installed in the same way as the firmware.
Next, you need to upload the firmware files to the root of the memory card. Next we need to dive into TWRP, where we will reflash the files. (We go into Fastboot, then click Recovery Mode. After that we got into TWRP) Then we need to clear the data of the old firmware, or rather do a full reset. To reset the settings, click on the Wipe tile in TWRP, select Factory Reset there, click, agree and exit back to menu
TWRP.
Now we have met the firmware. Click on the Install tile and install our firmware files (if there are gaps, then install more gaps). Confirm your choice and wait for the installation to complete. Then we do a reset. Everything is ready!
2) Let's flash the full image of the official firmware via ADB.
First you need to install the drivers through the Nexus Root Toolkit. Open the control panel and go to the device manager tab, find our Nexus device, and right-click Update Drivers. Specify the folder data\drivers, which is located in the Nexus Root Toolkit program folder.
Next you need to open the bootloader. You must indicate your device and firmware version. Press the button
Change, click the Unlock button. The tablet should reboot. When the question “Unlock Bootloader?” appears on the tablet display, select “Yes” by pressing the power button (on the tablet).
The tablet may reboot several times. Don't panic - this is normal. Eventually, sooner or later, you'll end up in the initial Nexus setup menu. After the initial settings, again go to the tablet settings menu and in the developer section check the box for “USB debugging”.
In the Nexus Root Toolkit program window that opens after the unlocking process begins, click the “OK” button.
Then you need to download the official firmware image. We open it as a regular archive and see the folder, it must be extracted to the Nexus Root Toolkit/data/Factory_Images folder and do not leave it yet. We turn off our device and enter bootloader mode (in Fastboot). Connect it to the PC and return to that folder. We see the flash-all.bat file there and click on it. All flashing is finished, wait for it to finish and press the exit button. IMPORTANT! When flashing the firmware by running flash-all.bat, all data will be deleted, but this can be avoided if you open flash-all.bat using notepad and remove -w, Save from the last command.
How can I get my warranty back?
- Restore original firmware via Nexus Root Toolkit.
- Block bootloader
Sometimes there comes a turning point when the firmware gets boring and you want to sit on the “good old stock”. This instruction is also suitable for people who have experienced some technical problems and need to return the device under warranty.
Instructions for installing stock firmware on Nexus 7 (2013) Wi-Fi
All your data will be deleted. If you want to save important information, I recommend making a backup. Everything you do, you do at your own peril and risk. The author is not responsible for the “bricking” of your device.
This instruction is only suitable for the Wi-Fi version of the device! When flashing the LTE version, you must use a different firmware file. There is a file with firmware for the LTE version
Preparation
- Download the drivers; if you don’t have them installed, install them according to the instructions.
- Download ADB and Fastboot depending on the OS bit depth: , . Unpack the archive into any folder. It is necessary that there are no Russian letters and numbers along the way. I unzipped my folder to d:\ADB
- Download the firmware file
Installation

Now enter the line:
- flash-all.bat
We are waiting for the firmware to finish
If the tablet is stuck in eternal loading
- Turn off the smartphone by holding the Power button for 10 seconds
- Press the Power + “Volume -” button, fastboot starts
- Go to Recovery Mode
- We see an android with exclamation point, hold down the Power button and volume “-“
- Select wipe data/factory reset and confirm the choice.
- And now we reboot the smartphone using the reboot system now item
- Enjoying the stock firmware
If you are going to return the tablet under warranty, then you need to lock the Bootloader. To do this, you need to put your device into fastboot mode and enter the command in the address bar: “fastboot oem lock”.
Unlocking the bootloader (aka bootloader, aka boot). Necessary action to install functional custom recovery and custom ROMs, obtain root rights, etc... All data on the tablet will be deleted.
1. Download and unpack the archive to drive C: (drive C:\ for convenience, you can unpack it to any drive). The result should be c:\android\tools
2. Open cmd - (command line. To do this, click “Start”, type cmd in the search bar, and run the found cmd file. WinXP users type cmd in the “Run” line and press Enter.)
3. go to the directory with the fastboot.exe utility, to do this enter in cmd
cd c:\android\tools
4. turn off the tablet and switch to fastboot (Hold down the volume keys (both) and the power button, or lower the volume and the power button to boot into fastboot mode.)
5. To check if the tablet is connected correctly, command line enter the command
fastboot devices

If the serial number of the tablet is displayed, move on. If nothing is displayed, then the computer does not see the tablet. Try reinstalling the drivers, connecting to a different USB port and/or using a different USB cable.
6. Type on the command line (or copy/paste)
fastboot oem unlock
The following message should appear on the tablet:

We confirm our actions with consent using the volume/power buttons. The next time you reboot, you will see the “lock slightly open” symbol at the bottom of the screen, which means the boot is also unlocked in Fastboot mode, the Lock state line should have the unlocked status.
This completes the unlocking of the bootloader.
If you need to block the bootloader back, enter the command:
fastboot oem lock
1. Copy the archive to the tablet.
2. turn off the tablet and switch to fastboot (Press the volume keys (both) and the power button, or lower the volume and the power button to boot into fastboot mode.)
3. go to recovery, to get root rights, you need to have custom recovery installed (scroll with the volume buttons, confirm the selection with the on button)
4. In recovery, select install zip from sdcard - install a zip file from a memory card
5. Next, select chooze zip from sdcard - select CWM-SuperSU-v0.**.zip on the memory card, confirm the installation by clicking Yes.
6. That’s it, reboot into the system by clicking Reboot system and check for root rights.
Android devices belonging to the famous NEXUS family are known for their reliability and long service life, which is ensured by high-quality technical components and well-developed software of the devices. In the article brought to the attention of the reader we'll talk about the system software of the first tablet computer Nexus series, developed by Google in collaboration with ASUS, in the most functional modification - Google Nexus 7 3G (2012). Let's consider the firmware capabilities of this popular device, which is very effective in performing many tasks even today.
After reading the recommendations from the proposed material, you can acquire knowledge that will allow you to not only reinstall the official Android on the tablet, but also completely transform the software part of the device and even give it a second life, using modified (custom) versions of Android with expanded functionality.
Despite the fact that the tools and methods of manipulating the internal memory of the device proposed in the material below have been used many times in practice, in general they have proven their effectiveness and relative safety, before proceeding to follow the instructions, it is necessary to consider:
Interfering with the system software of an Android device carries a potential risk of damage and is carried out by the user at his own decision after accepting full responsibility for any results of the manipulation, including negative ones!
As mentioned above, the methodology of methods that, as a result of their implementation, involve the implementation of Nexus 7 firmware, has been practically fully developed due to the widespread use of the device and its long service life. This means that following the proven instructions, you can reflash the tablet quite quickly and with virtually no problems. But any process is preceded by preparation and its implementation in full is very important to achieve a positive result.
Drivers and utilities
To seriously interfere with the system memory sections of the device, a PC or laptop is used as a tool, and direct actions to reinstall the software on the Android device are carried out using specialized utilities.

As for the software for Nexus 7 firmware, here for most operations the main tools are console utilities and. You can get acquainted with the purpose and capabilities of these tools in review articles on our website, and working through them in various situations is described in other materials available through search. Initially, it is recommended to study the capabilities of Fastboot, and only then proceed to follow the instructions from this article.

Of course, to ensure interaction between the firmware tools and the tablet itself, specialized drivers must be installed in Windows.

Installing drivers and console utilities
For a user who decides to flash the Nexus 7 3G firmware, there is a wonderful package, using which you can simultaneously get installed utilities for manipulating the device, as well as a driver for connecting it in software download mode - "15 seconds ADB Installer". You can download the solution from the link:

To avoid problems during the operation of the auto-installer and in the future when flashing the tablet firmware, we disable checking the digital signature of drivers before installing ADB, Fastboot and system components.
- We run the installer, that is, open the file "adb-setup-1.4.3.exe", obtained from the link above.

- In the console window that opens, confirm the need to install ADB and Fastboot by pressing "Y" and then "Enter".

- In exactly the same way as in the previous step, we confirm the request “Install ADB system-wide?”.

- Almost instantly, the necessary ADB and Fastboot files will be copied to the PC’s hard drive.

- We confirm your desire to install drivers.

- We follow the instructions of the launched installer.

In fact, you only need to press a single button - "Next", the installer will perform the remaining actions automatically.

- Upon completion of the tool, we obtain a PC operating system that is completely ready for manipulation of the Android device model in question.

The ADB and Fastboot components are located in the directory "adb", created by the proposed installer in the root of the disk WITH:.

The procedure for checking the correct installation of drivers is discussed below in the description of the device’s operating modes.

Multifunctional software package NRT
In addition to ADB and Fastboot, all owners of Nexus family devices are recommended to install the powerful multifunctional Nexus Root Toolkit (NRT) on their computers. The program allows you to carry out a lot of manipulations with any model from the family in question, and is successfully used to obtain root, create a backup, unlock the bootloader and completely flash devices. The use of individual functions of the tool is discussed in the instructions below in the article, and at the stage of preparing for the firmware, we will consider the process of installing the application.

- Download the distribution from the official developer resource:

- Launch the installer "NRT_v2.1.9.sfx.exe".

- Specify the path where the tool will be installed and press the button "Install".

- During the process of unpacking and transferring application files, a window will appear where you need to select the device model from the list and indicate the version of the firmware installed in it. In the first drop-down list, select "Nexus 7 (Mobile Tablet)", and in the second "NAKASIG-TILAPIA: Android *.*.* - Any Build" and then press "Apply".

- The next window prompts you to connect the tablet with the "USB debugging" to PC. Follow the instructions of the application and click "OK".

- After completing the previous step, the NRT installation can be considered complete, the tool will launch automatically.

Operating modes
To reinstall system software on any Android device, you will need to start the device in certain modes. For Nexus 7 this is "FASTBOOT" And "RECOVERY". In order not to return to this issue in the future, we will figure out how to switch the tablet to these states at the stage of preparing for the firmware.

Backup
Before moving on to flashing the Nexus 7 3G firmware, you should fully understand that the entire contents of the device’s memory will be destroyed during manipulations that involve reinstalling Android using any of the methods suggested below in the article. Therefore, if during the operation of the tablet it has accumulated information of any value to the user, obtaining a backup copy is definitely a necessity.
The ability to archive information and create a complete backup of the system was introduced by the developer into the aforementioned Nexus Root Toolkit application. Using the tool as a means to save data from the Nexus 7 3G and restore the necessary information later is very simple, and anyone, even a novice user, can figure out how to do this.

It should be noted that for the successful use of some backup methods using NRT, it is required that the tablet be equipped with a modified recovery environment (this component will be discussed later in this article), but, for example, applications with data can be backed up without prior manipulation of the device . We will create just such a copy according to the instructions below in order to understand how the information archiving tools offered by the Root Toolkit developer work.
- We connect the device to the USB port of the computer, having previously activated it on the tablet "Debugging via USB".

- Launch NRT and press the button "Backup" in the main application window.

- The window that opens contains several areas, clicking on the buttons in which allows you to archive information of various types and in different ways.

Select an option "Backup All Apps" by clicking on "Create Android Backup File". You can first set checkboxes: "System apps+data" to save system applications with data, "Shared data"— to add common application data (such as media files) to the backup.

- The next window contains detailed description scheduled process and an instruction to enable the mode on the device "On the plane". Activate in Nexus 7 3G "Airplane Mode" and press the button "OK".

- We indicate to the system the path where the backup file will be located, and also, if desired, indicate a meaningful name for the future backup file. Confirm your choice by pressing "Save", after which the connected device will automatically reboot.

- Next, you should unlock the device screen and press "OK" in the NRT request window.

The program will go into standby mode, and a request to start a full backup will appear on the tablet screen. Here you can specify a password with which the future backup will be encrypted. Next we tap "Back up data" and wait for the archiving procedure to complete.

- Upon completion of saving the information to the backup file, Nexus Root Toolkit displays a window confirming the success of the operation "Backup complete!".

Unlocking the bootloader
The entire Nexus family of Android devices are characterized by the ability to officially unlock the bootloader, because these devices are considered reference devices for mobile OS development. For the user of the device in question, unlocking makes it possible to install custom recovery and modified system software, as well as obtain root rights on the device, that is, make it possible to achieve the main goals of most device owners today. Unlocking is very quick and easy using Fastboot.

All data contained in the device’s memory will be destroyed during the unlocking process, and the Nexus 7 settings will be reset to factory settings!
- We start the device in mode "FASTBOOT" and connect it to the PC.
- Open the Windows console.

- We execute the command to go to the directory with ADB and Fastboot:
cd c:\adb
- We check the correct pairing of the tablet and the utility by sending the command
fastboot devices
As a result, the serial number of the device should be displayed on the command line.
- To start the bootloader unlocking process, use the command:
fastboot oem unlock
Enter the instructions and press "Enter" on the keyboard.
- We look at the screen of the Nexus 7 3G - a request has appeared about the need to unlock the bootloader, requiring confirmation or cancellation. Select an item "Yes" using the volume keys and press "Nutrition".

- Successful unlocking is confirmed by the corresponding response in the command line window,

and later - the inscription "LOCK STATE – UNLOCKED", displayed on the screen of the device launched into the mode "FASTBOOT", and also the image open lock on the device's boot screen every time it starts.

If necessary, the device bootloader can be returned to a locked state. To do this, follow steps 1-4 of the unlocking instructions presented above, and then send the command through the console:
fastboot oem lock

Firmware
Depending on the state of the software part of the Nexus 7 3G tablet, as well as on the owner’s ultimate goal, that is, the version of the system installed in the device as a result of the firmware process, the method of manipulation is selected. Below we consider the three most effective methods with which you can install an official system of any version “cleanly” and restore functionality operating system after serious software failures and, finally, give the Tablet PC a second life by installing custom firmware.

Method 1: Fastboot
The first method of flashing the device in question is perhaps the most effective and allows you to install official Android of any version in the Nexus 7 3G, regardless of the type and build of the system previously installed in the device. And also, the instructions given below allow you to restore the functionality of the software part of those device instances that do not start in normal mode.

As for firmware packages, the link below presents all solutions released for the model starting with Android 4.2.2 and ending latest build– 5.1.1. The user can choose any archive based on his own considerations.
As an example, we will install Android 4.4.4 (KTU84P), since this option, according to user reviews, is the most effective for daily use. Using earlier versions is hardly advisable, and after updating the official system to version 5.0.2 and higher, there is a slight decrease in device performance.

Before starting manipulations according to the instructions below, ADB and Fastboot must be installed on the system!
- Download the archive with the official system and unpack what you receive.

- We put Nexus 7 3G into mode "FASTBOOT" and connect it to the USB port of the PC.

- We follow the instructions for unlocking the bootloader if the action has not been carried out previously.
- Run the executable file "flash-all.bat", located in the directory with the unpacked firmware.

- The script will carry out further manipulations automatically; all that remains is to observe what is happening in the console window and not interrupt the process with any actions.

The messages that appear on the command line characterize what is happening at each moment in time, as well as the results of operations to overwrite a particular memory area.
- When the images are transferred to all partitions, the console will display the message "Press any key to exit...".

We press any key on the keyboard, as a result of which the command line window will be closed and the tablet will automatically reboot.
- We wait for the components of the reinstalled Android to initialize and the welcome screen to appear with the choice of language.

- After specifying the main OS parameters

Nexus 7 3G is ready for use running the selected firmware version!

Method 2: Nexus Root Toolkit
Those users for whom the use of Windows applications for operations with the memory of Android devices seems preferable to the use of console utilities can take advantage of the opportunities provided by the multifunctional Nexus Root Toolkit mentioned above. The application provides the function of installing the official version of the OS, including the model in question.

As a result of the program, we get virtually the same result as when using the method described above via Fastboot - the device is in the “out of the box” state in terms of software, but with an unlocked bootloader. And NRT can also be used to “unscramble” Nexus 7 devices in simple cases.
- Launch Root Toolkit. To install the firmware you will need an application section "Restore/Upgrade/Downgrade".

- Installing the switch "Current status:" to a position corresponding to the current state of the device:
- "Soft-Bricked/Bootloop"- for tablets that do not boot into Android;
- "Device is on/Normal"- for device instances that are generally functioning normally.

- We switch Nexus 7 to mode "FASTBOOT" and connect it with a cable to the USB connector of the PC.

- For unlocked devices, we skip this step! If the device's bootloader has not been unlocked previously, do the following:

- We begin installing the OS into the device. Click on the button "Flash Stock + Unroot".

- Confirm with the button "OK" request from the program that it is ready to start the procedure.

- Next window “Which factory image?” is intended for selecting the version and downloading firmware files. At the time of writing these instructions, only the latest version of the system for the Nexus 7 3G was able to be automatically downloaded through the program - Android 5.1.1 build LMY47V, the corresponding item must be selected in the drop-down list.

Switch in the field "Choice" the described window must be installed in the position “Automatically download + extract the factory image selected above for me.” After specifying the parameters, press the button "OK". The download of the package with system software files will begin, wait for the download to complete, and then unpack and check the components.

- After confirming another request - "Flash Stock – Confirmation"

The installation script will be launched and the Nexus 7 memory partitions will be automatically overwritten.

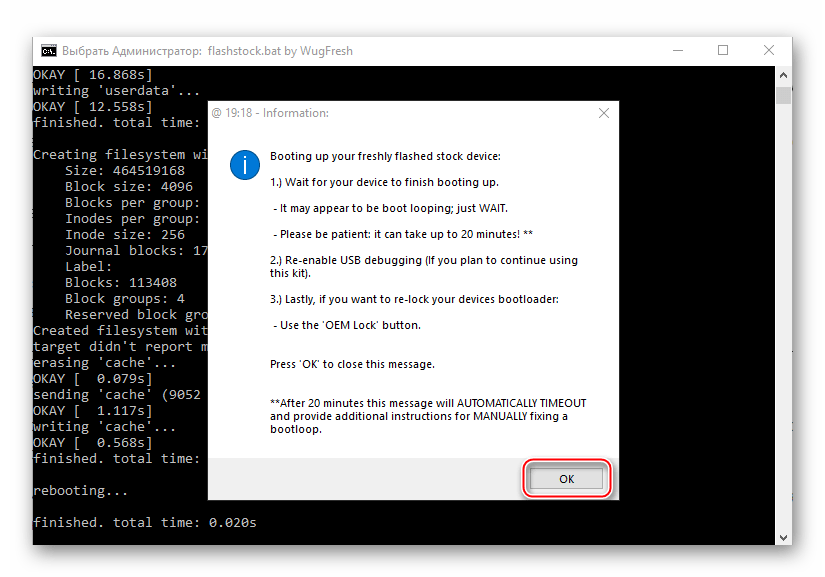
- We wait until the end of the manipulations - a window appears with information about how the tablet will start after reinstalling Android, and click "OK".
- Next, a prompt is displayed to update the entry in NRT about the system version installed on the device interfaced with the utility. Here we also click "OK".

- After completing the previous steps of the instructions, the device reboots into the OS automatically; you can disconnect it from the PC and close the NexusRootToolkit windows.
- The bootlog can be displayed for up to 20 minutes during the first startup after the above operations, without interrupting the initialization process. You need to wait until the first screen of the installed OS appears, containing a list of available interface languages. Next, we determine the main parameters of Android.

- After the initial setup of Android, the device is considered completely re-flashed

and ready for operation running the latest version of the official system software.

Installing any version of the official OS via NRT
If latest version official Android on the device is not the result that is required from NRT; we should not forget that using the tool you can install into the device any assembly offered for use by its creators. To do this, you will first have to download the desired package from the official Google Developers resource. Full system images from the developer are available at the following link:

We carefully select the package! Downloading software for the model in question should be done from the section entitled Identifier "nakasig"!
- Download the zip file with the OS of the required version from the link above and, without unpacking, place it in a separate directory and remember the location path.

- We follow the instructions for installing Android via NRT, suggested above. The steps for installing the package contained on the PC disk are almost exactly the same as the recommendations above.

The exception is point 7. At this stage in the window “Which factory image?” do the following:

- We are waiting for the installation to complete

and reboot the tablet.

Method 3: Custom (modified) OS
After the Google Nexus 7 3G user has learned how to install the official system into the device and has mastered the tools to restore the device’s performance in critical situations, he can proceed to installing modified systems into the tablet. A large number of custom firmwares for the model in question have been released, because the device was initially positioned as a reference for the development of mobile OSs. 
Almost all modified versions of Android developed for a tablet are installed the same way. The process is implemented in two stages: equipping the tablet with a custom recovery environment with advanced capabilities, and then installing an operating system from third-party developers using the recovery functionality.
Instructions for flashing Google Nexus 7 2013 WiFi:
First you need to install the drivers, unlock the Bootloader and install custom Recowery CWM or TWRP.
The instructions themselves (Described when using CWM. On TWRP it is almost identical with minor nuances.):
1. Load the previously downloaded CyanogenMod assembly into the tablet’s memory. If the tablet is not detected by the computer:
- Go to "Settings" -> "Memory" -> "Three dots in the upper right corner" -> "USB connection to computer" -> and check the box "Media device (MTP)"
- If after this the device is still not detected, then do the following. Go to "Settings" -> "() For Developers" -> and check the box "USB Debugging"
2. Launch CWM (to do this, with the tablet turned off, hold down the "Power" and "Volume -" keys simultaneously, use the volume rockers to select "Recovery mode" and press the "Power" key)
3. Do Backup (item "Backup and Restore" -> "Backup to /sdcard")
4. Do "Wipe data/factory reset", "Wipe cache partition" and "Advanced" -> "Wipe dalvik cache"
5. Flash CyanogenMod 10.x ("install zip" -> "choose zip from/sdcard" -> "0/" -> "and here select the .zip firmware file
6. If necessary, flash the Google Apps addon (do the same as in step “5.” just select the GApps .zip file
7. Click "Reboot system now" and follow the instructions on the display
You will need:
Computer running Windows8/Windows 7/Vista/XP 32/64 Bit;
- loaded drivers.
First step: Move the file to the root of drive C: and unpack it so that there are no unnecessary folders nested inside one another:
On drive C: the Android directory should appear with Driver and Tools inside.
Second step: Turn off the device, connect it to the USB port of the computer with a cable and without hesitation, simultaneously press two buttons: volume down and the power button. If you did everything correctly, you will see a droid lying on its back under the “Start” inscription:

Almost immediately, Windows will notify you that a new device has been detected; Without paying attention to this, we go to the device manager (usually just right-click on “(My) Computer” -> Properties -> Device Manager), find in “Other devices” “Unknown device” (or “Android 1.0”) c exclamation mark in the yellow triangle and double-click on it.
Click “Update driver”, abandon the search on the network and select a local search for the driver, directing it to the C:\Android\Drivers directory and allowing searching in subfolders.
If the warning "Windows Security (could not verify publisher)" appears -> Install this driver anyway. As a result, the tablet will be detected as Android ADB Interface:

Third step: Open the command line. Press the Win+R keys and enter cmd:

A black window will open, blinking welcomingly with the cursor, in which we write in English letters: cd C:\Android\Tools and press Enter:

We found ourselves in the directory where fastboot.exe is located, now let’s make sure that we did everything correctly and that the device is accessible. To do this, enter a command that will show the connected devices - fastboot devices and see the following:

If instead we see "waiting for devices..." or something like that, there is good reason reboot/reconnect the device correctly (two buttons after connecting to the USB port)/remember if it was installed previously alternative versions drivers.
Congratulations! You have just done, in fact, the biggest and most difficult work. In the future, from the third step, begin all operations that can be performed via fastboot.
Unlock Bootloader Google Nexus 7 2013
This is a necessary step to install functional custom TWRP recovery and custom ROMs.
Leads to complete loss of all data, it is recommended to do a BACKUP.
Type on the command line (or copy/paste):
fastboot oem unlock
We confirm our actions with consent using the volume/power buttons. The next time you reboot, you will see a “jawed lock” symbol at the bottom of the screen, which means the job is done: the bootloader is unlocked.
Bootloader lock
To lock the bootloader, enter on the command line:
fastboot oem lock
Installing custom recovery on Google Nexus 7 2013
Download.
We connect the device in fastboot mode, move the downloaded recovery file to the C:\Android\Tools directory and enter the command:
fastboot flash recovery twrp.img
Installation Root is right on Google Nexus 7 2013
Downloads.
We upload the file to the tablet’s memory, turn off the tablet and go to fastboot. Next, use the volume buttons to look for Recovery Mode and press the power button. Click on Install and select the Root file. After installation, select Reboot System.
You will need:
- unlocked bootloader;
- installed recovery;
First step: Download the desired firmware file in a zip archive. You also download Google Apps (Gapps). Place the files in the root of the tablet's memory.
Second step: Turn off the tablet. Press and hold the Power key and the Volume Down key. Use the volume keys to select Recovery mode and press the power button. The tablet boots into recovery mode.
Third step: Select the Install item, find the file of the selected firmware and swipe to the right in a specially designated area, wait for the installation to complete. After completion, click Wipe cache/dalvik, make a swipe, click the Back button, click the back button and select Google Apps, if downloaded. We install it in the same way as the firmware.
Fourth step: Return to the main recovery menu. Click on the Wipe item and swipe to the right. Next, click Reboot System.
Congratulations! You now have the new firmware installed.
You will need:
- Installed drivers;
- ADB and Fastboot utilities;
- unlocked bootloader;
First step: Download the official image 4.3.
Second step: Unpack the contents of the archive into the folder with the ADB and Fastboot utilities (the link is in the header).
Third step: Boot into Fastboot mode. Run the file flash-all.bat. Waiting for the end. During the firmware installation, the device may reboot.
Congratulations! Your Google Nexus 7 2013 tablet has been returned to factory condition.
 Harmful working conditions Documents confirming work in hazardous working conditions
 Topic in German “Umwelt” (Environment) Message in German on the topic of nature
 How do you understand the main idea of the excerpt from the poem N