Do-it-yourself heating and cooking stoves diagrams. Do-it-yourself heating and cooking stove: recommendations
Stoves, which are heating equipment and at the same time serve as a hob, are becoming more common today. It’s very convenient to cook real food over a live fire – it’s tastier and healthier! For country house or for a summer residence, a heating and cooking stove is very convenient and practical. We will try to tell you in detail how to build a heating and cooking stove.
Operating principle
Most often, a heating and cooking stove has small dimensions, as it is designed to heat a house or cottage with a total area up to 50 square meters. This is exactly the kind of stove we will consider, but this is not at all a reason not to increase the size and not make a stove for the home area up to 100 m2.
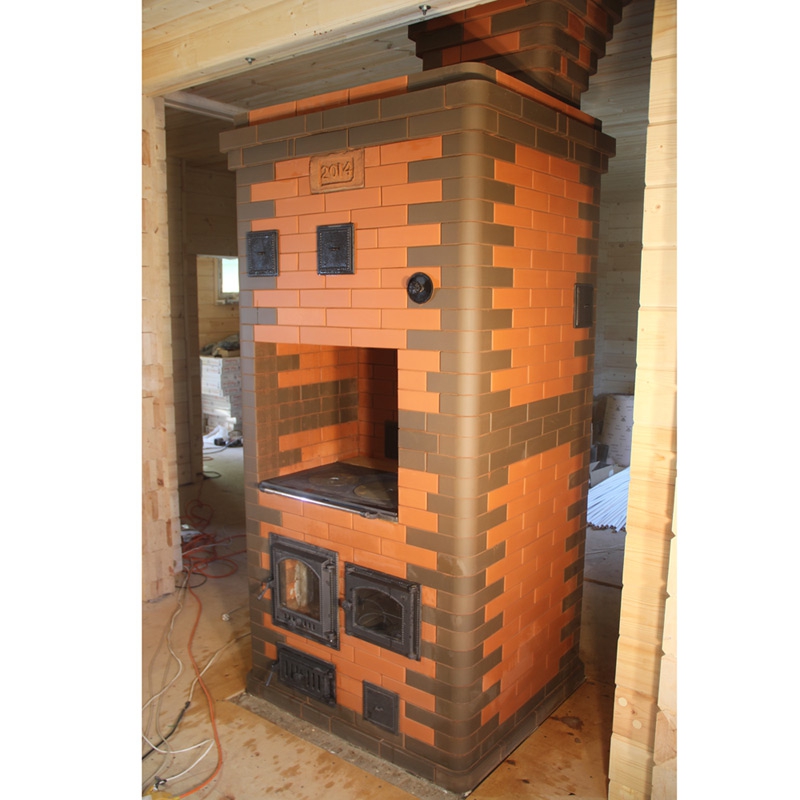
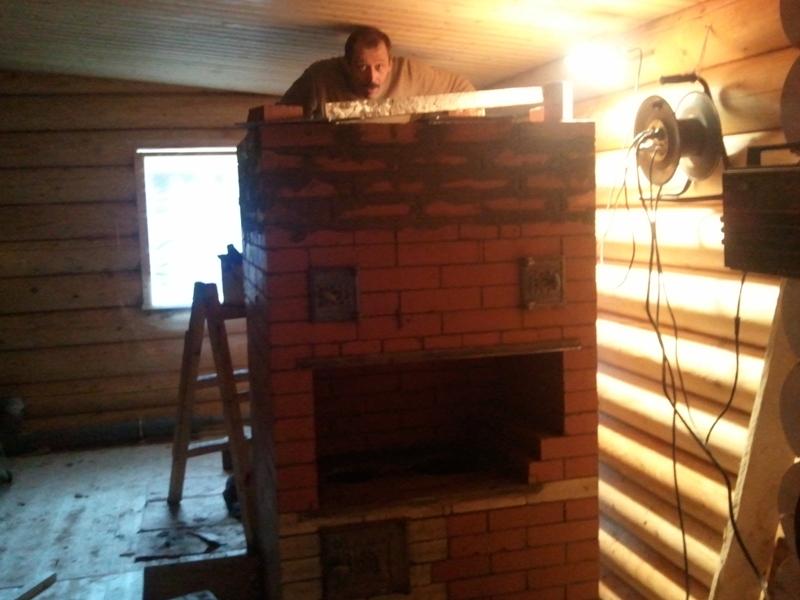
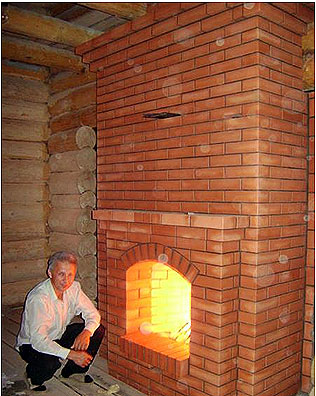
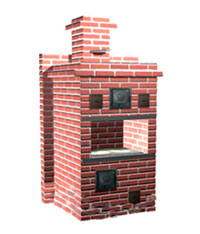
Depending on the type of construction and fuels used, brick kilns for home with hob long burning have different heat output. We will start from the fact that the outer wall is made ½ brick, the design runs on wood, has a hot water box and an oven, a cast iron stove with two burners is used as a hob. We cover the firebox with a thick cast iron plate to increase heat transfer, and above it, in a niche covered by a metal door with glass, we will place the cooking chamber. We will install the oven to the right or left of the firebox, depending on local conditions.
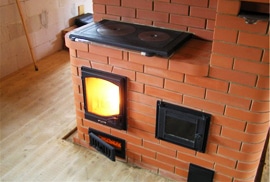
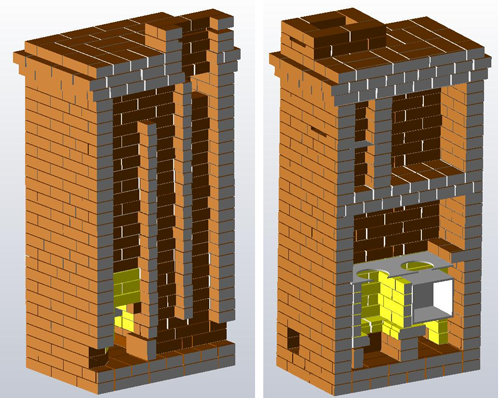
A long-burning heating and cooking stove is designed to operate in two modes: winter and summer. For this purpose, a two-bell heating and cooking stove is built.
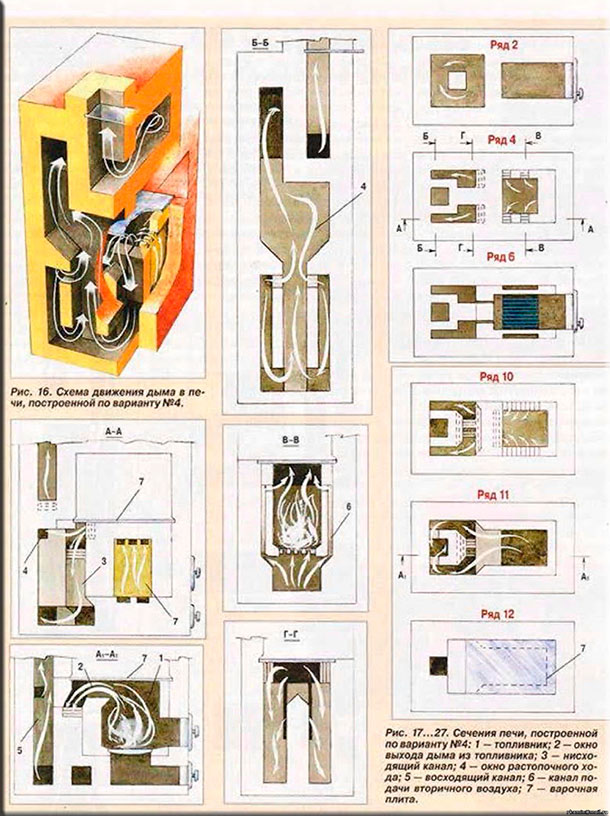
In summer, the equipment is used exclusively as a hob for cooking food and heating water, drying food, steaming cereals and other feed for livestock and poultry. The stove works in this way: from the firebox, hot gas passes under the cast iron hob, heating it, and also heats the oven, and is then removed through chimney.
In the “winter” mode, the process is the same, but after heating the stove and cabinet, the gas does not go into the chimney, but passes through the heating ducts into the closed upper chamber, heats it and is then removed. Therefore, the stove heats the house.
This two-bell heating and cooking stove with an oven is the most efficient design; it is very convenient for a summer house or country house.
A little about the benefits
Long-burning heating and cooking stoves powered by wood have a number of advantages, after learning about which you can decide to make it yourself for your home or cottage.
Firstly, this is a significant cost savings, since in ready-made versions of long-burning stoves there is always a significant price increase. Secondly, this is not a given configuration, but your own decision, that is, you make the design according to the overall dimensions of the house or cottage.
Other advantages include the following. Long-burning equipment combines the functionality of a heating device and a kitchen stove. Since one design works instead of two separate ones, free space in the house is freed up. Fuel is used more functionally, working “on two fronts” during combustion - this is also a serious saving. There is no need to additionally install an exhaust hood; such a stove already has one, so the removal of combustion products along with unpleasant odors is already provided for.
Tools for work
To build a long-burning thermal unit from brick, you will need to build a heating and cooking furnace. In addition, to perform brick masonry, you need to have not only skills and knowledge, but also high-quality tools.
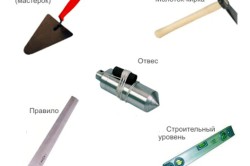
To perform brickwork, prepare and check the serviceability of the following items and devices::
- Trowel (trowel) for laying and removing excess mortar.
- Mallet for setting and adjusting bricks (wooden).
- Construction level for checking the horizontality of the rows.
- A water level for those who know how to use it correctly.
- Plumb line for checking the verticality of corners and walls.
- Rule.
- Mason's hammer for splitting bricks.
- Tape measure or flexible meter for determining and checking linear dimensions.
Important! The material for laying the future long-burning furnace must certainly be red refractory brick, whole and even. Unburned or overburnt bricks, with cracks and chips are not suitable. Cement mortar It is also not suitable for masonry; as a binder, you need to use a mixture of clay and sand of a fairly thick consistency. Be sure to check the quality of the prepared solution! To do this, take several samples at random from different places from the batch and roll them into small balls. After drying, look for any cracks on the surface of the balls. Additional check: when dropped from one meter onto a hard surface, the ball should not break, and after calcination at high temperature it should not crumble into dust. This solution is ideal for laying long-burning stoves with your own hands; the design will be reliable.
Materials for a homemade stove
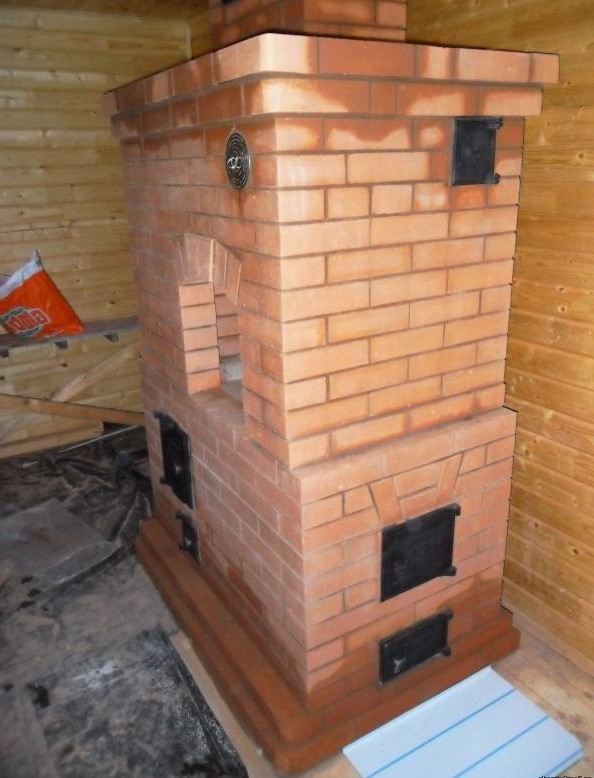
For a small room, a stove with only 14 rows will be sufficient. Heating will already be carried out efficiently. The combustion chamber has walls that are also external walls, hot and intensely giving off heat. Heating will be low-level, efficient and hygienic. The hob, of course, does not need a large and constant amount of heat. There is a water heating tank, and you can also build in a drying cabinet for berries, herbs and fruits. You can also dry clothes. What materials need to be prepared, what are heating and cooking stoves made of with your own hands? With a simple design and small size, the stove will be multifunctional, but will require minimal consumption of building materials.
You will need:
- 225-250 pieces of red stove brick for masonry (make a reserve for battle).
- 200 kg of high-quality clay for mortar.
- 200 kg of already sifted fine fraction river sand.
- Steel corner 45x45x3 mm.
- steel strip 40x3 mm.
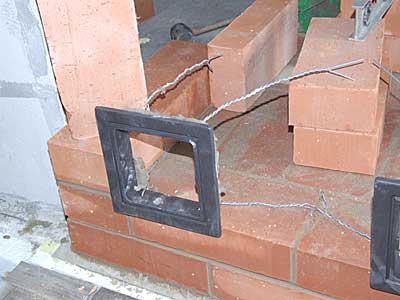
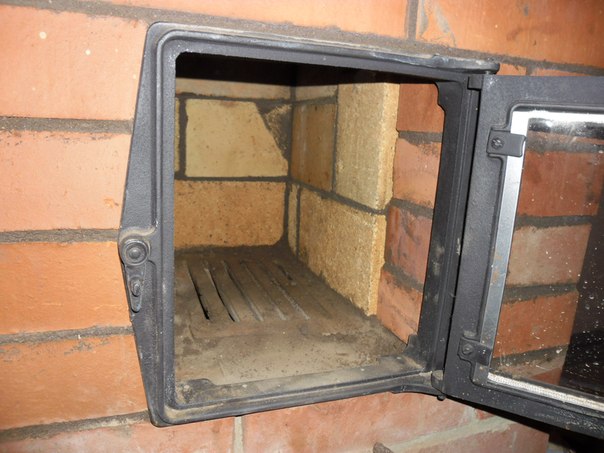
- Metal fire door (approximately 270x300 mm ).
- Blower door ( 130-150x270 mm).
- Cooktop made of thick steel or cast iron with burners.
- View latch.
- Hot water box (approximate dimensions 500x350x300 mm).
- Drying box of any size from 350x350x350 mm.
The doors can be equipped with heat-resistant glass. The presence of a door with glass in the oven is highly desirable. Since the presence of a door with glass will allow you to control the baking process without opening the oven door. You need to install the door with glass carefully; it is better to install the glass at the last moment.
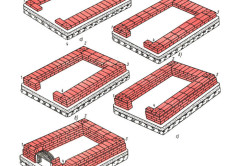
Important! Before starting work, if you do not have the skills and experience of laying in order, before you build the heating stove yourself, take ready-made drawings. Find them on the Internet, read literature, and so on. Put the order on paper and put it right in front of you! Check each row. Not only the efficiency of the furnace and its durability, but also its ability to function as a whole will directly depend on the correct placement of bricks.
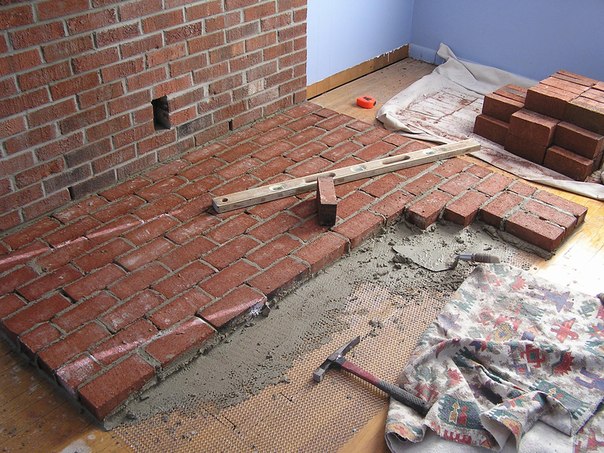
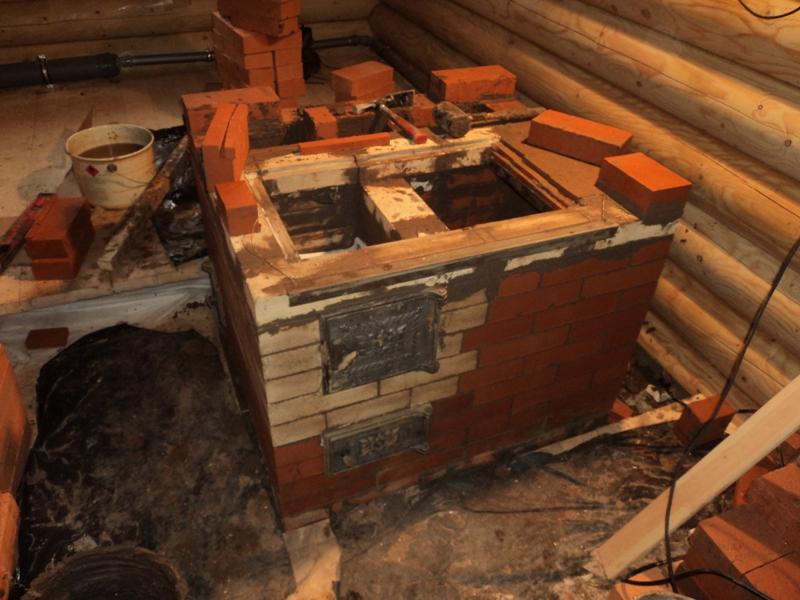
Do-it-yourself stove laying
There is no point in describing each brick step by step, even each row. , this is provided for during the construction of any structure that has a sufficient specific gravity in itself. This is absolutely for those who are seeing a trowel for the first time and have only mixed the mixture in a blender from kefir and strawberries.
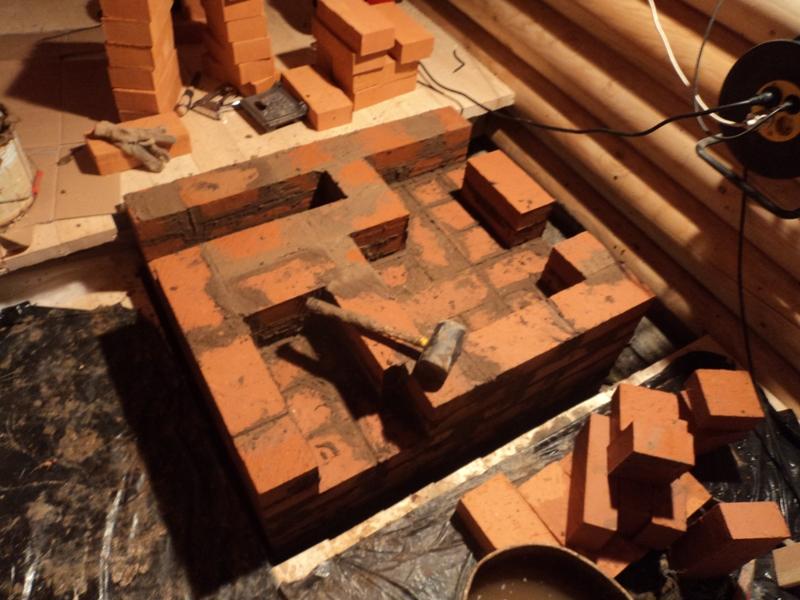
- Place the first and second rows completely, be sure to place solid bricks on the first row along the edges, and you can also use bricks in the middle (although it is not advisable). The second row - only whole bricks.
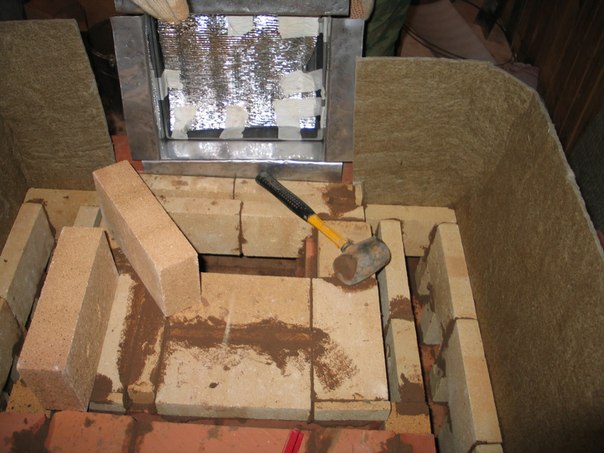
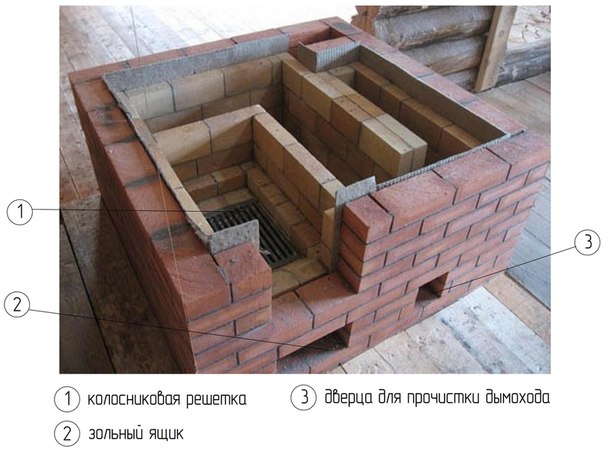
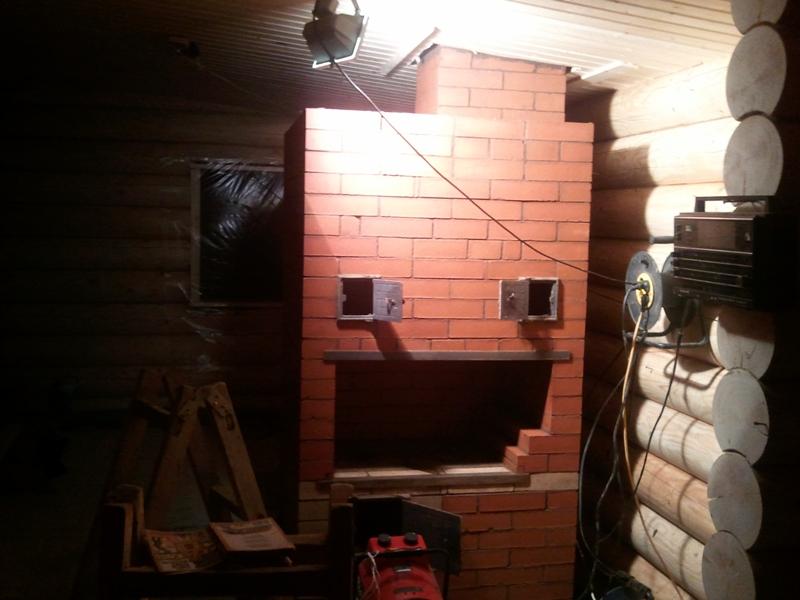
- The third to fifth rows form the future ash chamber, here a door is placed on the ash pan, an overlap is made on top of the fifth row, and a place is also set for the future drying chamber (box). Based on the dimensions of the box prepared for the dryer.
- Do-it-yourself long-burning heating stove is built inward starting from the sixth row to install a grate. Already on the seventh row it is first placed grate, and then the firebox door.
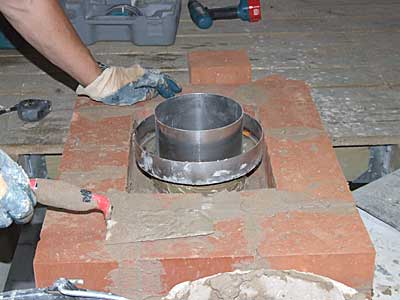
- The eighth to tenth rows are the future firebox, and here you also need to line the drying box. Further, in the 11th row, strips of steel are laid on top of the box, and the whole thing is covered with a solution of clay and sand. Don't forget to leave room for the chimney!
- Row 12 - a brick is laid directly on the mortar layer and a place is prepared for installing the hob. Determine the sizes using pre-prepared consumables. The slab is laid on top of the 13th row, and a hot water tank is also installed, which partially covers the chimney. In the 14th row, the installation of the chimney itself is provided.
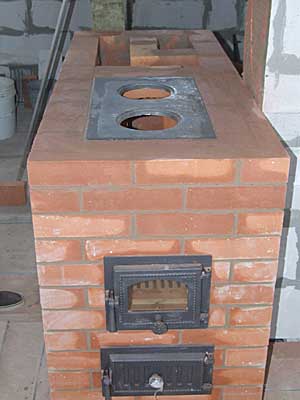
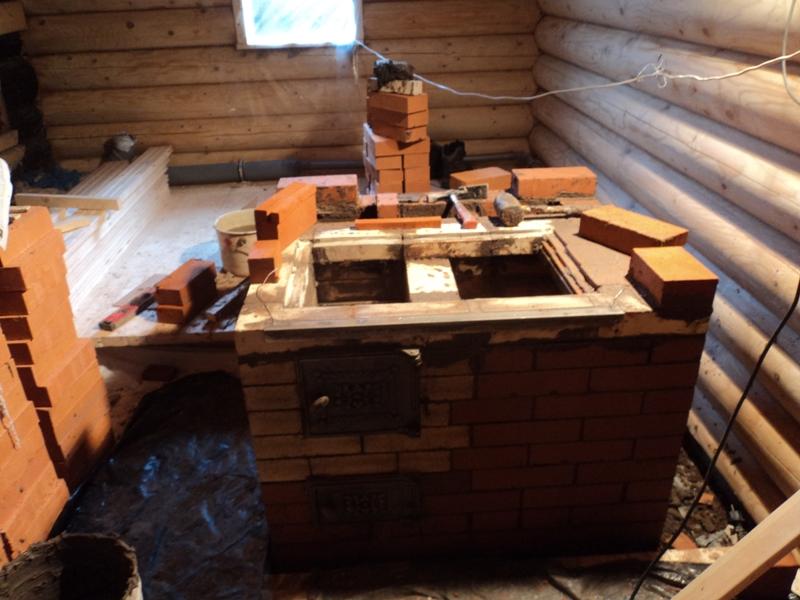
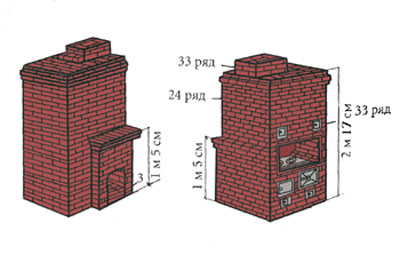
Thus, a long-burning heating stove with your own hands is ready, this is its “compact” version, so to speak, a “small version”. Larger sizes simply involve adding rows and slightly enlarging both the firebox and ash pan, as well as the water heating and drying boxes. Additional rows are also added, but the basic concept is exactly as described here.
Additional nuances
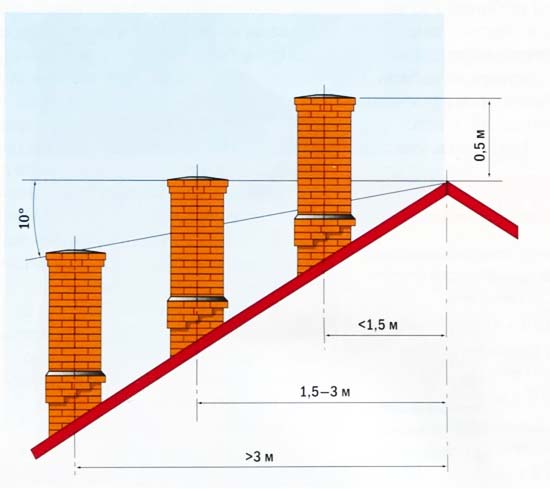
A do-it-yourself heating stove with a hob function is installed with additional straight chimneys. They are opened in the summer, when the heating functions of the stoves are not activated. Of course, the main chimney is closed.
You don’t have to install an additional chimney, but then the room will heat up in any case, even if there is no water in the water-heating box. It’s a good idea to provide an additional hood for the summer, which will remove warm air and odors from the cooking chamber directly into the smoke duct. The second is important: the cooking chamber must be closed. One wall of the oven must be laid out on edge, and a metal double-leaf door must be placed in the second. Take this into account at the stage of purchasing consumables.
A device for removing soot must be provided under the lower cooking oven. After heating stoves have been completely lined with your own hands, experts recommend not lighting a fire in them until the solution has completely dried; this may take several days. The draft is checked by burning a small amount of paper in the firebox. After meeting all the requirements and strictly following the recommendations, your brick wood heating stove, laid with your own hands, will work for a long time and productively. Don't forget to clean it on time and maintain it properly!
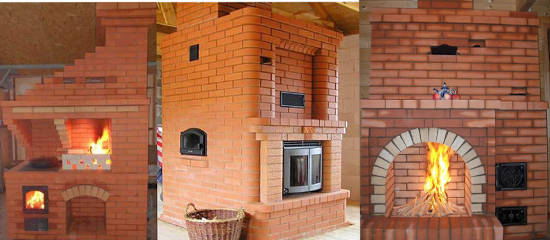
There are many different designs of stoves. Some are intended for heating, others for cooking, and others are installed for purely decorative purposes. At the same time, there are also combination stoves that perform several functions at the same time. We are talking about heating and cooking structures.
Main features
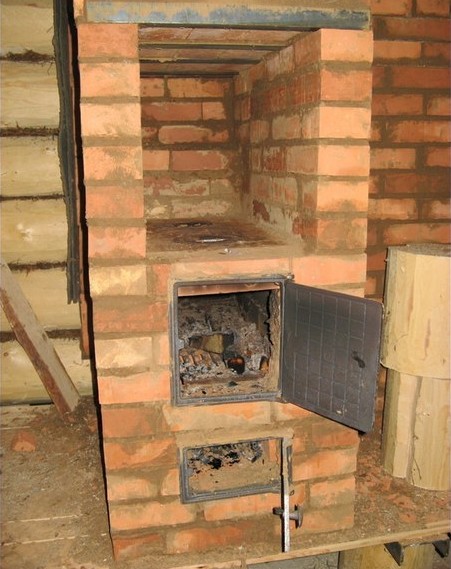
A similar oven is popularly called a “Swedish stove”. If everything is done correctly, the oven will not only perform the above functions - you can even bake bread with its help.
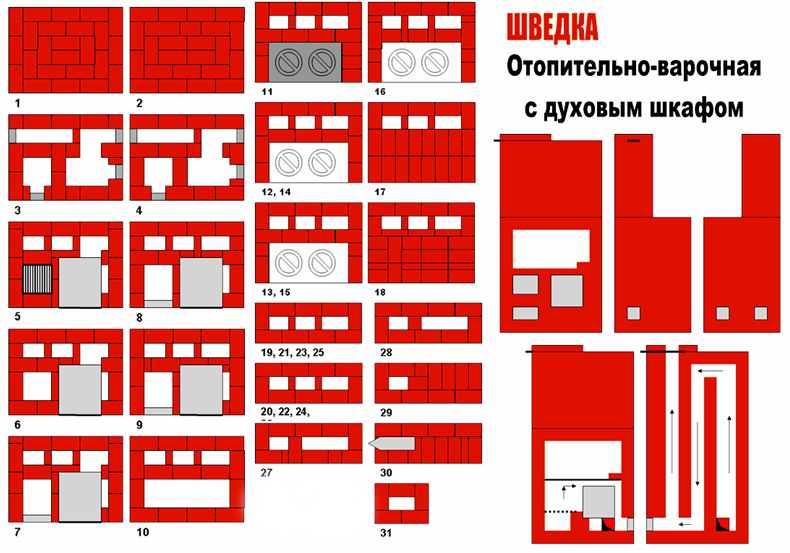
This is the option that will be discussed in today’s article. Below is a drawing and order of the “Swedish”.
Knowledgeable people will immediately notice that this arrangement is in many ways similar to the Russian stove, but also has elements of a fireplace. There is nothing surprising here, because despite the foreign name, “Swedish” ones in the domestic interpretation are intended, first of all, for use in our homes.
Before you begin installation, check that you have all the necessary materials.
Stage 1. Preparation
To build a “Swedish” you will need:
In addition, you will need the following materials:
- mounting level;
- fine mesh sieve (o2-3 mm);
- plumb line;
- container for mixing the solution;
- trowel;
- shovel;
- hammer.
Stage 2. Foundation and start of construction
First mix the solution, then follow the instructions.
![]()
![]()
Row No. 1. Laying the first row is the most important and critical stage of construction. Hold it level, use the mounting square for control.
Important information! Is it used in the front part of the stove opposite the blower? bricks In addition, the brick can be cut into a cone (it should be directed towards the combustion chamber) - this will make it more convenient to remove ash during operation.
Row No. 2. Similar to the previous one.
Row No. 3. Lay the third row according to the order. When forming the blower, stitch both sides of the brick. It is typical that the height of the third row should be equal to the height of the door.
Row No. 4. Lay this tier from left to right, but install the cleaning door first. Next, close the ash door and leave a rectangular hole above the ash pan (to do this you will have to chop off a brick).
Row No. 5. Similar to the previous one, only the hole above the ash chamber needs to be made narrower.
Row No. 6. For the sixth tier, use refractory bricks; lay the brickwork in accordance with the shading on the diagram. Leave a small gap between the grate and the bricks - no more than 1.5 cm - and fill it with sand. This gap is needed to compensate for the expansion of the metal, which will inevitably occur at high temperatures.
Row No. 7. Close the vertical channel so that three new ones are formed at once. For the combustion chamber, install a door resting on the previous tier.
Row No. 8, 9. Similar to the previous one.
Important information! The ninth row should be at the level of the door from the combustion chamber.
Stitch the ends of the bricks that will cover the left channel and the firebox - this will make the transition of smoke gases smoother.
Row No. 10. Use fireclay bricks for this too. The entire tier must be strictly horizontal; for this you can use a building level. This need can be explained quite simply: this arrangement involves laying a cooking floor.
Stage 3. Brewing compartment
Row No. 11. Use a regular red brick for it. Cover the firebox with a cooking floor, leaving, as already noted, only two channels. The ends of the bricks in direct contact with the flooring should be smoothed out so that there is a gap of approximately 2 cm.
Important information! The flooring itself should rest on tier No. 10.
Also equip a door for the cooking chamber. This will allow you to use the camera as an oven if necessary. It is advisable to install an iron frame and make a separate damper, but this is not necessary. In a simple heating design, this element is not provided for in order.
Row No. 12. When laying the twelfth row, combine the two remaining channels.
Row No. 13. Close the created channel so that you again have two separate square-shaped channels.
Row No. 14. Post it in the same way as before. To operate the hob without increasing the temperature of the entire structure, install a damper. This is very convenient, especially in summer, because with the damper open, the device will function as a simple heating stove.
Row No. 15. Close the valve.
Row No. 16. Close the brew compartment doors. On the left side, install another door that will perform two functions at once:
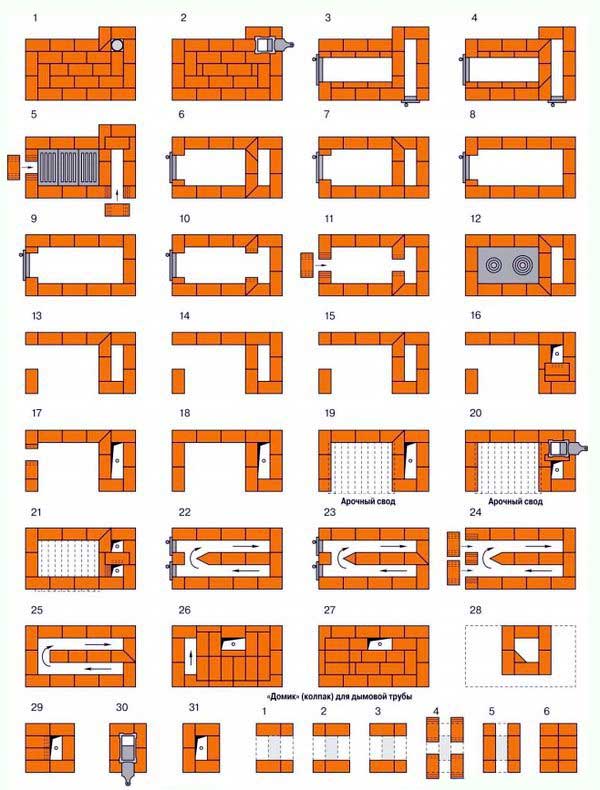
Row No. 17. Here close the door installed in the previous step. Carry out the installation in order, and lay steel strips above the brewing compartment (they will be needed to cover the chamber).
Important information! In most “Swedish” orders, such an overlap is not provided; usually, instead of it, a kind of dome is made. But in this option The requirements are slightly different.
Row No. 18, 19. Close the brewing compartment, leaving a couple of square channels.
Row No. 20. Leave only one channel on the left. Install two doors - one for cleaning, the other for the samovar tube. Cover the chamber with two bricks, laying them on edge. It is important that the distance between these and the rear wall of the structure is 4 cm.
Row No. 21. Completely similar to the previous one.
Row No. 22. Close all doors equipped in the previous steps. On the left, again arrange a couple of square channels. Make three horizontal channels above the cooking compartment - the side ones are 11 cm wide, the middle one is 5 cm wide.
Row No. 23. Leave the channels on the left, and block the longitudinal ones. Be sure to do this across, lay the brick “on edge” at the same distance from the wall as in tier No. 20.
Row No. 24. Do everything the same as in the previous one.
Row No. 25, 26. Here everything is similar to row No. 22.
Row No. 27. Lay three bricks “on edge” at the same distance from the walls of the structure and from each other. Leave one channel in a square shape.
Row No. 28. Lay out this tier identically to the previous one. In this case, pay great attention to the correct dressing of the seams.
Row No. 29. Leave a square channel and place two bricks closer to the front. Install them close to the front wall and recess them onto the? thickness. They will rest on bricks that are installed “on edge”.
Row No. 30. Close the thermal chamber. Leave only the smoke exhaust channel and install a valve there.
Row No. 31, 32. Place in accordance with the order. As a result, there will be three rows above the camera - this is quite enough for fire safety.
Stage 4. Chimney
All that remains is to bring the chimney to the appropriate height. There is nothing complicated in this procedure; the chimney along its entire length must have a square cross-section. The main thing is to ensure that the sutures are bandaged properly.
After the solution has dried, you can begin to use.
About other modifications of the “Swedish”
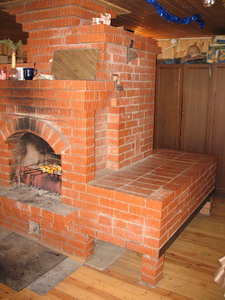
The described cooking and heating stove is one of the most simple options designs. If desired, such a stove can be upgraded with glass doors - this will not only improve appearance, but will also additionally protect the room from food odors.
Another variation of the “Swedish” can be considered a structure with a fireplace installed between the living room and kitchen. In this case, the kitchen will have a full-fledged stove with oven, dryer and hob, and in the living room there will be an original fireplace, which will not only heat the room, but will also serve as an additional decorative element of the interior. For this, one common chimney is used, for this reason additional costs will not be required.
Important information! One of the main advantages of the “Swedish” is the ability effective treatment colds and flu. You just need to sleep on heated (but not hot) bricks, after which the disease will very soon pass.
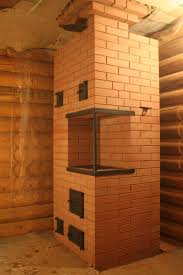
In the same way, you can heal your joints and get rid of lower back pain. To do this, you need to equip the stove with a stove bench. For the first time, a similar design was developed by Henry Reznik and it consisted of a stove measuring 3x4.5 bricks and a stove bench - 2.5x7 bricks, respectively. This stove can operate in two modes - winter and summer - and heat a room up to 40 m².
Video - Stove with a stove bench
In conclusion. About order and principles
Despite the apparent complexity of the design, if you have proper order and comply with all the requirements for the construction, you can build a stove with your own hands. Of course, the described oven is somewhat different from the traditional one, but they have the same operating principle.
This article examined the principles and technology of constructing a combined structure that can be used for both heating and cooking. All that remains is to finish it off, but that is a topic for another article.
- Types, design features
- The structure of the furnace, characteristics of the work on its installation
- Self-masonry: recommendations
- Additional points
A heating and cooking stove with your own hands is quite easy to install if you have necessary materials and follow the rules. This is a very ancient element of the house. Our ancestors stored them in huts. Now the fashion for such devices is returning, more and more people want to have such a stove in their private home. The design is very functional; it can be used for cooking and heating the room at the same time. Since it consists of sections, tiers, it is possible to dry mushrooms, herbs, clothes, and heat water.
Types, design features
There are quite a lot of installation schemes for houses of different sizes. There is an opportunity to fantasize and come up with different designs. The large space of the room allows you to make a water heating tank, a drying rack for shoes, clothes, a container for firewood and tools for caring for the stove, and an oven. But even its most compact type can heat a room and provide an opportunity for cooking. In terms of design, this is a rather beautiful, solid building with a warm ethnic or traditional folk motif, which goes well with wood cladding and elements in the interior.
This is an ideal device for a housewife; you can fry, boil, or bake using it using an oven. This is very economical, since at the same time heating and cooking stoves also perform the function of heating the room, heating water and cooking food. The fuel is wood, coal, and gas can be supplied to it at the same time. There are models that are equipped with doors like a fireplace, this gives it some of its functions.
Return to contents
The structure of the furnace, characteristics of the work on its installation
The work must be carried out efficiently, since if deficiencies are identified, the heating and cooking stoves must be completely disassembled and rebuilt. It will be impossible to do this without damaging the material if the solution has frozen. They make stoves for one- and two-story rooms. Their only difference is in size.
List of tools used for its installation:
- trowel for mortar and brick laying;
- a wooden mallet (hammer) to correct the position of the masonry;
- construction and water levels;
- plumb line and rule;
- a hammer used to split bricks, its design is different from the usual one;
- tape measure and meter.
The first and most important thing to think about is the circuit diagram of the device. It needs to be drawn on paper, a plan drawn up. The stove is laid like a construction set from bottom to top in layers or like a small house, taking into account the location of all the holes.
To install a medium-height stove with your own hands in a two-story building, which will have parameters of 90*90 cm, you will need the following materials:
- red stove brick (2000 pcs.), fireclay, silicate for the firebox and places in contact with fire (150 pcs.). They take it with some reserve, taking into account the battle;
- about 100 buckets of sand (sifted river, fine fraction);
- clay for mortar – 200 kg;
- steel corner or other durable metal 45x45x3 mm and 50*50*3 mm;
- steel wire with a cross section of 2 mm – 30 m;
- iron sheet (or steel) GK - 4 mm thick 1.5 * 1.5 m;
- roofing felt 1*4 m;
- 10 m of asbestos cord 4 mm in diameter;
- insulation for walls.
To equip with functional metal parts you must have:
- combustion door about 250*300 mm, blower door 130-150x270 mm;
- hob made of thick steel or cast iron. They are sold ready-made with burners (three are enough);
- view valves, 3 pcs.;
- doors (5 pcs.) and grate sheathing (1 pc.);
- hot water and drying boxes.
To fill the foundation you need:
- solutions from sand, cement, crushed stone;
- reinforcing mesh;
- boards (for formwork).
After checking the presence of all items and substances, installation begins.
Return to contents
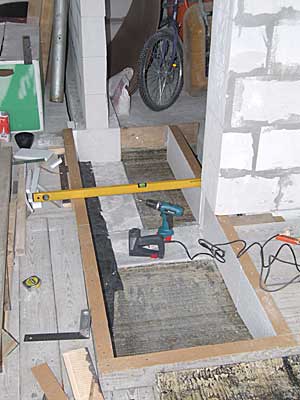
The first step is to pour the foundation. The building is quite massive, so it is made about 90 cm deep. When determining the depth, it would not be amiss to inquire what type of soil is under the house, whether it freezes, subsides, and similar characteristics. Data can be obtained from regional land organizations. If possible, consult with builders who have experience working in the area.
The pit for the foundation has the shape of a square with sides of 1.2 m, its bottom is compacted and lined with a 15 cm layer of sand. Then a layer of crushed stone 5 cm larger is laid. Then they make the formwork and lay out the reinforcing mesh, it passes through the entire foundation. It is poured in two or more stages with different solutions. Here is an option: 1 layer of pebbles and cement, 2 layers of sand, concrete and cement. The base will cool for 3 or more weeks. Then the formwork is removed and a waterproofing material, roofing felt, is placed on the base. Row 1 will be placed on it.
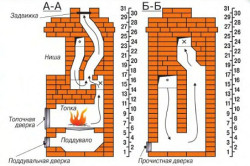
The design is complex, so row masonry must be carried out carefully. This is more difficult than fireplace masonry. Foundation larger size than the lower part of the stove, the contours of the initial row are marked on roofing felt. Unstitch the seams with fresh mortar immediately if decorative designs are not planned. The channels for the chimney should be wide enough, they should not be too narrow (their size is from 13*13 cm).
The blower door is installed during laying of the 2nd layer; it is wrapped with an asbestos cord. The blowing chamber is provided on the 1st row. The door is secured with a wire and fixed with bricks, then the wire is bent. 4 holes are provided for heated air flows, the grille is mounted in the fifth. The walls and firebox threshold are decorated with fireclay refractory bricks.
Row 6 – installation of the firebox door is installed in the same way as described above for the blower. Up to 10 rows are laid according to the pattern, following the configuration of the holes. This row is held together by a frame made from angle iron (although not necessary). At 11, the hob is placed on an asbestos gasket. Then styling. From 17 above the cooking surface a corner is placed, the 18th row is laid out on it, it ends the chamber above the tile.
At 19 they install a door for cleaning, then the work proceeds according to the scheme. In 24, a dryer is made, for this purpose a corner is placed, the next layer is placed on it, a door is mounted in it for cleaning. Lay out the brick according to the configuration. On row 30, 2 valves are installed. Then laying again according to plan. After 38 the structure will go to the next floor.
On it, the order is counted again from 1 layer. Layers 2 and 3 – installation of a cleaning door, and on layer 27 – chimney valves. This part of the stove looks like a large chimney, there is a valve and a chamber.
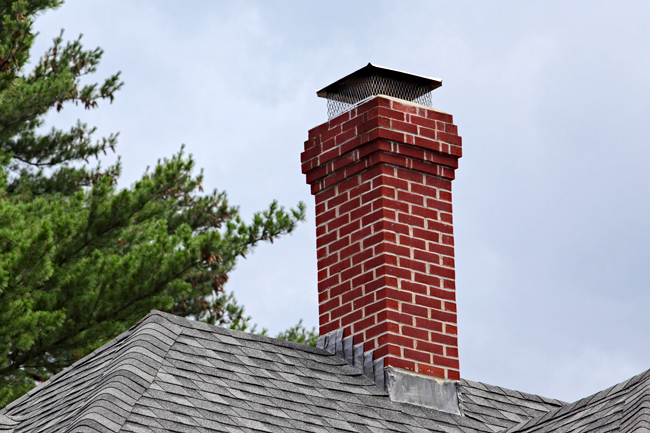
Below the ceiling, the structure transitions into a much narrower brick chimney, then goes up to the attic and roof. The top of the pipe is equipped with an umbrella from rain, snow and dust.
 Harmful working conditions Documents confirming work in hazardous working conditions
 Topic in German “Umwelt” (Environment) Message in German on the topic of nature
 How do you understand the main idea of the excerpt from the poem N