Brick sauna stove with water tank. Do-it-yourself brick stove for a bathhouse: what types of stoves are there, what type of brick is needed. Installation of a water tank, grate, firebox.
Despite the growing popularity of prefabricated metal structures, the traditional Russian bathhouse is invariably associated with brick model ovens. It is useful for craftsmen who prefer to independently engage in property improvement to familiarize themselves with the construction procedure sauna stove made of brick. Information about the required materials, process nuances and detailed description the sequence of work will help to create a comfortable place for relaxation.
Materials and tools
Purchasing quality material is the first step towards building a durable brick construction for a bath. Brick deserves primary attention: for the construction of the heater stove and chimney, a red refractory type is used that can withstand heating up to 850 o C; the firebox is laid with fireclay bricks, which retain their properties at temperatures above 1500 o C. To lay the foundation, you will need coarse sand and clay, as Roofing felt is used as a waterproofing material between the base and the sauna stove.
Additional materials for arranging a sauna stove:
- furnace casting;
- steel corner and tape;
- container for heating liquid;
- asbestos cord;
- galvanized wire.
The listed materials will allow you to build the simplest model of a brick sauna stove; more complex designs will require additional parts. To avoid interrupting the process to find the required tools, make sure you have them in advance. In addition to an electric drill and a grinder, you will need a container for the solution, a level, a tape measure, a plumb line and a wooden mallet.
Project options
There are many masonry schemes; if you do not consider yourself a professional, it is better to choose a simple option for construction on your own. The efficiency of the sauna stove will not be affected, and the chance of a successful result will be much higher.


In addition to traditional masonry methods, we bring to your attention the order of Kuznetsov’s bell-shaped sauna stoves, which take up significantly less space in contrast to standard designs.


It is useful for every novice stove maker to become familiar with the intricacies of the process of equipping a brick stove, otherwise mistakes made during masonry can become fatal during the operation of the sauna structure. So, what you should pay attention to:
- The clay removed during the digging of a pit for the foundation will be useful for the mortar mixture when laying the furnace.
- Clay and sand for laying a sauna stove are mixed in a ratio of 2:1 or 3:1. The following method will help determine the correct thickness of the mortar for connecting bricks: lower a wooden stick into it and measure the remaining layer of clay. The optimal thickness is considered to be 2 mm; if the figure is greater, you need to add sand; a thinner layer indicates the need to add clay.
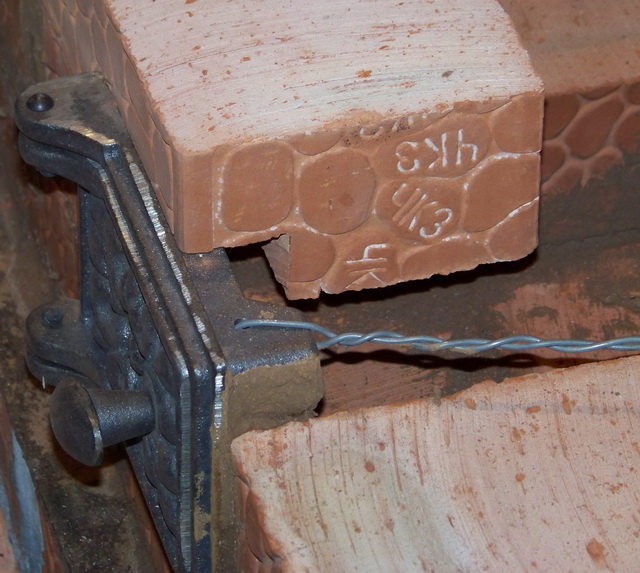
- Installation of oven castings in brick rows involves the formation of a half-centimeter gap between them. This prevents the destruction of the brick sauna stove as a result of metal expansion due to incandescence.
- Non-standard brick sizes lead to protrusions or shortages when laying a row. The situation can be corrected by sawing off the protruding parts of the brick with a grinder or, if there is a shortage, forming thickened intermediate seams.
- If the size of the grate does not correspond to the hole in the firebox prepared in the sauna stove, turn to a grinder equipped with a metal circle.
- Be sure to provide cleaning wells at the turns of the internal chimney channels; these areas are most susceptible to soot accumulation.
- Avoid contact of furnace casting with bricks. These places of the sauna stove need additional protection, which is organized by winding an asbestos cord around metal parts.
- Wooden elements located next to the sauna stove require protection with antiseptic solutions, which protect the material from spontaneous combustion as a result of heating from bricks and prevent rotting processes.
Important ! The laying of a brick oven is carried out with the obligatory use of a building level strictly in a plumb line.

Sequence of work
A sauna stove made of brick, due to its massiveness, requires preliminary equipment of the foundation. Having laid the foundation, they proceed directly to the masonry, completing the process by arranging the chimney.
Foundation
The foundation pit for a brick sauna stove is dug to a depth exceeding the freezing level of the soil. Depending on the region, this figure is 0.7-1.2 m. The width of the pit at the very bottom is slightly larger than the main excavation. This prevents the integrity of the overall structure from being damaged by ground movement. The procedure for constructing a foundation for a sauna stove includes the following steps:
- The bottom of the pit is equipped with a sand cushion 15 cm high, which is subsequently filled with water.
- After complete impregnation, stone or broken brick is laid, a layer is formed with a thickness of 20 cm.
- Upon completion of the shrinkage of the sand cushion, a layer of crushed stone is formed.
- Formwork is installed on top and a reinforced frame is mounted.
- The concrete solution is poured to a level not reaching 15 cm from the floor surface.
- The next stage is dismantling the formwork. The vacant space is filled with fine gravel or coarse sand.
The process is completed by laying two layers of roofing felt on the concrete, which acts as a waterproofing material between the foundation and the brick oven. Preventing moisture from entering the brick prevents premature destruction of the material. After the foundation has completely dried, they move on to the main brick bath structure.
Furnace laying
After checking the horizontal level of the foundation, you can proceed to the construction of the walls of the sauna stove. First, a kind of protective screen made of brick, creating a fire barrier. To do this you will need sand-concrete mortar and cut bricks. For the main masonry, a sand-clay mixture is used.
Advice ! To make using dry clay easier, pre-soak it for several days in a special container. The sand for the solution is cleared of debris and sifted.
It is recommended to apply a small volume of solution in an approximate ratio of sand and clay of 2:1. When forming the first row of a sauna stove, the brick placed on the waterproofing material is pre-wetted with water. Finish the first row mandatory check angles and compliance with the chosen order. It is taken into account for any chosen brick sauna stove design. The seams between the rows are formed with a thickness of 3-5 mm. The next layer of bricks is laid at the junction of the two lower ones, this rule is observed throughout the entire masonry.
Usually, when forming the third row of a sauna stove from bricks, the blower door is installed. To strengthen it, use strips of steel sheet or galvanized wire. Experts give preference to steel strips due to the simplified fastening process; in the absence of strips, the selected wire must correspond to the standard thickness. To fix it in the bricks, it is necessary to prepare small recesses.
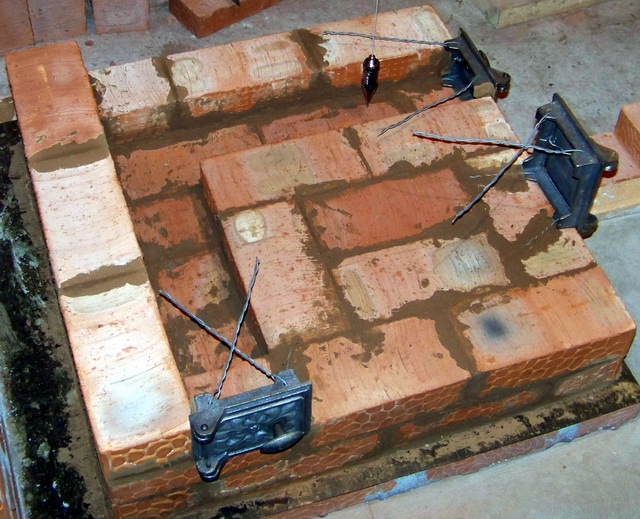
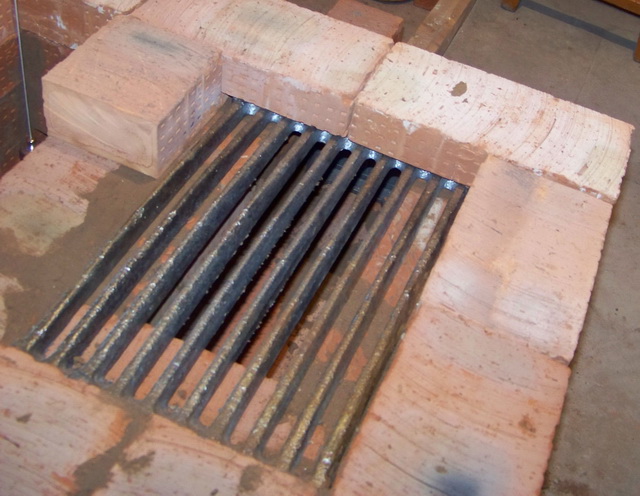
Before starting the formation of the fourth row, once again check the level of the walls horizontally and vertically, as well as the established 90° for the corners of the sauna stove. This row is equipped with a well for ash and a grate. To install the grate, recesses are hollowed out in the bricks so that the formed gaps allow the grate to expand as a result of thermal exposure. These gaps are approximately 1 cm in each direction. The rear wall under the grate is rounded with broken bricks to reduce resistance when air flows into the combustion chamber.

After the 6th row, the ash door is installed, the 7th row ends with the fixation of the grate and the combustion door. It is installed in the same way as the blower door. As a rule, cast iron doors are used for sauna stoves, which are distinguished by their strength and high fire-resistant properties. On the 8th row, a partition is formed, which serves as the beginning of the chimney. Similar brickwork continues until the fourteenth row, on which channels are installed. The next row of the sauna stove is laid out with half-bricks lying at an angle relative to each other. This serves as the basis for the formation of a dividing plane. The laying of the next three rows is carried out similarly to the first three levels: each brick is laid at the junction of the previous layer.
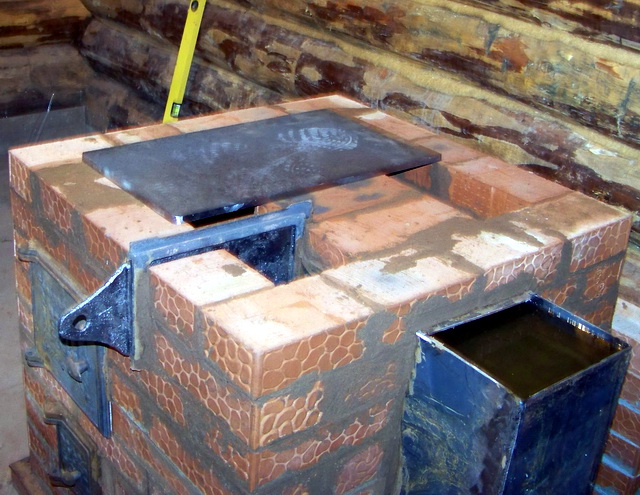
A steam exit door is installed on the 19th row of the sauna stove, after which thin metal strips are installed that serve to fasten the 20th and 21st rows. On the 21st row, the frame of the steam door is closed and a water container is installed, if provided for by the project.

Chimney
The twenty-third row is used to equip the sauna stove with a pipe, the length of which varies depending on the overall height of the room. The pipe is selected in proportion to the size of the sauna stove itself: the more powerful the main structure, the larger the chimney, and vice versa.
Important ! Minimum thickness chimney walls and sauna stove - half a brick, the same cross-sectional size of the smoke passages.
The elevation of the chimney above the roof is at least half a meter. For its laying, lime or cement mortar, since the sand-clay mixture will be washed out as a result of precipitation or exposure to condensation.

Will improve appearance The finished sauna stove will be helped by plastering it. It is advisable to add asbestos or gypsum to the solution. Before the intended procedure, the brick oven is cleaned of excess mortar, the seams are slightly deepened and putty is applied.
By adhering to the established dimensions of the firebox, the dimensions of the heater and the cross-section of the chimney, you will ensure the safe operation of the sauna stove, and the brick structure will create comfortable conditions for a long time when visiting the steam room.
The stove - a brick heater - is the heart of the bathhouse; it gently and evenly warms the room and maintains a heat level pleasant for bathing procedures for a long time. Taking a steam bath with such a stove means being “born again”; it is a whole range of wellness procedures, both for the body and for the general tone of the body. "Enjoy your bath!" - not just a wish, it is a whole philosophy that has absorbed all the experience and traditions of bathhouse masters.
That's why brick sauna stove must meet the highest requirements, the laying of the furnace must be carried out with special care, have necessary knowledge, skills and abilities. The secrets of how to build a stove are carefully passed down from generation to generation, each time the design of the stove is improved, but there are a few rules that remain unshakable for centuries.
Under no circumstances should the foundation for the stove be tied to the main foundation of the bathhouse, since when the stove is heated, a difference in temperature expansion is formed. It must be separated and laid out according to a certain pattern; violation of this rule will inevitably lead to damage to the masonry.
Device:
- The base should be made larger than the dimensions of the stove by half a brick on each side.
- It is recommended to deepen to 700 mm or more.
- The distance from the main foundation to the furnace foundation should be at least half a meter.
- Sifted sand and slaked lime 2:1.
- Sand and cement 3:1.
- Slaked lime, cement, sand 2: 1: 6. Sand can be up to 16 parts, this directly depends on the brand of cement and the fat content of the lime.

The first row of the foundation is laid out of rubble stone, crushed stone and burnt brick, everything is carefully compacted and filled with mortar, then the layer should be repeated. The height of the structure should not reach the level of the floor of the bathhouse by 2 bricks; the surface of the layers must be leveled. Then, using the same solution, lay 2 rows of brick. The gaps between the stove foundation and the bathhouse floor should be filled with sand and compacted. The foundation is completed with 2 layers of waterproofing bitumen mastic or roofing felt.
DIY sauna stove
Do not use perforated or sand-lime brick, they are destroyed at high temperatures.
Before laying, each brick should be soaked in water for a couple of minutes, this will increase the adhesion of the layers and prevent dehydration of the solution.
The solution is prepared from clay and sand 1: 1 or 1: 2. The clay must be soaked in water for a day (see Mixture for laying bricks for the stove). For laying refractory and refractory bricks, a solution of clay and fireclay, or clay and mountain sand, is used in a ratio of 1: 1 (2). The finished solution should be homogeneous, with a rough surface, and easily come off the shovel. There should be no lumps in the solution, the consistency should be brought to the consistency of fatty sour cream, and strain through a sieve with a metal mesh.
The laying up to the chimney is carried out strictly according to the scheme; the brick can be laid directly on the mortar; when laying the firebox and chimney, each brick must first be adjusted dry.
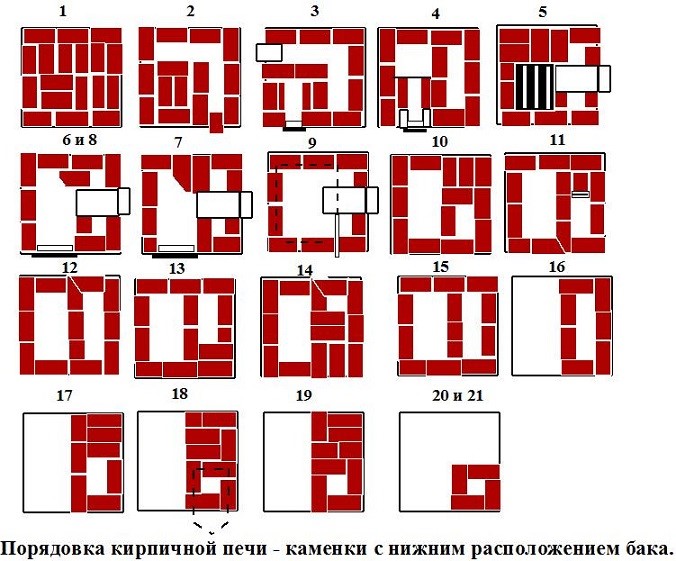
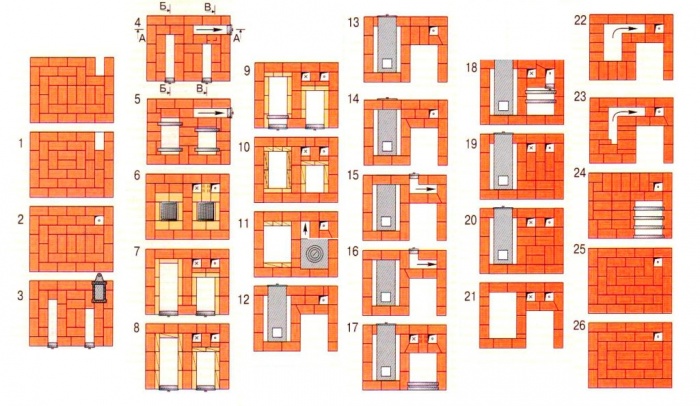
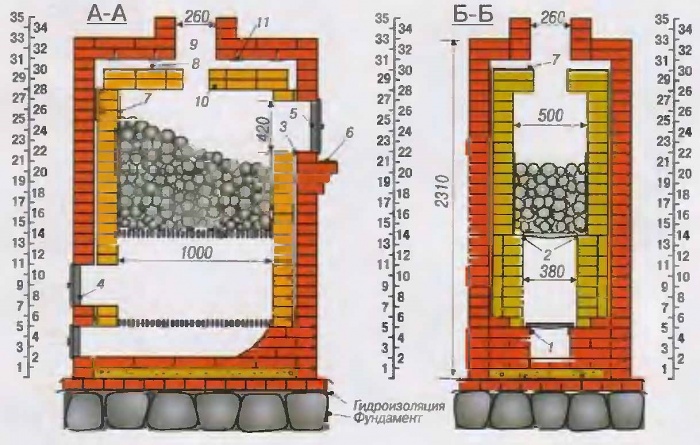
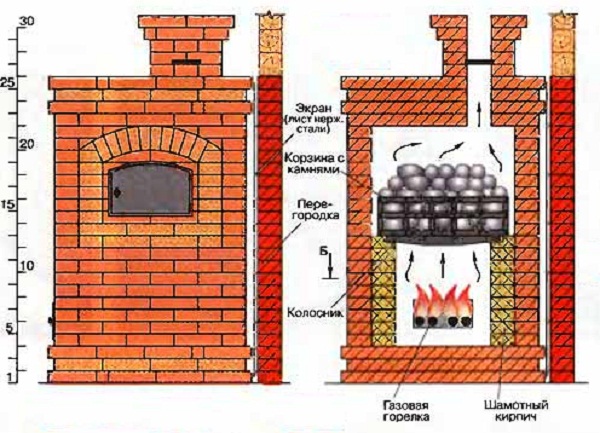
Below is a diagram brickwork wood stove with stones and water tank:

In the image above you can see a vertical scale from bottom to top from one to 25 - these are the stages of masonry, which are depicted in more detail in the diagram below:

To maintain the horizontality of the masonry, the first brick in the row must be placed on the recommended layer of mortar, and the second on a thicker layer and squeeze out the mortar, checking the level. The seams should be as thin as possible, filled with clay to the full depth. The layer for laying ordinary bricks is 5 mm, for refractory and refractory bricks 3 mm.
Dressing rules:
- Due to the difference in expansion when heated, it is impossible to bind ordinary bricks with refractory and refractory bricks.
- Vertical seams must be covered with brick from above.
- The seams should be carefully sealed so that carbon monoxide does not spoil your stay in the bathhouse.
The internal surface of the sauna stove should be very smooth, all irregularities should be brought out. It is recommended to wipe the inside with a rag soaked in clay to rub out the smallest cracks and irregularities.
Video instructions
When laying the stove, you should check the geometry of the structure as often as possible using a horizontal level and vertical plumbs.
Always check the drawing For correct installation grates, valves, hot water tanks, doors.
If the stove is planned to be heated with wood, then the grate and door should be located at the same level, but if coal will be used, then the grate should be positioned 20-30 cm below the fire door.
Rules for installing fuel devices:
- When installing a grate that expands when heated, a gap of 5 mm should be left between it and the bricks. The gap can be filled with asbestos or sand.
- The slab above the firebox is also installed with a gap of 5 mm and lined with asbestos.
- The doors are attached using special “legs”, which are made of wire or soft steel tape. Asbestos cord is used to insulate the door.
- For a wood-burning stove, the door width must be at least 250 mm, 1 brick, and the height must be 350 mm or more.
The upper wall of the furnace (roof) is made up of 3 rows of bricks laid flat with careful bandaging of the seams.
Chimney
Observe fire safety! Remember that the pipe must rise above the roof by at least 80 cm, then you will not have to flee from the burning bathhouse.
The walls of the chimney should be made thicker; experts insist on a thickness of one and a half bricks. Of course, they will warm up slowly, but they will retain heat much longer, so it is possible to avoid the formation of condensation on the inner walls of the chimney.
Quantity of materials
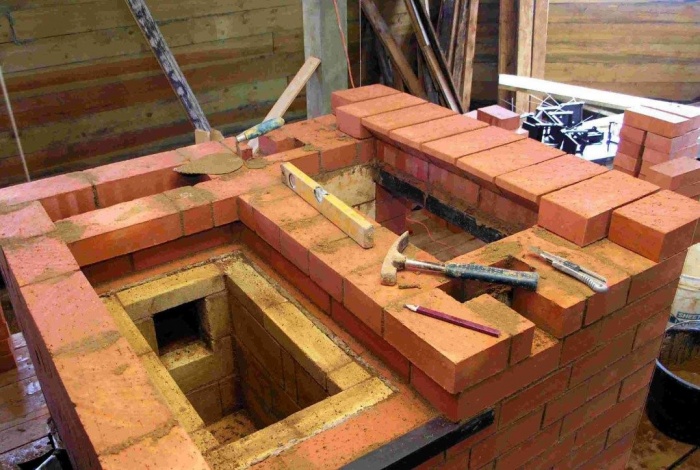
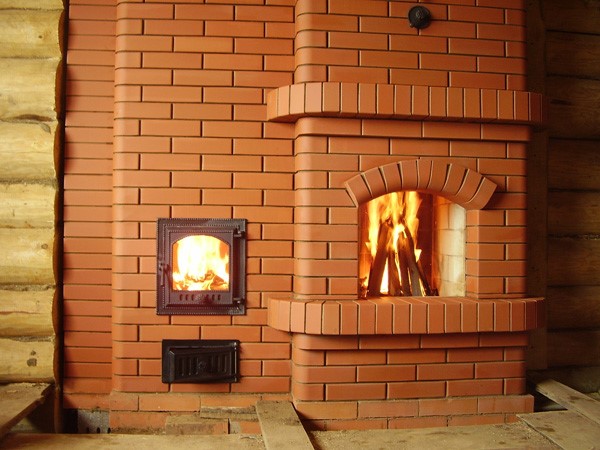
To lay a typical sauna stove shown in the photo, you will need:
- selected brick – 230 pcs;
- clay – 0.1 m3;
- sand – 0.2 m3;
- tank for heating water – 1 piece;
- grate - 1 piece;
- blower door – 1 piece;
- combustion door – 1 piece;
- cast iron stove - 1 piece;
- roofing felt – 2 sq. m;
- smoke valve – 1 piece;
- valve – 1 piece;
- asbestos and pre-furnace protective sheet.
The furnace design from the base to the chimney includes 21 rows of brickwork, each row must be carried out in strict accordance with the drawings, and repeatedly checked horizontally and vertically.
It takes at least 2 weeks for a brick sauna stove to dry. After completing the masonry, be sure to check the draft by opening all doors and plugs. It is recommended to carry out a test fire with wood chips, without heating the stove too much.
4 main advantages of the design brick stove for a bath
In this article I would like to talk about the advantages of the structure brick stove for a bath, or in another way it is often called a heater stove for a bath. Many customers doubt the choice of whether to buy an iron stove or hire a stove maker to lay a sauna stove. Let's weigh the pros and cons and figure out why brick is better?
Advantages of a brick stove in a bathhouse
Disadvantages of an iron stove
Brick-lined sauna stove
When a customer asks me, a stove maker, what to choose - an iron stove or a brick one, then, as a rule, the client himself already has certain motives for choosing an iron stove. One of the motives is the price of the issue.
Let's briefly look at how much a good iron stove costs, what its capabilities are and how much it costs to install such a stove.
Comparison of metal and brick stoves
diagram of an iron stove with a water tank
First, let's calculate the cost of materials
Cost of iron furnace materials
The cost of a stove with a good, durable stove design made of durable metal is on average 60-70 thousand. An iron pipe from 1000-1500 per meter, that’s 3-4 meters, it turns out to be about 6000 rubles, and the third component, optional, optional - although it’s hard to imagine without it your bathhouse. This is a water tank that needs to be built into the chimney system. The tank will cost you an average of 5,000 rubles. Total expenses will be 80,000 rubles.
Cost of installing an iron stove
Now let’s estimate the cost of installing a sauna stove, installing a chimney and connecting the tank to the sauna stove if you want to use the energy of the burned fuel completely and use it to heat water for the shower. Installing a stove together with a chimney will cost about 30,000 thousand, but if you also have to install a water tank, then no less than 40,000
Materials
Cost of Work
Iron stove
Water tank
The total installation cost is 116,000 rubles. Expensive or cheap - you can only say in comparison with a brick oven.
Brick stove in the bathhouse. Estimation of the cost of work
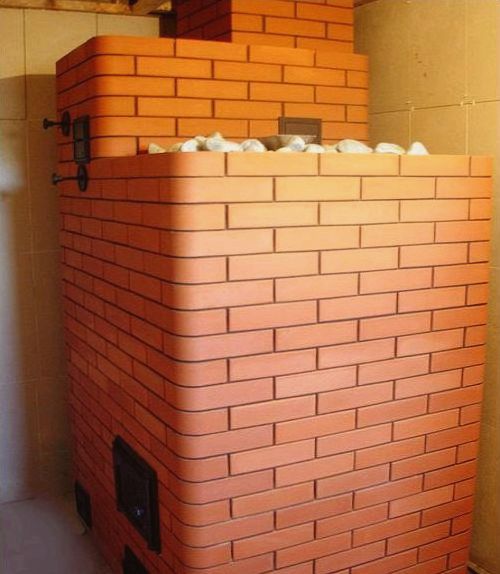
For comparison, I will take one of my works. On next photo my brick sauna stove, the advantages of which I will describe to you later, and in this section I compare only cost indicators.
Brick stove for a bathhouse. View from the firebox

So, this stove took 900 bricks, and this is not a small amount. On average, sauna stoves require 600-800 bricks. But my brick sauna stove is special. 900 bricks at the average cost of a brick, taking into account the masonry mixture and fittings - grates, fire door, etc. - in total as of September 2015 amounted to about 80,000 rubles.
The cost of our work is 90,000. The total was 170,000.
Iron stove
Brick oven
Materials
Of course, you can say that an iron stove costs an order of magnitude cheaper than if you order a masonry stove for a bathhouse.
Let's compare the time frames for installing an iron stove and laying a sauna stove
Iron stove
Brick oven
Installation time
The bottom line is that a brick stove in a bathhouse costs more and takes more time, but the advantages of a brick stove are much greater, and they more than pay for the money and time spent.
Brick sauna stove
: main advantages
Most customers choose brickwork for the following reasons:
Smooth heating of the roomBrick has the ability to heat up smoothly, in turn, it warms up the room just as smoothly. Brick heater in a bathhouse will also replace the heating element in the dressing room and on the second floor. The stove will give off heat for a long time, despite the fact that the firewood has long since burned out.
DurabilityBrick sauna stove more durable. This is due to the smooth heating of the brick. Having built such a stove once, you will not have to buy it again every 5-10 years; it is a durable design that will last 15-20 years without repair work.
SafetyDue to the smooth and uniform heating of the brick, unlike hot iron, you will not get burns if you accidentally touch a hot brick. From this side, a heater stove in a Russian bath is the safest.
Uniqueness of sizes
You can have absolutely any size of the bathhouse, and absolutely any requirements for the stove - the stove maker will design the design of the heater stove for the bathhouse according to your parameters. Here is one of the striking examples of my work: A sauna stove made of brick in the steam room, from the side of the large dressing room, the rest room, a firebox with a large heating panel was installed, performing both a heating role and the role of a fireplace.
The large firebox door opens and you can see the open fire. And what’s more, on the second floor we designed an additional independent firebox for heating the second floor
Brick sauna stove
: disadvantages of an iron stove
Unsmooth warm-up Iron heats up quickly, but the heat from an iron stove will not be entirely healthy - try to sit next to a hot iron, you will get burns even from a distance. And if you accidentally touch such a stove with your body, you will get a 100% burn, after which you will not want to steam at all.
The fragility of iron An iron heating stove, in contrast to the “brick sauna stove” design, heats up sharply, and the material itself wears out quickly. After 5-10 years of active use, you will have to throw the iron stove in the trash, while a sauna stove will last 15-25 years
Radiation The heat from iron is very dry, and most importantly, the hot metal emits elements harmful to the body. Brick sauna stove has no such disadvantages.
4. Sauna stove lined with brick
In order to avoid irradiation with hot iron, direct burns from accidental contact of skin and iron, as well as to preserve heat in the steam room, you need to line the sauna stove with bricks. In this video you can schematically trace what happens during construction work on the furnace lining with bricks. This is one of the most frequently performed jobs, so I would recommend considering this as some kind of middle link between an iron stove and a brick sauna stove.
The laying of a sauna stove must be done on a separate foundation, taking into account special technical requirements.
The design of heaters differs from the structures of home brick stoves used for heating the room in cold weather and cooking.
The brick stove of the bathhouse can be used at any time of the year, regardless of weather conditions.
Its purpose is to uniformly heat the bath space and maintain a special indoor climate.
Correctly done in order of the stove allows the heater to function according to a well-thought-out scheme - first the stove itself warms up, then the stones and then the steam room.
The information and video materials in this article will allow you to choose the right one building material and build a sauna stove with your own hands.
Today, several technologies for laying bath stoves are known among bathhouse masters.
Some types of stoves are more common, others are almost forgotten, as they are not entirely comfortable to use.
If you wish, you can put together any of the following structures with your own hands: white, gray, black, with a stove.
With or without a smoker, with a tank located above the stove or a water tank placed at the bottom of the stove.
The main thing is to choose the best option for your needs.
The “white” sauna heating stove does not emit soot into the room at all, which is why it meets environmental standards more than any other type of sauna stove.
The stones are heated by means of an iron part located in the structure. That is why it takes more than 12 hours to warm up the room.
But such a long heating period is justified by a long period of heat retention.
The “gray” furnace masonry is built with a straight chimney pipe, due to which the direct flow is considered the most economical.
The “gray” design of the steam room of the bathhouse warms up for short time, but in order to take advantage of its purpose, you have to wait for complete combustion of the fuel, since soot settles on the stones.
The laying of a “black” stove is done without a chimney pipe. It was this design that was widespread in Russian villages, and today, as it turns out, this masonry technology has not been forgotten.
The only disadvantage of using a sauna stove is that you have to wait until the fuel burns out, but this is offset by the advantage of receiving aromatic, high-quality steam.
The masonry of a stove with a stove is a building equipped with a fireplace and a tank, which are mounted on cast-iron ceilings and heated by them.
The tank is surrounded by a brick casing with your own hands, which allows you to maintain the desired water temperature for a long time.
More information about the methods of laying sauna stoves in the video material in the article.
How to choose the right brick for a heater?
To lay a sauna stove, it is better to purchase expensive high quality materials, but if the budget does not allow, you can build a stove from inexpensive red brick.
The main thing is to choose products with the correct geometric shape, without any deformations.
When purchasing bricks from the category of low-budget materials, you need to take into account that some products may have slightly different sizes from the standard.
As a result, when laying a sauna stove, the joints will differ by up to 10 mm.
This masonry technology is allowed for the construction of building walls, but not for the construction of a heater.
The negative point will not be in appearance, but in the release of heat to the outside, which is unacceptable for bathhouse stoves.
A high-quality brick product, when lightly tapped with a hammer on its surface, should produce a ringing sound.
If a dull sound is heard upon impact, it means the product was fired without following the technology.
Production and testing of masonry mixture for viscosity
This approach will allow you to obtain the same coefficient of thermal expansion of the joints and bricks, due to which the service life of the sauna stove will be increased.
At the same time, do not forget about the rules for laying a stove for a bath: you can build a high-quality stove with your own hands if the seams of the brick structure are made as thin as possible.
The most suitable seam thickness is 5 mm; if possible, the solution can be applied even thinner.
The solution must be made using washed river sand; even the presence of traces of silt in this component of the mixture is unacceptable.
In this case, a sand fraction from 1 mm to 1.5 mm can be used.
It’s not difficult to prepare the solution yourself, the main thing is to follow the technology below.
In addition, to strengthen your knowledge on this topic, you can watch useful video material.
Preparation of masonry mixture and methods for checking its quality:
- The clay is placed in a prepared container, crushed with your own hands and a little water is added. After thoroughly mixing the soaked clay, add more water and mix again. The output should be a homogeneous mass without lumps with the consistency of thick sour cream. In this state, it is left to stand for a day;
- After the specified time, the water will rise above the clay level, after which the excess water is drained. The not yet fully prepared solution is rubbed through a sieve to completely remove lumps;
- As soon as the clay mass acquires the desired uniformity due to water, sand is added to it with your own hands. Its quantity is determined based on the fat content of the clay mass.
The quality of the prepared mixture is determined in two ways:
- From the mortar composition, form a ball with your own hands, with a diameter of about 50 mm. Then they place it on a wooden plank, press the sample from above with another plank, press it until cracks begin to form on the spilled product. If the ball crumbles even before cracking appears, it means that the solution has poor viscosity. If cracks begin to form on a third of the diameter of the product, then the solution can be considered normal. Cracks that appear in the middle of the product indicate the need to add a little more sand to the mixture;
- With their own hands they make two round samples of 50 mm in diameter. A flat cake is made from one ball, the products are left to dry in the shade for 2 days. If during this time cracks appear on the samples, then it is necessary to add more sand to the mixture, since the clay is oily. If the ball is dropped onto a wooden board, and after that it remains intact, then the solution turned out to be good.
Features of laying a stove for a bath
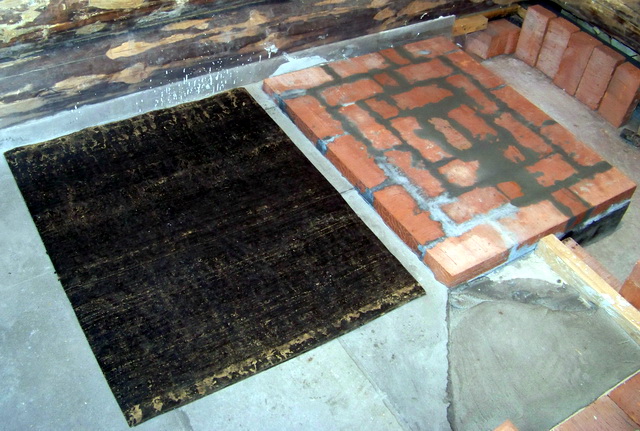
To build a full-fledged sauna stove, a foundation with waterproofing is first made for it. Installation of the base is carried out below the flooring, using a cement mixture.
At the level of the floor surface, at the location of the oven door, an iron sheet is installed.
First, each row of brickwork must be laid without using mortar, in order to select bricks with the same parameters and determine the thickness of the future seam.
At the same time, do not forget that each row of masonry must begin with a corner brick.
Then you need to fill some container with water, and immediately before laying, lower the brick into it for a couple of seconds.
The presence of water is necessary so that the drying process of the erected structure proceeds evenly, and the dry brick cannot take moisture from the mortar.
For each row of brickwork, its own scheme is developed, it is also called ordering. Different arrangements of a sauna stove have their own impact on the ability of brickwork to transfer heat.
Any of the proposed ordering schemes below can provide a different appearance and size of the sauna stove.
Row laying of a sauna stove can be done as follows:
- Using a trowel, a certain amount of clay mixture is laid out and leveled over the working area - in the place where the first row of brick blocks is laid. The blocks are taken out of the water one by one (soaked for no more than 20 seconds), then placed on the solution;
- When laying bricks, they are compacted with a trowel, ensuring that the thickness of the mortar joint does not exceed 5 mm. Excess clay mixture is removed with a trowel;
- After laying the first brick, the end of the next one is treated with mortar and attached to the end of the first, already laid. Thus, using a clay composition and using the stage of compacting the products with a trowel, the first row is laid. All subsequent rows of stove masonry are laid according to the same principle;
- When the first 3-4 rows of blocks are laid, the resulting facade is wiped with a damp cloth to improve the visual perception of the order and make it easier to control the subsequent process of row laying;
- The next row of blocks is laid in the same way as the first. In this case, it is impossible to allow the seams to coincide vertically. The vertical seams of one row must overlap the middle of the body of the bricks of the second row.
During the work process, it is not allowed to use quarters of products for laying chipped pieces inside a stove or chimney - under the influence of high temperatures, the chipped blocks will gradually collapse.
Tips for laying the combustion chamber and installing stove appliances
The combustion chamber for the bathhouse stove is constructed only from fireclay bricks; a combination of products made using different technologies is unacceptable.
If you compare refractory and simple bricks, both materials have different degrees of thermal expansion. When laying fireclay bricks, only fireclay clay should be used.
If you watch the video carefully, you will notice that brick blocks During the construction process, sauna fireboxes are laid on edge.
In this case, gaps of at least 50 cm are left between the inner walls of the stove and the walls of the combustion chamber.
Since stove appliances (doors, grates) are made of cast iron, it is recommended to install them with a gap, otherwise the heated metal will tear the masonry.
The grate is installed without mortar; if necessary, the grate should be easily removed.
All kinds of sauna stove doors are fixed to the structure due to special holes in them and the use of soft wire, which is fixed in the masonry joints.
When fastening, the devices are also installed on the mortar mixture.
From time immemorial, brick has been used to lay sauna stoves. Even in our time, given the wide choice of materials for this, stoves are still made from brick. Read our article and you can make a brick stove for a bathhouse with your own hands.
And in fact, it is not only traditional, but also not so difficult. That's why many people try to do brick kilns for a bath with your own hands. It is enough to have a little understanding of construction and some skills in constructing sauna stoves. And it will be easy to install the stove yourself. Moreover, it will not require any further cladding or even plaster.
And you won’t need many tools for a brick oven. In addition to the bricks themselves, you will also need a container for the mortar, an emery tool, squares, pencils for marks, pliers and other simple things that almost everyone has on hand.
Arrangement of a brick stove for a bath
To begin with, as in almost all building structures, you will need to lay a foundation. The foundations for different furnaces will also not be the same. IN in this case let's talk about brick stove and, accordingly, about the foundation for it. And if you have decided on a place to build a stove, you can start.
Brick foundation for sauna stove
First you need to dig a pit. Its bottom should reach a depth that will be below the layer of frozen soil. And this is approximately 0.7 meters. The width of the pit at the very bottom should be slightly larger than the main excavation. This is necessary so that any movement of the soil does not affect the overall structure of the foundation.
Ruberoid on the foundation for a brick stove
Then sand is poured into the bottom of the dug pit. Its quantity should be such as to cover the bottom by about 1.5 dm. The sand is poured with water, and after it is saturated with water, it is covered with broken bricks and stones, up to two inches thick. After the sand stops shrinking, the layer is sprinkled with crushed stone, and then formwork is made in the pit and a reinforced frame is installed. After this, concrete is poured with a thickness that should not reach 1.5 dm. to the ground surface. Then the formwork is dismantled by spreading several layers of tar along its sides, and the remaining space is filled with coarse sand and fine gravel.
Next, we will need roofing felt, two pieces, similar in size to the area of the foundation, which are laid on concrete as the last layers of the foundation. These pieces thereby act as a spacer between them and serve as a waterproofing material. This is very important, because if moisture gets on the bricks, their strength is lost, and this leads to its early destruction. So, if the foundation is ready, you can start building the walls.
Preparing the mortar for masonry
Once the foundation is ready, you can check its horizontalness and suitability, and you can proceed to the next stage - the construction of walls. First you will need to lay out the so-called “protective wall”, that is, protective against possible fire. It will require a solution of sand and concrete and cut bricks. The first wall is laid out of them, which serves as the basis of the furnace.

Masonry clay soaked in a basin
The brickwork of a sauna stove is usually laid using sand-clay mortar. Clay is usually mined at a depth of more than half a meter. For easier use, the clay is softened with water. It is soaked in a special container for several days, and then I use it. The sand for the solution must be cleared of debris and preferably sifted.
The solution is prepared by kneading the clay and adding water to it, while the mass is thoroughly mixed. After this, sand is added to the composition, which is usually about twice as much as clay. It must be remembered that you should not immediately prepare the required amount of solution for the entire structure, since the mixture quickly loses its properties, hardens, and its use becomes difficult over time.
We are building a brick oven
The first laying of bricks is carried out on a bitumen waterproofing layer placed on the foundation. Each brick is wetted with water.

We protect the wall and lining from fire. It must be remembered that here you need to use a cement-sand mortar
After this installation, you must definitely check the angles, which should be straight, and the so-called “ordering”. The order of the sauna stove should be taken into account for any construction of stoves made of brick or other stone. It depends on the size of the heating structure: the larger it is, the more powerful its heating capacity. It is worth measuring the edges of the arrangement carefully, since any gap may allow smoke to enter the room. The thickness of the seams between the rows of bricks should not exceed three to five mm, the bricks should fit tightly to each other. To do this, it is necessary, as already mentioned, to make a high-quality solution without unnecessary debris and stones.

Installing a plumb line with a load
The second row of bricks is laid so that each brick lies at the junction of the bottom two bricks, the third row is similar to the second, and so on.

Installation of dodduval. Here you can see the level - plumb line
When laying the third row of bricks, a blower door is usually installed. For a more accurate calculation, you will need drawings of brick stoves for a bathhouse. Guided by them, it will be possible to calculate all stages of the structure. The door is reinforced with galvanized wire or strips of steel sheet. By the way, experts recommend using steel strips, as they are easier to attach. But if they are not there, wire will also do, the main thing is that its thickness corresponds to the standard. To do this you will need to make small indentations in the bricks.
Installing doors in a brick stove for a bath
In order for the door to fit well, the bricks need to be filed
Before laying the fourth row, it will be necessary to check again the evenness of the walls and the straightness of the corners of the future stove.

There will be a well for ash
This is very important, since in the fourth row a well is laid for ash, as well as for the grate - a grate for the air duct and for cleaning the fuel compartment from ash. In order to install it, you need to hollow out recesses in the bricks, leaving gaps for the thermal expansion of the grate.
Grate box in a brick oven
They should be approximately one cm in each direction. The back wall under the grate will need to be rounded with broken bricks so as to provide the least resistance to the passage of air into the firebox.
In the sixth row, the bricklaying ends with the installation of the ash door, and in the seventh row, with the installation of the grate and the combustion door. By the way, the furnace door is installed in the same way as the blower door. Doors for sauna stoves are usually made of cast iron. They are considered the strongest and most fire-resistant parts available today.
The eighth row of masonry is made with a partition from which the chimney will begin. Thus, the bricks are laid up to the 14th row, on which channels are already installed - metal U-shaped products, often used in construction, including in the construction of a furnace.
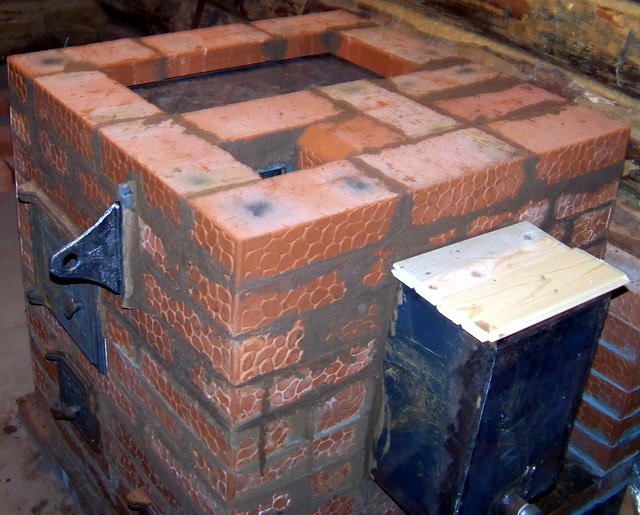
It is necessary to make an opening in the front wall of the sauna stove for a container where there will be hot water. This container should be positioned so that it rests vertically on the side walls of the masonry and touches the previously laid channels.
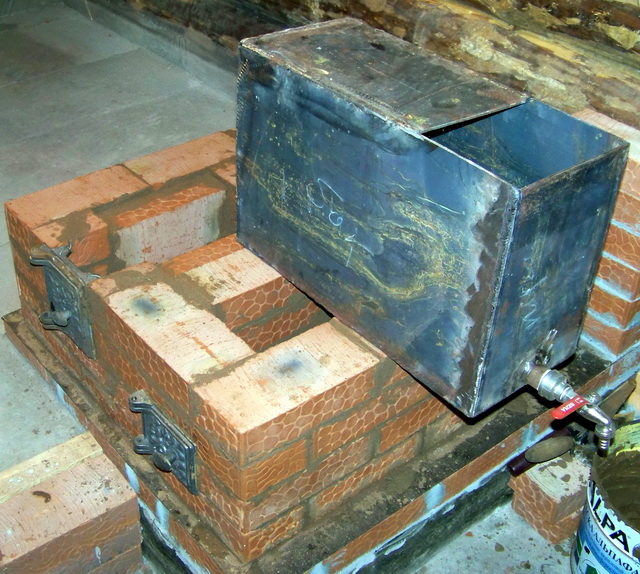
Installing a tank in a brick kiln
The fifteenth row is laid out with halves of bricks, which lie at an angle to each other. This will be the basis for laying out the dividing wall. The next three rows are laid out in the same way as the first, that is, each brick covers the joints of the bricks of the previous row.

All doors and tank must be wrapped with asbestos

We install a blower in our brick stove
On the 19th row, a door is installed through which steam will escape. Thin strips of metal, preferably mild steel, are then usually laid to hold the 20th and 21st rows together. This is done because already on the 21st row they close the steam door frame and place a container for hot water. After installation, it is as if it is wrapped in fragments of brick, pressing it as much as possible against the walls of the tank.
Installing the stove
The 23rd row begins with the installation of a pipe, the length of which will depend on the height of the bath.
The pipe for the sauna stove is chosen depending on the design itself. That is, if this is a massive stove, then the pipe should not be light. For a more fragile structure, you will need a smaller pipe. In this case, you must always take into account that the thickness of the walls of the pipe and furnace should not be less than half a brick, and the cross-section of the smoke passages should be the same size. The chimney is erected no less than half a meter above the roof surface. In this case, it is no longer a sand-clay mortar that is used, which is easily washed out by rain or softens under the influence of condensation formed in the pipe, but a lime mortar, or even a cement mortar.
Almost completed 10th row of brick kiln
After the brick sauna stove is ready, you can plaster it. Although this is not a mandatory procedure. However, some prefer to thereby improve the appearance of the stove, as well as protect the bathhouse from fire.
Any solution with a small amount of asbestos added to it is suitable for plaster. You can also use a solution with gypsum, but here you need to take into account that such plaster will set quite quickly. In addition, for plaster there are mixtures of clay, sand and gypsum, or without gypsum.
Before plastering, the furnace wall is prepared, that is, it is cleaned of the mortar that hardened during construction, the seams are cleared to a depth of 1 cm and putty is applied.
As you can see, making brick stoves for a bathhouse with your own hands is not so difficult. And, most importantly, it’s not expensive. Although it depends on what bricks you choose for it. Typically, more durable bricks are chosen for stoves than for other buildings. For this purpose, fire-resistant types are chosen, that is, made from fire-resistant clay. The brick for the bathhouse should be solid, properly fired, without cracks or chips.
Many people use ordinary brick, which is not very durable, but also not very expensive. But the most common is the so-called fireclay brick (from the name of the clay “fireclay”), which consists of 70 percent refractory clay. Its popularity is due to its durability and quality, incomparable to normal look. Such a brick costs much more, but will last many times longer.
When building a stove, the main attention should be paid not to the brick, but to the structure and its safety. This is a very important point, since most fires occur precisely due to those stoves that are lined with brick. For fire safety, you should know a few simple rules:
- the distance from the surface of the furnace and the combustible structure should not be less than half a meter. If the structure has fire-resistant armor, then the distance can be reduced.
- There must be a free gap of at least one dm between the brick pipe and the wooden elements of the bathhouse roof, for example, cladding or rafters.
- the gap between the chimney and the roof is lined with a cutout made of galvanized steel.
- on the floor in front of the base of the stove, if it is wooden, lay a metal plate or sheet, which will also protect the bathhouse from fire caused by burning coals falling on the floor.
Knowing these structural principles, you can safely begin building a sauna stove without worrying about its future
And you should always remember that when building a stove for a bath, you must choose only proven material and begin construction only after everything has been carefully calculated.
 Enzyme preparations (pepsin, trypsin, pancreatin, lidase, streptoliase, etc.
 Cod liver salads: recipes with photos
 Wild duck shulum: recipe