Ready-made refractory mixture for furnaces. Laying classic fireplaces with your own hands: materials and diagrams
Anyone who is familiar with construction work will be able to build a stove or fireplace of a simple design with their own hands if they have at their disposal detailed description and row layout schemes - ordering. But laying a fireplace with your own hands is impossible without knowing what materials can be used, how to choose or prepare them.
Even a person far from the stove business will say that to build a fireplace you need brick and mortar. But what kind of brick, and what should it be? correct solution? This is a matter of paramount importance, neglecting which means wasting energy, time and money on useless work. Let's figure out how to choose materials and how to build a fireplace.
Brick
Types of bricks for laying fireplaces
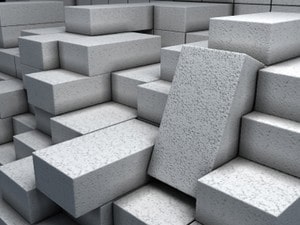
The fireplace is laid with your own hands using solid red clay bricks. It is used to build the outer part of the fireplace, and for the facade you should choose smooth bricks of the correct shape without chips and cracks.
For that part of the stove or fireplace that is in direct contact with an open fire, a special fireproof fireclay or quartz brick is selected.
Can also be used hollow facing brick, but only for laying the pipe head above the roof or for lining a finished fireplace.
Brick quality requirements
Before you build the fireplace yourself, you should make sure that the material is chosen correctly.
When choosing a brick, the following requirements must be observed:
- Give preference to bricks of a brand no lower M 200. Products of this brand look better externally than bricks of lower brands, and, most importantly, have high strength, withstanding the permissible load 200 kg/cm².
- Buy the required amount of bricks at once so that they all come from the same batch and have the same characteristics.
- Assess the external condition of the brick: absence of cracks, chips, presence of chips in the pallet.
Solution
Composition of the solution
Conventional cement mortar is completely unsuitable for constructing structures that experience high thermal loads. The mixture for laying a fireplace is made on the basis of clay and sand, and their percentage depends on the fat content of the clay.
Cement may also be present in such a solution, but in a very small amount.
- The solution must be homogeneous, without lumps, and have normal plasticity. Only in this case will he firmly bind brickwork, will not crack when drying and will shrink slightly.
- A too plastic mortar based on fatty clay is perfectly leveled on brick, allowing you to make a beautiful and thin seam, but it is not suitable for stove work, since during operation it shrinks a lot.
- A low-plasticity solution based on lean clay practically does not shrink, but does not provide good masonry strength, cracks and spills out of the seams when dry.
Requirements for the quality of sand and clay for mortar
The sand must be clean and fine. It is best to use mountain or river sand, sifted through a fine sieve to remove large inclusions and vegetation. This procedure will create a high-quality, homogeneous solution and obtain a thin and even masonry joint.
Only experienced stove makers can determine the quality of clay by touch. But there are many ways, both folk and laboratory, to check whether clay is suitable for preparing stove mortar and to determine the optimal ratio of clay and sand. Here are some of the most simple ways:

How to prepare the solution?
Having determined experimentally the ratio of sand and clay, measure out the required amount of materials and sift them. Sand - in the usual way, and clay is pre-soaked with water, mixed thoroughly and filtered through a sieve with fine mesh.
After mixing the clay and sand, the solution is filtered again through a larger sieve so that it is homogeneous, without clots. Ready mix should not spread over the shovel, but slide off it well. This solution produces ideal thick seams 3–5 mm.
To increase the strength of the solution, cement can be added to it ( ¾ liter per bucket of solution) or table salt ( 150–250 g). Before adding, cement is diluted with water to the consistency of sour cream, salt is also dissolved in water.
How much mortar is needed for laying fireplaces?
To lay 100 bricks flat, making seams along 5 mm, you will need two buckets of solution. When laying a Russian stove, this amount increases by 20%.
Attention! It is very important to prepare a solution of the required plasticity and thickness! Only such a solution will fill all the unevenness, ensure density and gas-tightness of the seams and strong adhesion of the bricks.
How to build a fireplace with your own hands?
Having prepared the necessary materials, you need to solve the main question of how to build a fireplace.
To build a stove or fireplace (see Laying brick fireplaces), you will need to make a solid foundation and prepare masonry patterns, which are called ordering.
Preparing the base
If the floors in the house are made of reinforced concrete slabs, laying a fireplace with your own hands does not require the construction of a foundation. In all other cases, it is necessary to do this in order to ensure the stability of the fireplace and avoid its destruction.
Important! The base for a stove or fireplace should not be connected to the foundation of the house!
Orders
Order is very detailed diagram, which indicates the position of each brick. Please note that the ordering is done separately for each row of masonry.
Only an experienced craftsman can fold a fireplace without order, but a beginner will not be able to do the job correctly without it. Therefore, the order must be prepared independently, or even better, order a good stove maker to draw up a diagram for your fireplace.
Work technology
It is necessary to lay two layers of waterproofing on the base of the fireplace under the first row of masonry. The basement row is usually laid “on edge” so that it is higher than the level of the finished floor. In all subsequent rows the brick is laid flat.
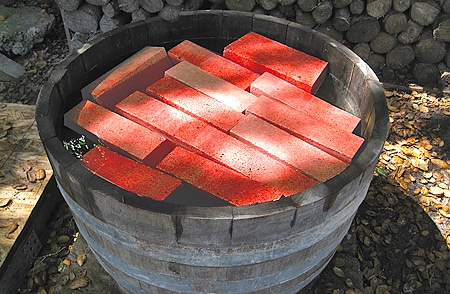
Before laying, the bricks are soaked in water for 2–3 minutes to ensure closer contact with the mortar.
The bottom of the fireplace insert should be located at a height of two or three rows of masonry from the floor level.
If you decide that laying fireplace stoves with your own hands is within your power, you definitely need to consider the following: red and refractory bricks have different parameters of linear expansion when heated.
Therefore, there are some features of their simultaneous use in a single design. Since the fireplace insert is made of refractory brick, which gives greater linear growth, during operation it can cause destruction of the fireplace body, made of red brick.
To prevent this from happening, it is necessary to use “dry seams”, that is, lay out the fireproof insert of the fireplace without ligating it with the outer walls, retreating from it at least by 2–3 mm.
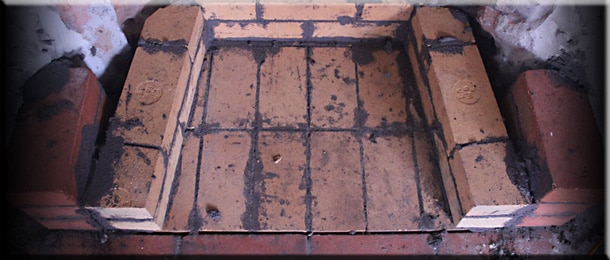
In this case, the firebox is provided with freedom to expand, and the space between the masonry creates thermal resistance, preventing the fireplace body from getting too hot.
The masonry of the ceiling above the firebox opening requires special attention. Here it is undesirable to use metal or reinforced concrete lintels, which can be severely deformed when heated.
You can lay out the brick in the form of an arch or an even horizontal ceiling, with a certain protrusion, using special formwork.
There are several options for laying floors:
- wedge,
- arched,
- archery
In any case, before starting work on laying the floor, it is necessary to make formwork, which must exactly match the lower contour of the firebox arch. The formwork is designed in such a way that after the mortar has hardened, it can be lowered and removed without effort, without damaging the masonry. To do this, it is supported by bars in the upper part.

Arched and beam lintels are laid flat on the formwork, and to install wedge-shaped ceilings, the brick is turned on its edge. The thickness of the joints between the bricks at the bottom is approx. 3 mm, and at the top - 25 mm and more.
The laying of the lintel is carried out on both sides and ends with the installation of a central brick, which is placed strictly in the middle of the arch vertically. Of course, the brick for laying this part of the structure must be selected especially carefully.
Mantel
You need to think in advance about what materials will be used for decorative finishing of the fireplace (see Finishing the fireplace). If you want to leave the fireplace unlined, you should lay the brick very carefully, not bringing the mortar half a centimeter to the front of the masonry. The seams can be unstitched later.
If the masonry is not very beautiful, then the fireplace can be completely plastered or lined with natural or artificial stone, ceramic tiles, tiles. The finishing will hide all your flaws and defects in the brick, allowing you to do without any rework.
With your own hands, first of all, you need to take care of the quality of the materials used, because this determines how long the building will last you. If you choose low-quality materials, when heated, your stove may release carbon monoxide into the room, which will cause irreparable harm to the health of all family members.
For fireplaces and stoves, it is necessary to use a solution mixed on the basis of clay and sand, since this particular material can withstand constant exposure to thermal loads.
Composition of the solution
Clay cleaning
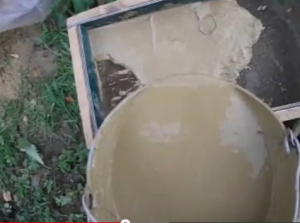
In order for the bricklaying to be of high quality, the clay for the mortar must be cleared of large lumps and debris. This is done in two ways: alluvial and using a sieve. The sieve should have cells no larger than 3x3 mm, because this is exactly the thickness of an ideal seam. The alluvial method is much more complicated, but clay purified with water is also of better quality. Clay is poured into an oblong container (you can take a children's trough), installed at an angle of 5-7 degrees, but so that it fills only the upper part, and water is poured into the lower part so that it does not come into contact with the clay. Use a scoop to push the water onto the clay until they are completely mixed. Then the solution is filtered, the operation is repeated until the required amount of building material is obtained.
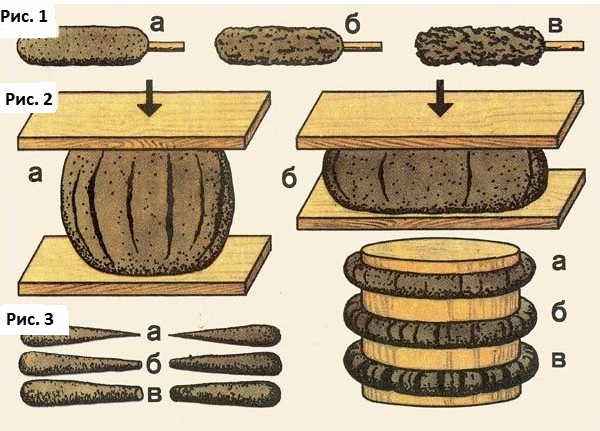
Rice. 1 a – the clay sticks strongly to the funnel, it’s too greasy; rice. 1 b – separate clots remain on the jig – the clay is normal; rice. 1 c – the veselka is covered with a thin layer – thin clay; rice. 2 a – a ball, compressed by 1/5 of its diameter from thin clay, cracked; rice. 2 b – a ball, compressed by 1/2 of the diameter from fatty clay, cracked; rice. 3 a – flagella smoothly stretch, there are sharp ends in places where they break, there are no cracks when bent – too fat; rice. 3 b – flagella smoothly stretch, in places of rupture there is a thickening of 20% of the original thickness – normal clay; rice. 3 c - flagella stretch little, when bent there are many cracks - skinny clay.
Sand selection and processing
To make the process of passing clay through a sieve faster and easier, you just need to add more water to the bucket of clay.
Sand can also be bought in a store, or you can get it yourself on the slopes of ravines or on the shore of the sea or river. As a rule, this material is sold in stores purified and ready to be added to the mortar for laying the stove. But if you are using non-purchased material, then you will have to sift it in a sieve with a cell width of 1.5x1.5 mm and rinse it in the following way:
- Pull the burlap over the frame so that sides 50-100 mm high are formed.
- Pour sand into it.
- Use a hose to pour water into the sand until the stream comes out relatively clear.
Preparation of the solution
After you have empirically determined the amount of materials required for the solution and cleaned it, you can begin mixing. Having combined sand and clay, the solution must be filtered through a large sieve to get rid of lumps and clots. The finished mixture should slide well from the shovel, and not spread over it! In order for the mortar for laying a stove or fireplace to be as durable as possible, you can add cement or table salt to it. 3/4 liter of cement per bucket of mixture or 150-250 g of salt will be enough. Solutions with the addition of these ingredients are the strongest.
To find out how much mortar is needed, you need to know the rule: 2 buckets are needed for 100 bricks. In the case of laying a Russian stove, this volume increases by 20%. The ideal solution will ensure a long service life for your fireplace.
- Types of masonry mortars
- Mortar for basic masonry
- Mortar for laying the foundation and the outer part of the chimney
- Plastering solution
- Tile mortar
Not only the durability of the structure, but also its characteristics such as efficiency and safety depend on how high-quality the mortar for laying the fireplace is. If mortar spalls in the seams of unlined brick or masonry, carbon monoxide and other combustion products can enter the room and cause poisoning to those present in it. The reverse process (suction of air from the room through the cracks) is also undesirable, since it is accompanied by an increase in fuel consumption and a deterioration in the performance of the fireplace.
Types of masonry mortars
In the process of laying stoves and fireplaces, not one, but several types of mortar are used. They differ from each other in properties and purpose:
- The mortar for constructing a stove or fireplace (main masonry) must withstand temperatures up to 1000° C.
- The solution for constructing the foundation and the outer (street) part of the chimney must maintain strength in conditions of high humidity.
- The finishing (plaster) mixture for cladding the structure requires increased strength.
- The mixture for fixing ceramic tiles must have sufficient adhesive properties.
It is necessary to consider the composition, characteristics and method of use of each type of solution in more detail.
Return to contents
Mortar for basic masonry
The cement mortar familiar to all builders, on which almost all stone structures are built, cannot be used in conditions of high temperatures. Therefore, when constructing the main part of stoves and fireplaces, a clay-based solution is used.
You can buy clay at any hardware store. In this case, you will receive a pure product, the composition and characteristics of which are reliably known. Clay can be obtained in another way, free, but troublesome: digging it up in natural conditions. Layers of clay lie at a depth of only 0.5 m. It is most convenient to collect it on the slopes of ravines or along river banks. An inhabitant of city neighborhoods only needs to find a venue earthworks: there, most likely, he will be able to collect clay in the required volume.
Clays are divided into three types:
- skinny;
- normal;
- fatty.
A mortar prepared on the basis of lean clay becomes brittle and crumbly after drying; it has absolutely no strength and does not provide adhesion to the masonry. Fatty clay must be added to such a solution.
A mixture based only on fatty clay shrinks significantly after drying and may crack. To normalize the fatty solution, sand must be added to it.

How can you determine what kind of clay you got and how much sand needs to be added to it? All this can be found out experimentally. Clay taken in a volume of 1 liter is cleaned of large impurities and divided into five parts. The first part is left in pure form. Sand is added to the second, the volume of which is 4 times less than a portion of clay. Next, sand is added in the following proportions: to the third part - half the volume of clay; to the fourth part - a whole volume; to the fifth part - one and a half volumes of clay. Then water is added to each container, and their contents are thoroughly stirred. The finished mixture should be homogeneous and plastic, but should not stick to the skin. This solution is called “steep dough”.
From each portion of the solution you need to make a ball, which is placed between several polished planks. Press on one of the boards until cracks appear on the ball. If at the same time the gap between the planks was reduced by 50%, the solution turned out to be greasy. If it's within one-fifth, you're dealing with lean clay or too much sand. A normal mortar, suitable for laying stoves and fireplaces, will begin to crack when the planks approach 1/3 of the original distance.
The clay is filtered through a sieve with a 3-mm mesh. This cell size is determined by the thickness of the seam in the masonry, which is 3-5 mm. Thus, it is advisable to filter out precisely those particles whose dimensions exceed 3 mm, otherwise they will interfere with the construction of a seam of normal thickness.
The alluvial method of cleaning clay is more effective. To implement this, you will need a long container like a trough or a baby bath. Having placed the container with a slight inclination (within 7°), a small amount of water is poured into it, and a portion of clay is poured into the upper part. The volumes of water and clay are selected so that they do not come into contact with each other. Now, using a spatula or other flat tool (like a construction trowel), you should pump water onto the clay, which will wash out and settle at the bottom of the container. After this, all that remains is to strain the clay.
For clay mortar, you need fine-grained sand with a grain size of no more than 1 mm. The most suitable is mountain sand, the deposits of which lie on land. Unlike sea or river sand, which has a smooth surface polished by water, mountain sand is rough, which makes the solution more durable.
Before preparing the solution, the sand should also be washed. This can be done conveniently using a homemade tool that resembles a sieve: four boards 50-100 mm wide are knocked together into a square box, the bottom of which is formed by stretched burlap. Having poured a portion of sand into such a “sieve” installed on a support, they begin to water it from a hose with water, which flows out through the burlap along with the dirt. The quality of flushing is assessed visually by the purity of the flowing water.
How much clay and sand should be prepared? On average, mortar for laying stoves or fireplaces occupies a volume that is 8 times less than the volume of a brick or 10-13 times less than the volume of the entire structure, calculated based on external dimensions. Thus, a masonry of 100 standard-sized bricks will require about 25 liters of mortar.
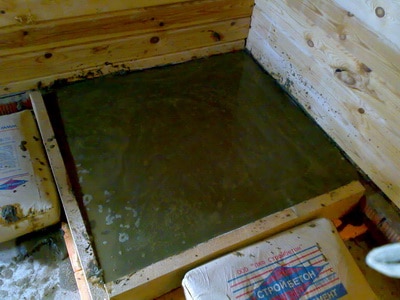
To prepare the solution, purified clay should be soaked. This should be done in a container or on a specially constructed wooden platform with an area of 1.5x1.5 m. The clay is poured in layers, pouring water over each layer. The thickness of one layer ranges from 100 to 200 mm. After the clay is saturated with water and becomes soft (it may take about a day), it is mixed with a bayonet shovel, if necessary, again filled with water and left for another day.
If you add 100-150 g of ordinary table salt to 10 liters of clay solution, it will become more durable. For the same purpose, 0.5-1 kg of Portland cement is added to this amount of the mixture, which can be either dry or in the form of a solution. Clay mortar with the addition of Portland cement should be prepared in small portions, since within an hour from the time of mixing it becomes unsuitable for work.
The working conditions of the mortar located in the foundation or the outer part of the chimney are very different from those in which the mortar of the main masonry has to work. There are no high temperatures here, but there is high humidity. In such an environment best characteristics has lime or lime-cement mortar. This mixture includes lime paste, cement, sand and water. Lime dough must be filtered through a sieve with a mesh size of 3x3 mm; it can also be used to sift sand. On average, 2-3 parts of sand are added to one part of lime dough.
Lime composition, like clay, can be lean, normal and oily. Check it with a wooden spatula. After stirring for 3 minutes, you need to see if the solution sticks to the spatula. If not, the solution is thin. If a layer 2-3 mm thick forms on the blade or the solution sticks in the form of clots, then it is normal. The greasy solution will adhere to the instrument in a thick layer. You can bring a lean solution to normal plasticity by adding lime paste. Sand should be added to the greasy one.
The finished lime mortar remains suitable for use construction work within a few days.
Clay, lime, mixed mortars, as well as heat-resistant concrete mixtures for laying stoves and fireplaces.
Solution– a mixture of binders, aggregate and water. Based on their dry density, they are divided into heavy (1500 kg/cub.m or more) and light (less than 1500 kg/cub.m). According to their intended purpose, mortars are masonry (for laying brick, stone and stove blocks), finishing (for finishing stoves) and special.
The filler, together with the binding material and water, creates a solid foundation and a monolithic body of the furnace and chimney. It reduces the shrinkage of the mortar (eg slag aggregate). Based on the type of binding materials, mortars are divided into cement, lime, gypsum and mixed (cement-lime, lime-slag, etc.).
Simple mortars consist of one type of binding material and filler; complex, or mixed, consist of two or more binders (cement and clay, cement and lime) and fillers. For example, a cement-lime mortar with a ratio of 1:3:15 consists of one part cement, three parts lime paste and 15 parts sand.
In complex solutions, the volume of the main binder material is conventionally taken as one, the remaining components (binders and fillers) are expressed by numbers showing how many volumetric parts are taken per one part of the main binder. The main substance has stronger astringent properties, so the name of complex solutions begins with the name of the main binder. For example, a lime-clay mortar contains two binders– lime and clay.
Clay mortar is destroyed by moisture, it is not suitable for laying foundations and chimneys over the roof. These parts of the furnace are made with lime, cement or lime-cement mortar.
Clay mortar for laying stoves is used only in a dry place, and the seam should be 3-5 mm. The mortar from a thick joint quickly crumbles, air is sucked into it, which impairs the operation of the furnace and causes excessive fuel consumption. Thin joints can only be obtained from good clay and a thoroughly mixed solution, strained through a sieve with 3x3 mm cells. The sand for the solution should be fine, the grain size should be no more than 1 mm.
Lean solutions do not have the required plasticity and strength, while fat solutions are plastic, but form cracks when dry. The most suitable for masonry are mortars of medium plasticity, or normal ones, in which the binder and filler are in the optimal ratio. They are durable, do not crack when drying and exhibit minimal shrinkage.
Lime, cement and complex mortars are applied to the masonry only with tools.
Before preparing a clay solution, the clay must be checked: add a little water to 0.5 kg of it and knead it thoroughly with your hands until it completely absorbs water and does not stick to your hands. Having prepared a stiff dough, roll a ball with a diameter of 40-50 mm, make a flat cake with a diameter of 100 mm from the same ball and dry it for 2-3 days. If cracks appear on the ball or cake during this time, then the clay is oily and requires adding sand. If, after drying, there are no cracks on the ball and cake, and the ball, falling from a height of 1 m, does not crumble, then the clay is suitable for preparing a solution. Skinny clays do not crack, but do not have strength; fattier clays must be added to them. Sand or clay is added in several stages, each time checking the quality of the solution.
Another way to check the quality of clay: take 2-3 kg of material, place it in a bowl, add water, knead the lumps and mix. If the clay sticks strongly to the blade (completely envelops it), it means that it is oily, and you need to add sand to it. If individual clots remain on the blade, the clay is considered normal, and a solution is prepared from it without adding sand. If the shoulder blade is covered with a thin layer of clay, it means that it is skinny and requires the addition of fatty clay.
You can check the quality of the clay this way: 0.5 kg is kneaded until a stiff dough is thick and kneaded thoroughly with your hands. Roll out a ball of clay dough with a diameter of 40-50 mm, place it between two smooth boards and gently press on the top one, gradually squeezing the ball until cracks form on it. The applied force and the amount of flattening of the ball, as well as the nature of the cracks that form, indicate the fat content of the clay. A ball made of lean clay (loam) breaks into pieces with slight pressure. A ball of fatter clay, loam, when compressed by 1/5-1/4 of its diameter, gives cracks. A ball of normal clay cracks when compressed by 1/3 of its diameter. A ball of oily clay gives thin cracks when compressed by 1/2 of its diameter.
From the same clay dough as the ball, roll out flagella with your hands, 10-15 mm thick, 150-200 mm long, and stretch or bend in the shape of a ring around a round and smooth wooden rolling pin with a diameter of 40-50 mm. A flagellum made of fatty clay stretches smoothly, gradually becomes thinner, forming sharp ends at the point of rupture, and when bent, cracks do not form. A flagellum from normal clay stretches smoothly and breaks off when its thickness at the break point becomes 15-20% less than the thickness of the flagellum, and small cracks form when bent. A flagellum made of lean clay stretches little, gives an uneven break, and when bent, many cracks and tears form.
Clay mortar for stove masonry requires from 1/10 to 1/13 of the volume of the stove, based on the outer size, or up to 1/8 of the volume of bricks being laid - on average 25 liters (2.5 buckets) per 100 pieces. bricks The clay mortar should not differ from the composition of the brick and can withstand heating up to 800-1000 degrees without losing strength or emitting harmful fumes. The less clay in the stove masonry, the higher its quality. The best solution is the clay from which bricks are made. To prepare the solution, you can use broken adobe bricks. The solution must be plastic. When a greasy mortar dries, it decreases in volume and cracks; a thin mortar does not provide sufficient strength, binds the brick poorly and easily crumbles out of the seams.
The strength of the clay solution increases if you add 100-150 g of table salt per bucket. Fine salt is mixed with the solution, and coarse salt is pre-dissolved in water. Sometimes 0.5-1 kg of Portland cement is added to a bucket of solution, mixing it dry or pre-mixed with water. Use this solution no later than an hour after preparation.
To prepare the solution, use different clays, mix them dry, and then mix them with water. Add 0.5-5 volume parts of sand to oily clay. It is sifted through a fine sieve with cells of 1.5x1.5 mm. Very thin clays are soaked - washed in water, removing excess sand from them.
If the clay fluid is normal, there is no need to add sand. To prepare a clay solution, a boardwalk measuring 1.5x1.5 m is made, onto which clay is poured in layers and moistened with water. When the clay softens, it is shoveled several times and raked into a pile in the form of a narrow bed 300-350 mm high. Then thin plates are cut from it with the edge of a wooden shovel, the lumps are broken and crumpled. Stones and foreign matter are removed. Then the mass is shoveled, raked into a bed and again crushed with a shovel 3-5 times until all the lumps are broken.
If during the work you need to add sand to the clay, then pour it in the form of a wide bed, make depressions in it, then pour the clay in layers, moisten it with water and cover it with sand on top. Wait until the clay softens, then shovel it with sand many times, collect it in a bed and crush it with a shovel until it is completely mixed with sand and becomes homogeneous. A well-mixed solution with the required amount of sand and water should slide off the iron shovel, but not spread over it; to the touch it is a slippery mass with an even filling of sand without clay or sand clots. In such a solution, large particles often remain that do not allow making thin seams, so during work you have to constantly feel it with your hands, removing foreign particles, which slows down the work. It is advisable to strain such a solution through a sieve.
The optimal ratio of clay and sand in clay solution– 1:1 or 1:2. The amount of water is 1/4 of the volume of clay.
Clay of normal fat content, which does not require the addition of sand, is poured into a box or barrel in layers and moistened with water, where it soaks for several hours. Then it is thoroughly mixed and filtered through a sieve with 3x3 mm cells. Water is added at the workplace to achieve the required thickness of the solution.
If sand needs to be added to the clay, it is measured in the required dose and sifted on a sieve. After the clay is soaked, it is filtered, sand is added, mixed and filtered again.
Mortar prepared from lime dough, sand and water. It is used for laying the foundations of furnaces, as well as pipes above the roof. To give strength to the solution, cement is added to it, and for quick setting, gypsum is added (in plastering work).
To prepare the solution, the lime paste is filtered through a sieve with 3x3 mm holes, and sand is sifted through it. If the dough is too thick, it must be stirred with water. Add sand and mix the whole mass thoroughly until smooth. The amount of sand depends on the quality of the lime: for one volume part of lime paste add from 0.5 to 5 volume parts of sand (usually 2-3 parts).
To determine the quality of the lime mortar, mix it with a wooden oar for 2-3 minutes; if the solution does not stick to the oar, it means it is thin; if it sticks in places in the form of separate clots or covers the paddle with a layer of 2-3 mm, it is normal; if the solution sticks in a thick layer, it means it is greasy. It is necessary to add lime paste to a thin solution, and sand to a greasy solution. Lime solutions can be stored for several days.
The better the lime paste, the higher the quality of the solution, and vice versa. Therefore, lump lime-boiler is quenched by filling it with water and keeping it in creative boxes until completely quenched. The quality of lime and the maximum yield of lime paste depend on this operation. You can pour slaked lime into any container, but it is better into a creative pit dug in the ground, lined with boards, where it can be stored for a long time if it is covered with soil on top in a layer no thinner than 50 cm. The longer it is stored, the higher the quality, but without access air. Drain the lime through a sieve with cells of at least 5x5 mm.
To prepare quick-quenching lime, water is poured into the slaking box to half its height. Then it is filled with lime in several stages, distributing it evenly. When steam appears, stir it intensively, breaking up individual pieces and adding water until the release of steam stops. Water is added to slaked lime to obtain a homogeneous milk of lime, and left for a while to slak the remaining pieces. Then the whole mass is mixed and filtered through a sieve.
To extinguish medium-slaking lime, lime is poured into the slaking box to a quarter of its height and filled with water to half the layer. When steam appears, they begin to stir the lime, simultaneously breaking up the pieces. Water is added in small portions to prevent the lime from drying out and burning out. After the release of steam stops, add water, mix everything thoroughly and after a while the milk of lime is poured through a sieve into a bowl or creative pit.
Slowly slaking lime is poured into the slaking box to a quarter of its height, moistened with a small amount of water and kept until cracks and other signs of slaking appear. After this, it is watered in small portions and mixed. After slaking, the lime is diluted with water to the consistency of lime milk, left for some time and drained through a sieve for storage. In the cold season, slowly slaking lime is poured with hot water to speed up slaking.
The remaining unslaked lime is placed separately and filled with water, leaving for a while. Part of it may be extinguished. It is recommended to keep slaked lime for at least a month before use: its quality improves the longer the lime dough is aged.
Cement mortar – the most durable, it hardens in air and water. Prepared from cement, sand and water. It is used for laying foundations in damp places or soils saturated with water, as well as pipes above the roof. The cement mortar sets quickly (start of setting - 45 minutes, end - no later than 12 hours). It is used no later than an hour from the moment of preparation; with longer periods it reduces its strength. The grade, or compressive strength of the mortar, varies and depends on the amount of constituent materials, as well as the grade of cement. The composition of the solution is from 1:1 to 1:6.
To prepare the solution, cement and sand are sifted through a sieve with 3X3 mm holes, measuring them in volumetric doses. The required amount of sand is poured in a thin layer and sprinkled with cement on top, mixed until completely homogeneous, and sometimes additionally sifted through a sieve. Water is poured into the dry mixture to the desired thickness.
Complex solution prepared from two binders and one filler: cement, lime and sand. They are used for laying foundations in damp soil and pipes above the roof. For one part of cement take from one to three parts of lime paste and from six to fifteen parts of sand.
The solution is prepared in two ways. A dry mixture is prepared from cement and sand, then the lime dough is diluted with water until the consistency of sour cream. These materials are pre-measured in precise volumetric doses. Add the prepared portion to the diluted lime dough cement mixture, mix everything thoroughly. To obtain a solution of the desired thickness, add water and mix again.
Another method: prepare a solution from a measured amount of sand and lime paste, pour a portion of cement into it and mix everything thoroughly. Cement can be pre-mixed with water until creamy. This mortar is more plastic than cement mortar, but it is lower in strength. It must be stored in such quantities that it can be used within an hour from the moment of preparation.
Heat-resistant concrete mixtures used for the manufacture of monolithic open fires or blocks for laying stoves and fireboxes. Cooking technology - like cement-sand mortar. The use of concrete, as a rule, requires the construction of formwork and keeping it in wet conditions for up to 28 days. Freshly laid concrete (in formwork) is covered with matting or shavings and moistened abundantly with water, especially during the first three to five days. Good results gives the use of polyethylene film for these purposes (steam effect).
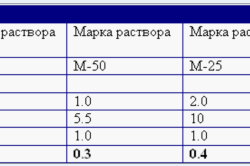
Compositions of heat-resistant (fire-resistant) concrete in volumetric parts:
For open fires
For fireboxes
 The first serial bioprinter was created
 Curiosity rover How to find a “face” on Mars
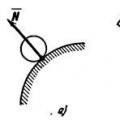 Technical mechanics of connections and their reactions free What types of connections are considered in statics