Opening in a non-load-bearing brick wall. How to make an opening in a brick wall
Making a doorway, its parameters, calculation and types, preparatory work, installation technology and design.
Contents of the article:
A doorway is an integral part of any interior or exterior building envelope. It is made both during the construction of the building frame and during the planning of its interior. Moreover, the shape of the opening, its size and decoration can be quite varied. In most cases, you can enter an apartment, room or house yourself. About this we'll talk in our material.
Doorway parameters
Calculation of openings is usually performed at the design stage of a house. An exception may be a small redevelopment of premises that does not affect load-bearing structures, for example, the production of plasterboard partitions with doors. The calculations take into account the dimensions of doorways, appearance and ways to strengthen them. Currently, despite the enormous popularity of non-standard design solutions, the basic parameters corresponding to the concepts of SNiP and GOST are still taken as a basis.
When calculating the opening, the following are primarily taken into account:
- Door height. In ordinary houses or apartments, its value is taken to be two meters with minor adjustments up or down.
- Width. Its standard values are 0.7-0.8 m. Entrance doors can have a width of 90 and 100 cm, doors to the toilet and bath are usually narrower - up to 70 cm.
- Strengthening the opening. This is a necessary measure, since in the area where it is located the wall partially loses its strength. Therefore, to redistribute the load from its overhanging part, the top of the opening is equipped with a jumper, which can have different shapes and material of manufacture.
Features of calculating the opening for a door
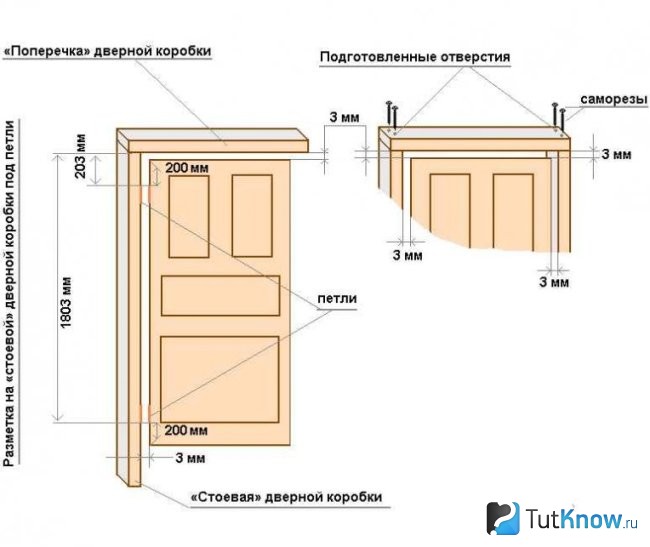
Before installing the doorway, you need to decide on its dimensions. When making calculations, it is important to know the dimensions of the door leaf and the thickness of its frame. Conventional sashes are manufactured according to GOST and have standard dimensions:
- Toilet and bath: the width of the door leaf here can be 600 mm and 500 mm, the height - 1900 or 2000 mm, the thickness of the door frame - 50-70 mm.
- Kitchen: canvas width - 700 mm, height - 2000 mm, box thickness - 70 mm.
- Living room: with a double-leaf door block design, its width is 1200 mm, height - 2000 mm, frame thickness - 70-200 mm.
- Interior: door leaf width - 800 mm, height - 2000 mm, frame thickness - 50-60 mm.
The width of the doorway can be determined by summing up the width of the door leaf, the double thickness of the side posts of the frame, the width of the technical seams and gaps along the rebates. You should be guided by the obtained value, taking into account the error of 10-20 mm. This will be the optimal opening width.
Its height should be calculated taking into account the absence or presence of a threshold. If you plan to install a door with a threshold, then you need to add 100 mm to the sash height, or 60 mm if there is no threshold.
For example: you need to determine the dimensions of a doorway for a leaf measuring 190x60 cm. First, calculate the width of the entrance: 60 + 3.5x2 (double the thickness of the post) + 0.2 (gaps along the hinges) + 0.4 (gaps along the lock) + 1x2 ( mounting seam gaps) = 60+7+0.2+0.4+2 = 69.6 cm.
The height of the opening with a threshold is calculated as follows: 190+3.5x2+0.3x2 (gaps along the vestibules) +1x2+10 = 190+7+0.6+2+10 = 209.6 cm. Without a threshold, the height of the opening will be as follows: 190+7+0.6+2+6 = 205.6 cm. As a result, we get: to install a door measuring 190x60 cm, you need an opening of 210x70 cm with a threshold or 206x70 cm without it.
The thickness of the side walls of the opening should be the same throughout their entire length. You should not make a doorway with a large margin in height and width, since the size of the platband does not always allow you to mask large gaps.
Main types of doorways
Before making a doorway, you need to choose its optimal type, suitable for the general style of the interior of a particular room. There are several types of openings that are worth paying attention to:
- Portal. This is a standard rectangular opening, but its width can be increased, depending on what doors you plan to install.
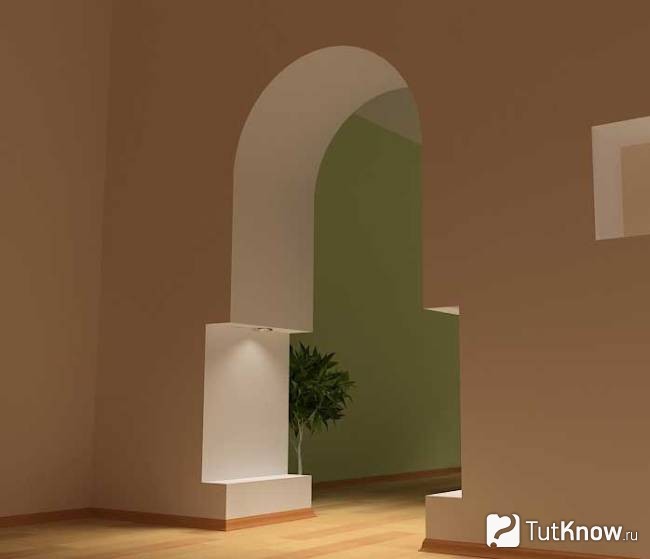
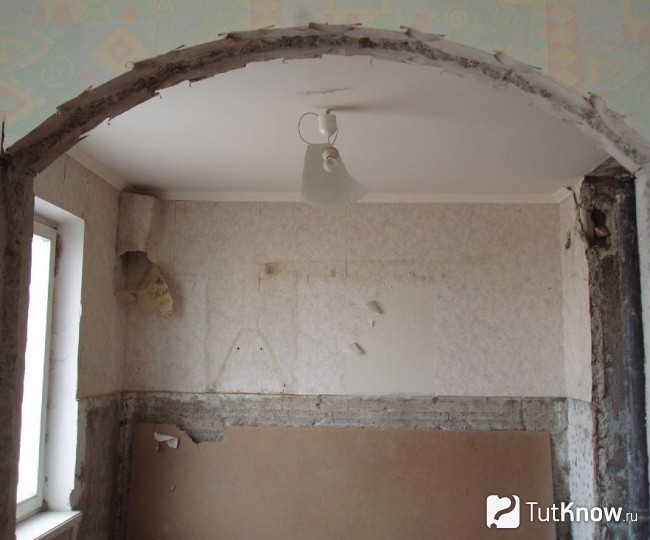
- Arch. This can be the same portal, the upper part of which is made in the form of an arc of regular or arbitrary shape. Another option: the arch originates from the surface of the base and closes on the straight side of the opening or continues to the floor line. Doors in arched openings are usually not installed.
Preparatory work before making the opening
In construction, any serious process begins with the production of a drawing. Therefore, before starting work, it is necessary to draw up a diagram of the wall, which will show the opening of the desired shape, indicating its dimensions, radii of curvature, if necessary, and linking the control points of the perimeter of the opening to the ceiling, corners or other basic structures.
A doorway can be made at the stage of construction of a wall or partition, or cut out in an existing structure during the redevelopment of premises. The second case is the most difficult, so today we will focus on it.
So, first of all, you need to know that the construction of doorways in the load-bearing walls of buildings without the appropriate permission is strictly prohibited. Therefore, before starting such “sabotage”, you need to fill out the necessary papers and obtain approval for redevelopment. Otherwise, the joy from the work done may best case scenario be overshadowed by a fine, and in the worst case, by the collapse of the ceiling.
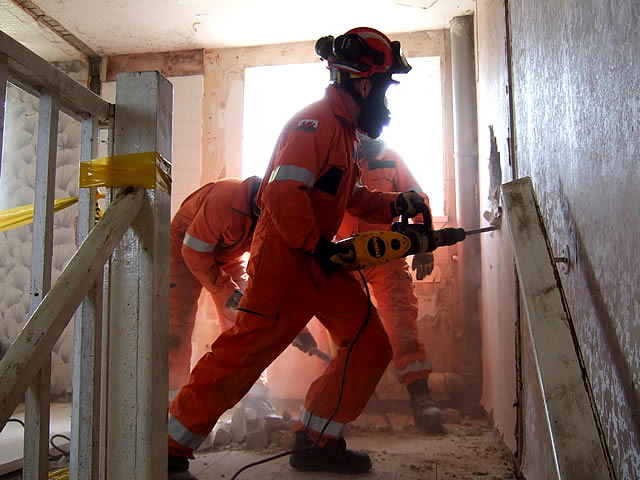
If such a problem does not exist, you should stock up on construction waste bags, overalls, work gloves, safety glasses, a respirator and a set of tools, which includes:
- Hammer or drill. They will be necessary for drilling the wall when marking the contour of the future doorway.
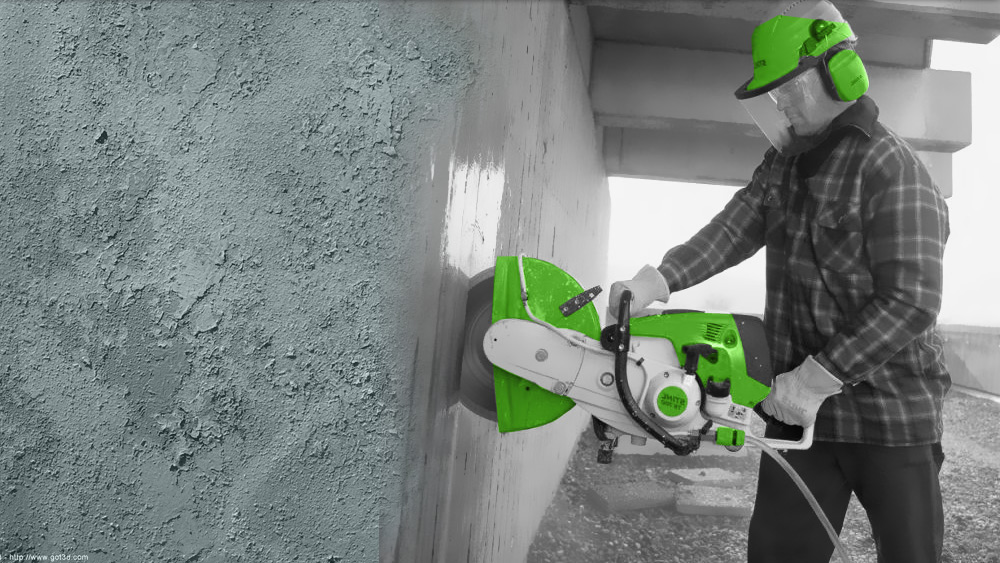
- Angle grinder “grinder” with cutting wheel for stone. It allows you to carefully cut openings in walls made of brick, concrete or wood. Cutting is done on both sides of the structure.
- Chisel. It is useful for cleaning the seams of brickwork.
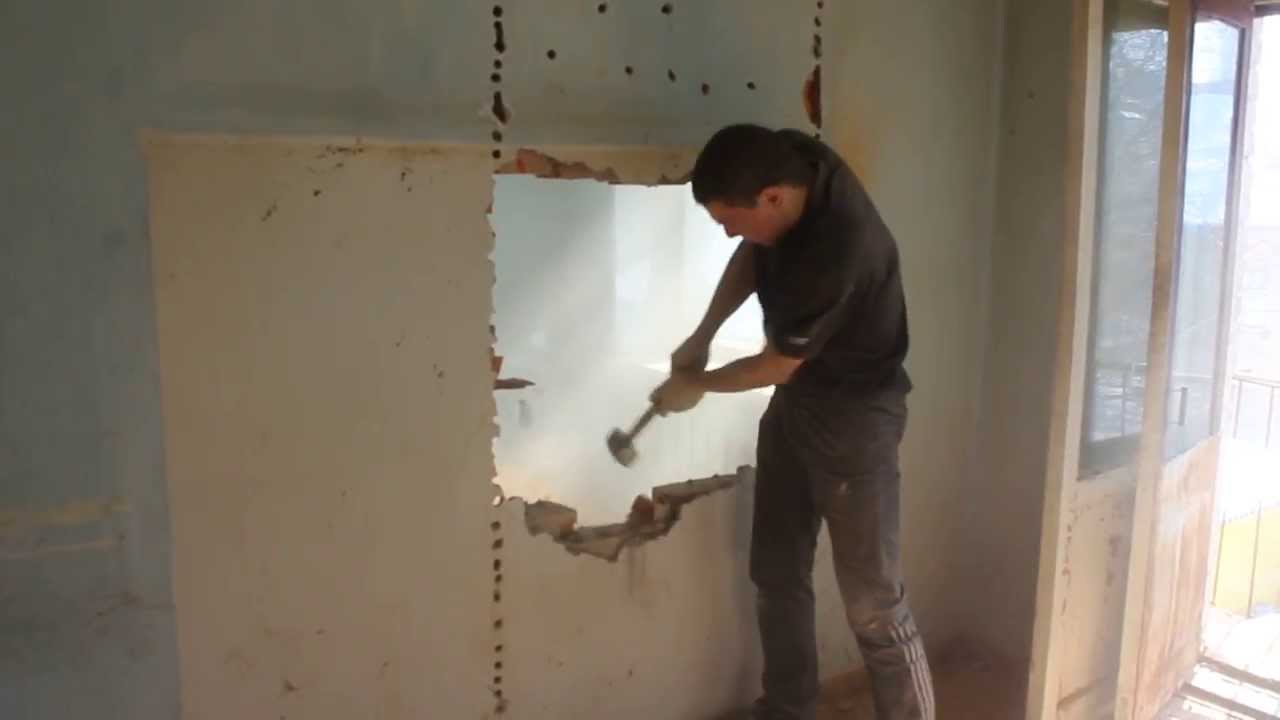
- Sledgehammer. This is the main tool designed to knock out wall material inside the cut contour of the opening.
- Diamond cutter. In fact, this is the same “grinder”, only enlarged. With its help, you can make an incision into a wall on one side to a depth of up to 40 cm. Advanced models are used in conjunction with an industrial vacuum cleaner, which, during operation, immediately removes construction dust into a built-in container with water.
Doorway installation technology
Let's consider the process of installing a door opening in walls made of different materials.
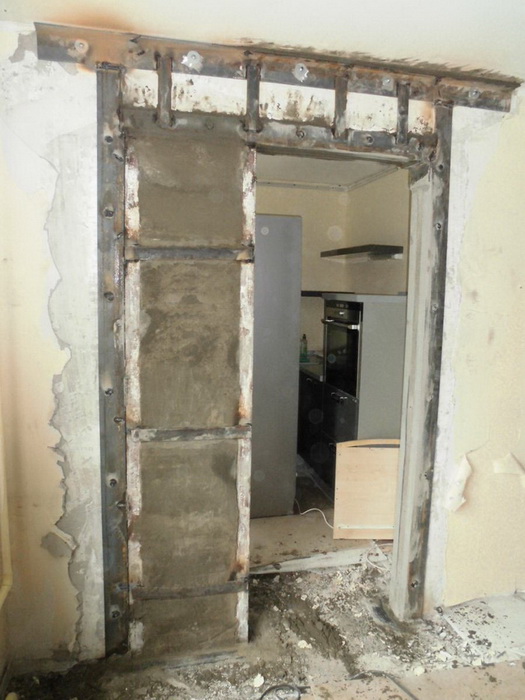
Making a doorway in a brick wall
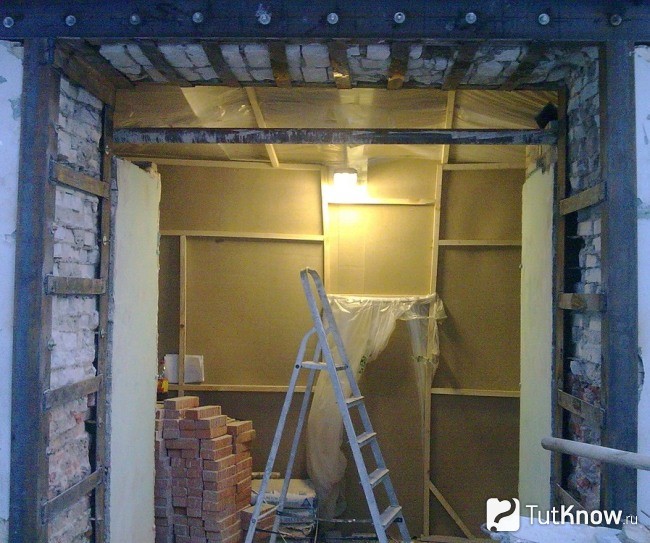
The peculiarity of this process is that the top line of the opening always coincides with the longitudinal seam of the masonry in this place, since cutting the brick along the spoon is unacceptable.
First, you should mark the outline of the opening on the wall according to the diagram. It is transferred to a life-size structure using a long rule ruler, a marker or a piece of chalk. At this stage, it is important to maintain the verticality of the side lines of the opening. Its desired height is determined taking into account the number of rows of masonry. If the top of the opening is in the middle of the bricks, it should be raised higher to the nearby seam.
After marking the contour in its two corners, you need to make through holes with a puncher. To do this, you will need a drill with a diameter of 12 mm and a length of at least the thickness of the wall. Such holes are necessary to mark the control points of the opening contour on the other side of the structure.
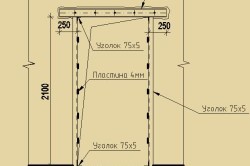
Then, above the top line of the future opening, a special fine should be cut, that is, a cavity for laying a lintel, which will hold the section of the wall above the opening, preventing it from collapsing after cutting the hole. The length of the cavity should be 1 m greater than the width of the opening. This will ensure reliable support for the lintel on the sides of the rectangular hole in the wall.
The jumper can be made from two channels. Before installing each of them, matching holes should be made in the profiles to secure them together. The hole pitch is 300 mm.
After this, one of the profiles must be fixed in the wall cavity with a solution, and the partition must be drilled through its holes. Then, on the other side of the structure, you should cut a similar groove, install a second channel in it, and then tighten both profiles through the holes with pins.
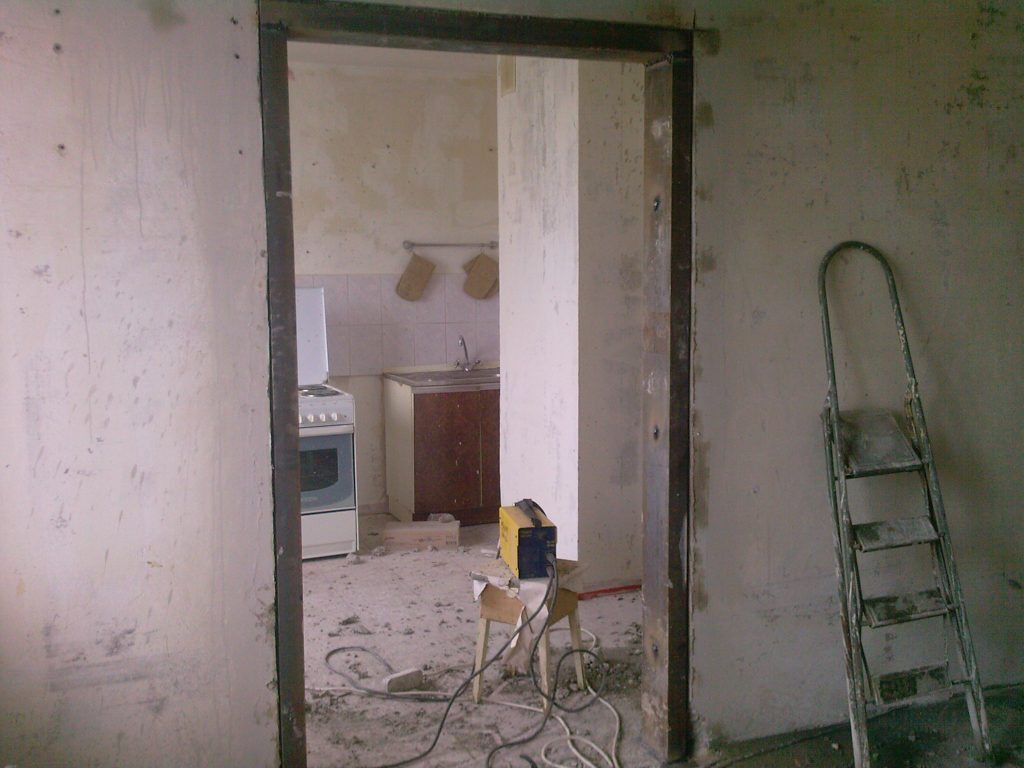
Once the lintel is in place, you can cut out the doorway. It is best to use a diamond cutter with an industrial vacuum cleaner for this. Work can only be done on one side of the wall, since the diameter of its disk is quite sufficient to make deep cuts.
After weakening the wall, excess material inside the opening contour should be knocked out with a sledgehammer, and then the debris should be collected in bags. When dismantling the masonry, some bricks will probably remain intact. They should not be thrown away - after cleaning the solution they can be useful around the house.
Making an opening for a door in a concrete panel
This process has fewer restrictions on the designation of opening lines and has a similar operating algorithm: drawing a contour, installing a lintel, cutting a hole, removing excess material from it.
Unlike a brick wall, where the unnecessary part of the masonry can be broken with a sledgehammer, a concrete structure is not so malleable. Therefore, here you will have to divide the outline of the opening into squares and remove excess wall fragments in parts using a cutting tool and a hammer drill. Work on installing the doorway must be carried out along the marking lines inside its contour. Some parts will be easy to remove; others will require cutting the wall reinforcement to remove.
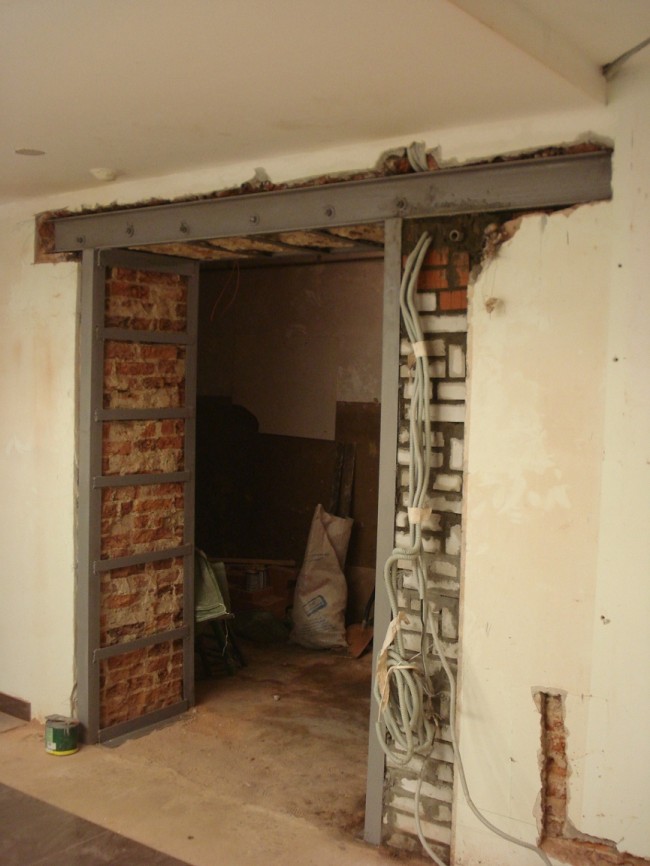
After cutting an opening in concrete or brick wall it needs to be strengthened. The jumper channels should be connected by welding using metal strips. Such fastening is carried out every 200 mm along the length of the lintel.
The sides of the opening need to be reinforced with metal corners. Their upper ends are connected by welding to the profiles of the horizontal part of the opening. In addition, the corners framing the corners of the hole are connected in pairs with plates and pulled together with pins along pre-prepared holes. If the wall is load-bearing, then the opening in it is additionally reinforced with a lower lintel, which must be welded to the side posts.
Making an opening in a plasterboard partition
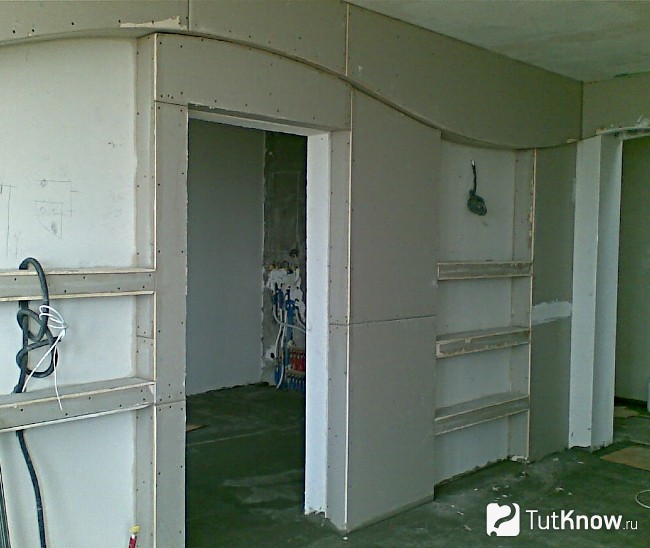
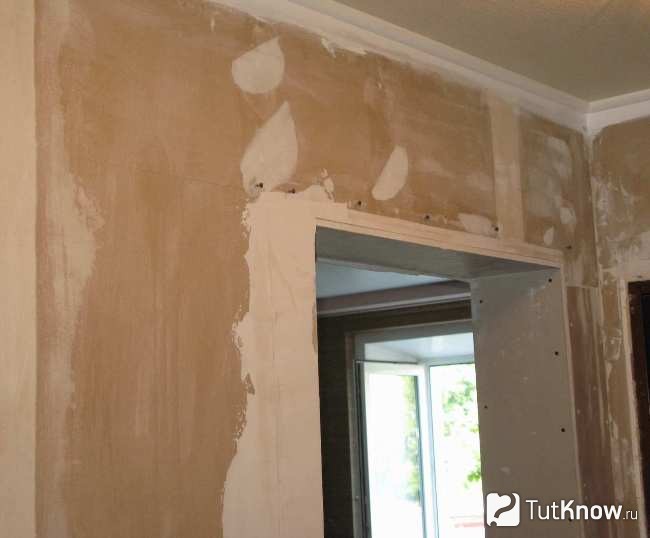
A doorway in a plasterboard partition is formed at the stage of manufacturing its frame. The design of such a wall consists of guides and rack aluminum profiles, soundproofing filler and outer cladding in 1-2 layers of gypsum plasterboard.
Guide profiles are attached to the ceiling and floor of the room, marking the contour of the wall. Rack profiles are installed vertically in the guides and serve to provide structural rigidity and the basis for fastening the sheathing. Two such profiles form a doorway at the selected location of the partition.
After installing them, taking into account the width of the door leaf, you need to make a horizontal upper part of the opening. To do this, use metal scissors to cut a piece from the waste rack profile, the length of which will correspond to the width of the opening. In addition, you will need a couple of short 10 cm sections of the stand, which need to be connected into the letter “P” with a transverse profile.
Then this element must be rotated 180 degrees and fixed with screws to the posts as the horizontal top crossbar of the opening. The rigidity of the side posts can be increased by inserting a wooden beam into them. In this way the doorway will be formed. It will take on its final appearance after covering the partition frame with plasterboard sheets.
Subtleties of doorway design
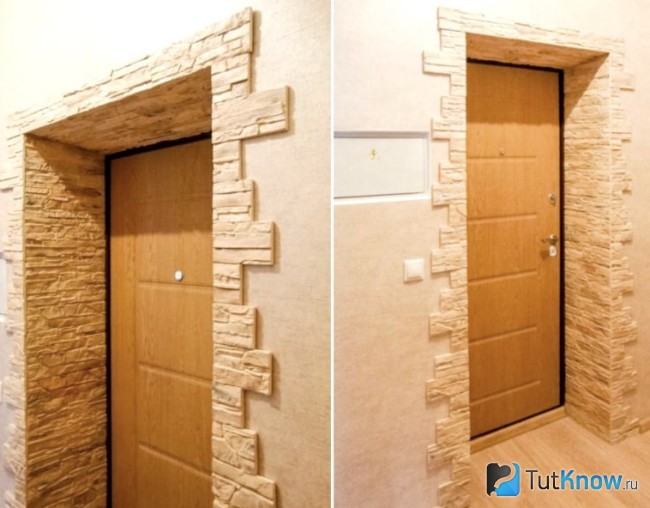
To decorate a homemade doorway, you can use various materials, which can properly emphasize the style of the interior. Most often used:
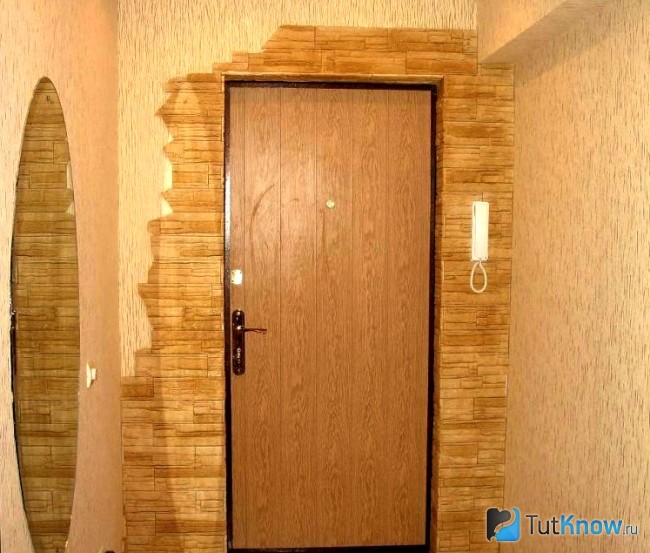
- Artificial and natural stone . They look great framed by an opening of impressive size. If you choose the right color scheme and type of stone cladding, you can create the visually intriguing effect of an opening cut into the rock.
- Natural wood. Decorating doorways with valuable species gives the interiors sophistication and luxury. The pleasure is expensive, but it's worth it.
- Decorative plaster. She has mass useful properties. The material is durable and environmentally friendly, can have a varied relief surface and be painted in any color. This plaster strengthens the doorway slopes, fills voids on their surface and has a presentable appearance.
- Drywall. It is one of the most practical materials used in the design of doorways. With its help, the entrance to the room can be given almost any shape: straight, curved, arched, oval, etc. Elements cut from plasterboard sheets are attached to the opening using a metal frame or glue. They can be painted in any color and serve as the basis for installing LED lighting. In addition, wallpaper, tiles and decorative plaster can be applied to plasterboard sheets.
How to make a doorway - watch the video:
In addition to the above materials, doorways are often decorated, depending on the style of the interior, with columns, stained glass or simply curtains with beautiful patterns. Good luck!
To achieve a visual expansion of the apartment area, designers use a popular technique by creating an additional passage. Anyone who is familiar with the technical rules and has construction skills can do it on their own in the wall.
Why and how is a doorway made?
In some apartments, redevelopment is done to create free space, which includes:
- moving the door;
- window expansion;
- enlargement of the arched passage.
How to make a doorway without catastrophic consequences? This question worries owners of their own apartments. The answer is the same. It is necessary to know construction technology and have construction experience.
If you make a passage without complying with regulatory requirements, you can destroy both the wall and the house.
Strengthening the passage to load-bearing wall
What to pay attention to
The cost of creating a passage depends on the contractor. If you do this kind of work yourself, you can save a lot of money, but you will have to be responsible for the wrong actions yourself. You should think about your choice so that you don’t regret it later.
Gather complete information before starting work. Find out how to make an opening in a wall. Several factors must be taken into account:
- wall material;
- opening width;
- number of storeys of the building;
- cracks;
- bends;
- potholes.
It is necessary to find out how the ceilings are located and what type they are. Such information will be needed to calculate the strengthening of the passage, if for this it was necessary to dismantle the load-bearing wall. The opening must have reliable lintels to prevent the building from collapsing. A suitable material for this is a steel channel.
 Removing the wall under the doorway
 If the wall is made of brick
How to make an opening in a brick wall to avoid catastrophic consequences? According to the technology, you first need to remove a couple of bricks from the masonry. Before starting to dismantle a large area, a jumper is first installed that will hold the wall. The thickness of this reinforcing structure is 12 cm.
If you need to cut a hole above the passage to install a lintel, grooves with a depth equal to the width of the corner are made above the ceiling of the future opening. The length of the groove is greater than the width of the opening. The calculation is based on the length of one brick.
To obtain a reliable fastening, the inserted corners must be well secured. Gaps are made in the corner and the wall, where fastening bolts are inserted to tie the corner.
 Strengthening an opening in a brick wall
 How to work with a concrete wall?
When the brick is removed, the corners are fastened together with steel strips welded to the shelves. After this, the fasteners are removed. Reinforcement of the vertical is done using channels welded to the lintel, which creates one structure.
You can move a doorway in a brick wall using the technology described above. It is necessary to follow the sequence of operations and install reinforcing jumpers in advance.
This kind of work takes a lot of time. It won't be possible to do everything quickly. Unlike a brick wall, a doorway is cut out here without installing lintels. The concrete panel is made monolithic, so it does not require additional support.
When the passage is dismantled, reinforcement is made. A channel is selected according to the thickness of the opening, which serves as a frame for the top crossbar. It will support the vertical walls of the opening.
 Concrete cutting
 Working with reinforced concrete wall
Concrete walls are made load-bearing. Therefore, how to make an opening in such a reinforced concrete wall so as not to destroy the building is indicated in regulatory documents. It is important to make the correct calculation of the reinforcing frame. It is better not to do such work yourself to avoid unpleasant consequences.
Similar changes in load-bearing structure require special permission. It is necessary to submit a work plan and drawings of the future redevelopment of the premises. Even the smallest nuances are taken into account in the documents. Only in this case can you count on approval of the work by the architectural organization. After receiving permission, you can begin work.
First, the future passage is marked. Moreover, it should be done on both sides of the wall. To ensure that the lines coincide, grooves are drilled in the corners of the wall and, starting from them, marking lines are drawn. Then holes are drilled around the perimeter of the opening, in increments of 30 mm.
For processing concrete walls, it is advisable to have diamond saws. They handle concrete surfaces easily. Without them, such work will take a lot of time and become labor-intensive.
The opening is framed in the broken wall. For this, a metal channel is used. You can install corners that are pre-welded to each other.
 Channel reinforcement of the opening
 Installing a doorway in a new location
It is easier to move the doorway if it is on an interior wall. It is not load-bearing, so every apartment owner knows how to move a doorway. You can do without complex calculations and carry out dismantling without fear that the integrity of the building will be damaged.
The ceiling is made from a variety of materials:
- bricks;
- drywall;
- concrete.
Making a passage in such a wall is easy. You can cut it out, or you can knock it out.
Before starting work, markings are made. The outlines of the opening are drawn on the wall. Moreover, it is necessary to take into account the dimensions of the door frame. Therefore, the contour should have a few centimeters of margin. This will help you install the door easily in the future.
To cut the opening, you will need a grinder and a diamond blade. Just don’t try to cut out the entire opening at once. Divide the area into several fragments, cutting each one in turn.
You can also knock out the opening with a heavy sledgehammer. But before starting work, perforate the wall in 5 cm increments. The wall will break only along the borders.
 Doorway shift
 In case of low strength of the material, the opening must be reinforced with a lintel. If this is not done, it may collapse. The jumper material can be:
- wooden beam;
- metal corner;
- channel.
To get started, you must first make a gap into which to insert the jumper and secure it. She will prevent the wall from collapsing.
Fill the old opening with bricks. Sometimes this unnecessary passage is framed and sheathed with plasterboard. Free space is filled mineral wool. This results in an excellent level of sound isolation.
Remember that a passage in a load-bearing wall cannot be made without the appropriate permission. It is better to invite professionals to perform such work. They will make the necessary calculations and do the work quickly and efficiently.
You can learn how they are made from the video presented.
Despite the well-known saying that says “breaking is not building,” you need to think carefully about the question of whether there is an opening in a brick wall. In principle, anyone can knock bricks out of masonry, but there are a number of rules that must be followed before and after making an opening. You don’t want a crack to form on the wall over time or for the top masonry to jam against the door frame.
What type of masonry is there?
Before we tell you about the masonry methods (and this is necessary, since the further principle of your actions depends on them), we must explain the structure of the brick itself. It has 3 sides. The flat surface with the largest area is called the “bed”. The side of the bed, which has the same length, is the “spoon”, and the end of the brick is the “poke”.
Opening in load-bearing wall with brickwork
The best option for a crossbar for an opening in a load-bearing wall would be a double-sided channel. In addition, you will need vertical posts, which can be 50*50 mm corners or a 20*40 mm profile pipe. Such racks will require a metal strip.
First make, then make cuts along them, using the same grinder. Get ready to sweat a fair bit, because if you have a well masonry, and this is probably what it is, then you will have to, the thickness of which reaches 2-3 bricks on both sides of the “well”. Knock out only the part of the wall at the top so that you can install the transom. Then insert the channel on at least one side, and install a corner or profile pipe under it.
IMPORTANT! Only after you have installed one side of the channel with a vertical post can you continue to knock the brickwork out of the wall.
Negligence in this matter can lead to injuries to people working at the site, even fatal consequences.
- Try to first knock out where the jumper will be, then install the crossbar there and fill it with cement mortar. It will take about a week, or even two, to cement mortar finally fixed the crossbar. After this, it will be possible to remove the remaining brickwork and finish the opening.
- In the case of spoon masonry, the halves of bricks that interfere with installing the door in the doorway must be knocked out with a hammer drill. Operate this so that the hammer drill attachment is perpendicular to the wall. It is forbidden to enter the doorway and knock out the halves with a hammer drill, directing the shock wave from top to bottom. This can lead to bad consequences (the crossbar may not withstand such a load).
- Bricks, the halves of which stick out in the doorway, can be knocked out completely. But before installing the door, do not forget to pour half bricks into the wall, the sides.
- These same halves can be cut using a grinder on both sides.
Conclusion
We tried to tell you in detail how to cut an opening in a brick wall. If you still have any questions, ask them in the comments to this article.
Everyone has their own reasons for “reformatting” their home - adding to the family, arranging a separate, additional room for an office, installing an arch or something else. As a rule, redevelopment does not cause any particular difficulties for owners; There are techniques that have been developed over the years. Another thing is an opening in a load-bearing wall. It is a loaded element of the building structure, and in in this case The owner's desire alone is clearly not enough.
General information
The owner of a private building decides independently whether to cut through the wall or not. He does not need to coordinate this issue with the supervisory authorities. But responsibility for negative consequences will fall entirely on his shoulders. If redevelopment is done in an apartment, then permission must be obtained. An opening in a load-bearing wall, constructed incorrectly, in violation of all norms and regulations, can lead to the appearance of cracks along the entire height of the building, displacement of floors, and the like. And it is unlikely that the matter will be limited to administrative penalties.
Any approval by the authorities is a long procedure; sometimes the issue takes months to resolve. This time can be spent rationally if you evaluate, check and analyze something. Perhaps the problem will disappear automatically, since quite often the opening where you want is impossible in principle or is technically extremely difficult. Which means it’s inappropriate.
What to consider:
- Degree of deterioration of the building.
- Wall material and thickness.
- The number of floors of the house and the level on which the dwelling is located. The maximum load is on the walls of the lower floors. For this reason, for such apartments, even if cutting an opening is allowed, its dimensions are limited.
- Whether it will be necessary to reinforce the wall in this place, by what method, with what - this question must be clarified in advance.
- Layout of the room and the distance of the opening from external wall. And there is a limitation on this point. If the interval is less than 1 m, then work cannot be carried out, otherwise the interior partition may be damaged. This is mainly typical for a brick house.
- Opening geometry. Simply put, what exactly do you want to do. Basically, 2 options are implemented: a simple passage (rectangular) or an arched one. If the opening only needs to be shifted without changing its geometry, then everything is much simpler; partial expansion on one side and sealing on the other.
Conclusion - before running through authorities, coordinating various papers, paying for an audit, and the like, you should consult with a professional. Perhaps it is impossible to make an opening in this particular room.
Operating procedure
The legal side of the issue is a separate topic. From a practical point of view, something more interesting is how a passage is cut in the wall depending on its material.
Preparation stage
Home redevelopment begins with this.
- Drawing up a diagram. It is advisable to inquire whether openings were made in the apartments on the floor below/above. It is optimal if they are located equally. By the way, this will make obtaining permission somewhat easier. During the design process, the parameters of the door are also taken into account, and therefore the appropriate model should be looked at in advance. Otherwise, you will have to further expand/narrow the opening, and this is extra work.
- Cleaning the base. Before you start cutting through the wall, you need to assess its condition. If signs of rot are visible, then you will have to do treatment, impregnation with special agents. In addition, it will become clear what will be needed during the work. Making an opening in a load-bearing wall with only a set of household tools at hand will definitely not work.
You should not use an impact-type electric tool (jackhammer, hammer drill with this function). His work initiates the appearance of cracks in the wall, and where they can “go” is unknown. And this means a decrease in the strength of the structure. To cut a passage in a residential building, the only acceptable option is cutting the material with a “grinder” (with a diamond blade).
- Surface marking. This is necessary in order to obtain the correct geometry of the opening, without bevels or curvatures of its end parts. This is especially true for thick walls; It is in this case that significant errors are inevitable, since you will have to cut into the material alternately from both sides.
After drawing the contour along its perimeter, maintaining the exact direction of the cutting tool (perpendicular to the base), through holes are drilled (at what distance is decided on the spot). Focusing on them, with reverse side a similar outline is drawn on the wall.
Arrangement of the opening
- Installation of supports. The feasibility of this is determined by local specifics. But logs (sleepers, beams) installed vertically in the area of the working area relieve the wall, and the load on it is reduced.
- Floor covering protection. Dust is not as bad as heavy fragments. When making a doorway in a panel house, you need to be prepared for large pieces of concrete with protruding reinforcement to fall off. Therefore, plastic film will not save the floor. It is advisable to cover it with rubber strips, thick fabric, etc. Chipboard slabs/sheets, plywood, boards will do.
- Removing material. At the first stage, you should mark the contour with an insert of a disk on both sides of the opening. After that, break it into segments and cut them out one by one. If we are talking about masonry, then it is even simpler - it is dismantled in rows.
- Processing the opening. In any case, the wall in this place must be strengthened. Therefore, it is necessary to give the passage the correct geometry. If there is little work in a brick building, then in relation to a panel house its volume increases. You will have to cut off all protruding pieces of reinforcing bar and concrete the damaged areas. The result should be a rectangle of the calculated width and height.
- Strengthening the passage. The technique is selected depending on the wall material.
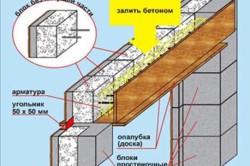
- Brick. In this case, a channel is sufficient. In the upper part of the opening, small niches are arranged on both sides, where the metal blank is placed. To ensure the reliability of the stop, its edges must extend into the masonry by at least 25 cm. It is somewhat more difficult with a thick wall. To strengthen it, you will need 2 channels installed on both sides of the opening. They are tightened with through studs, onto the ends of which bolts are screwed. The cavities formed in the wall are filled with solution.
- Concrete products For concrete, a horizontal lintel alone is clearly not enough. To really strengthen the load-bearing wall, a U-shaped frame is installed in the opening. It can be made in advance (according to the dimensions of the door block) or welded during operation from strip (thick) iron, I-beam, channel. This design is fixed with anchors; Reliability cannot be achieved simply by “landing” on the solution.
If the opening is large enough, then its additional reinforcement can be made in the form of supports for the floor, stylized as columns. Easiest to use steel pipes large section. There are enough options for decorating them, and the services of a specialist are not needed.
Even at the stage of preparation for marking the wall, it is necessary to clarify exactly how the in-house electrical wiring is organized in this area. Moreover, if it was not the owner who was doing it, but someone else. The simplest method is to use cell phone in "FM" mode. By moving it along the surface of the wall, it is easy to determine the wiring layout based on the noise level.
To increase the strength of structural elements (pipes, channels), it is advisable to perform injection. That is, introduce a solution of good fluidity into the cavity. After hardening, it will not only improve the strength of the samples, but also increase the reliability of their bonding to the base material.
In principle, making an opening in the wall is not difficult. The technology is quite simple and can be done by a home craftsman. But only subject to proper calculations and the right choice tools and materials. Therefore, it is at the preparation stage that special attention should be paid. Everything else is a matter of time.
- Preparatory work
- Punching an opening in a load-bearing wall
- Dismantling walls that do not bear loads
- Narrow opening device
In some cases, when remodeling rooms, you may be faced with the need to install additional windows and doors. In this regard, you will need to make an opening in the wall.
To add another window or door to your home, you will have to make an opening in the brick wall.
Although this procedure is quite complex and not very safe, it can be done with your own hands.
Preparatory work
Before drilling a hole in a brick wall, you need to make sure that there are no electrical wires, fittings or pipes in it. A metal detector is used for this. If there is electrical wiring in the wall, it must be carefully placed in another place. If there is a chimney, then the distance to the opening should exceed 3 m.
You should immediately decide in which wall the opening will be made. There are two main types:
- load-bearing wall;
- a wall that bears no load.
A wall that is not load-bearing can only be identified when it is divided by a partition. Or if it is indicated in the building design.
In other cases, such a wall is considered load-bearing.
As for the load-bearing wall, there is a nuance here too. Many people are mistaken when they claim that if there is another wall above the wall, then it is load-bearing. After all, load distribution can occur through beams or lintels that rest on a load-bearing wall.
When creating an opening for a door, special attention is paid to the size of the hole. It should not exceed 2 m in width and 2.1 m in height. The hole is made in the middle part of the wall. This ensures uniform distribution of loads.
To carry out dismantling works The following materials and tools will be required:
- wooden beam;
- baked brick;
- concrete solution;
- boards;
- corner;
- perforator;
- Bulgarian;
- chisel;
- hammer;
- capacity;
- trowel;
- jumper;
- bolts;
- safety glasses.
Return to contents
Punching an opening in a load-bearing wall
This process involves strengthening the floors using support elements called shoes. The timber is mounted on thick boards. The result is load-bearing beams that rest against the shoes.
When creating a wide opening, load-bearing beams should be laid on both sides of the opening along the walls. This is done before installing the supporting structures. This is the only way to achieve normal movement of the jumpers. The ideal basis for strengthening the floor is a concrete surface. The load-bearing elements of the floor, which rest on the wall, are supported for some time.

Punching an opening in brickwork is carried out in the following sequence. First, a groove is cut into the wall. A lintel is placed in it and covered with concrete mortar. The next fence is installed after the solution has set.
If there is fragile masonry, then vertical strips should be punched. Moreover, this procedure is carried out on both sides. The old masonry is connected to new slopes, which are created using baked bricks.
Before installing the slopes, bricks and old wall You need to moisten it a little with water. To attach new bricks to old masonry, the tenon ligation method is used, up to 5 rows of bricks high. The length of the masonry is 0.3-0.45 m.
After installing the lintels and making an opening in the wall, all loose bricks are strengthened with cement mortar.
All edge elements of the structure are aligned. They should be at right angles to the wall surface. The edges are flush with the applied plaster.
If a doorway is created, then plugs must be installed before leveling the slopes. Punching of strong masonry is carried out without the procedure of strengthening the old masonry. Only the holes intended for the supporting structure are punched.
Reinforcement of a doorway in a load-bearing wall is carried out using corners. They are fastened in two places: inside and outside the opening. To do this, a horizontal opening is created in which the corners are placed and tightened with bolts.
Return to contents
Dismantling walls that do not bear loads
This process begins at the top of the wall with a gradual transition to dismantling the bricks located near the floor.

This technology reduces the likelihood of wall collapse. If it is necessary to make a hole near the ceiling, then marking work must be carried out.
Removing the top row of the wall is done using a hammer and chisel. The chisel must be positioned strictly perpendicular to the bricks being knocked out. When removing the next rows, it is necessary to take into account that some bricks may lie without rigid adhesion to each other. This is how a hole is made for the window.
When arranging a doorway, it is necessary to provide for the presence of jumpers, with the help of which the load is distributed on both sides of the wall. When marking the hole, you should take into account the gap of 30 mm, which is located between the wall and the door frame.
Marks are made on the wall where the lintel will be located. The extreme points of this fence are located at a distance of 20-25 cm from the doorway. A hole is made for the jumper. If the wall is too wide, then it is better to lay and concrete two lintels. The hole between the lintel and the wall is also filled with concrete. If there is a risk of bricks collapsing, the wall must be completely dismantled and new masonry made over the lintel.
 Why do you dream about a dead person?
 Dream Interpretation: Why do you dream about your own, step-, or someone else’s older or younger sister?
 Grapevine interpretation of the dream book