4 ways to level walls for interior decoration
It will quickly lose its original appearance, and you will have to do it again. To save time and money, it is better to immediately properly level the walls. Which method of leveling walls is better to choose and how to carry out all the work?
Assessment of wall surface roughness
All methods of leveling walls are divided into two fundamentally different groups:
One way or another choose, taking into account the degree of unevenness of the walls, so this stage is especially important. You can measure how uneven the walls are laser level or regular building level.
Sequence of work looks like this:
- preparation of the wall surface. In order for the leveling mixture to stick, the wall must be properly treated. First, all remnants of the old coating are removed, then priming is carried out for better adhesion to the plaster layer. For cement compositions, use a primer made from mortar and water, the so-called cement laitance; for gypsum plaster, it is better to use a special one;

- if the plaster layer is more than 2 cm, then at this stage it is better to use reinforcing plaster mesh, which will not allow the composition to crumble. It is worth noting that if you use a ready-made factory plaster mixture, then you should pay attention to the composition: some manufacturers use polymer additives that increase the strength and degree of adhesion of the solution so much that a mesh may not be needed;

 installation of beacons. Wooden slats or a perforated metal profile are used as beacons, which become a guideline for creating a flat surface. The latter will be more convenient for beginners, since such beacons will not have to be removed after the plaster layer has slightly hardened and then the recesses will be masked. First, two beacons are mounted at opposite ends of the wall, and the beacons are secured with gypsum mortar of the required height until ideal verticality is achieved. Three cords are pulled between the two resulting beacons: at the top, in the middle of the wall and at the bottom, and already focusing on them, intermediate beacons are installed so that they lightly touch the cord. The step between the beacons depends on the size of the tool that will be used to level the plaster mixture (usually a rule is used for this). In any case, the distance between the beacons should be 20 cm less than the length of the instrument;
 You can find a wide variety in construction stores. At the construction site, all that remains is to properly prepare the solution, following the instructions. You can prepare a cement plaster solution yourself: mix cement and sand in a ratio of 1:6, then add water to a creamy consistency. Some experts recommend sticking to a component ratio of 1:2 or 1:3; the finished mixture is more plastic, and therefore easier to handle. The finished solution is used for 1-2 hours until it begins to harden;
 applying plaster. To do this, you can use a “falcon” and a trowel. The first is to take the mixture from a container, the second is to throw it on the wall in excess. The use of a “falcon”, a tool similar to a trowel, but larger in size, allows you to increase the speed of work. Now, as a rule, you need to evenly distribute the solution from bottom to top, leaning on the beacons. If the leveling layer is thick, then you can first apply a rough outline of the plaster, and after it dries, apply the main layer with leveling along the beacons. If wooden slats were used as the latter, then when the solution dries a little, they need to be carefully removed, the cavities filled with plaster and leveled with a spatula;
 After the plaster dries, we obtain a smooth but rough surface. To make it smooth, you need to apply thin layer of putty, and then sand the surface with fine sandpaper.
The main advantage of this leveling method is to maximize the preservation of the usable area of the room. The disadvantages are the labor-intensive process, the need to prepare the base and the presence of a large amount of dust.
No. 2. Leveling walls with putty
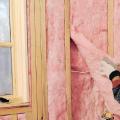
However, do not forget that this method of leveling walls will take up a lot of usable space, and if it is already in short supply, then the room risks turning into a hole. Walls covered with plasterboard sheets will be able to withstand less load than those lined with plaster. If we are talking about a room with high humidity, then you should use moisture-resistant plasterboard sheets.
Sequence of work:
 frame construction. It may consist of a metal profile. The timber does not allow achieving the desired durability of the frame, it is susceptible to the influence of moisture and microorganisms, therefore in most cases today they are used guide and rack metal profile.
The first two profiles are attached to the floor and ceiling.
Using a level, draw a straight line on the floor at a distance of 5-6 cm from the wall (more is possible if the curvature is large or you need to hide communications).
Using a vertical plumb line, the line is transferred to the ceiling.
Guide profiles are fastened along the resulting lines with self-tapping screws, constantly checking the evenness of their level using a plumb line. Between them, perpendicular to them, supporting profiles are attached along the wall using. The distance between them is 40-60 cm for plasterboard sheets 120 cm wide;
 Construction materials and list of works
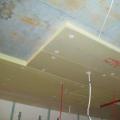 Proper insulation of a wooden ceiling in a private house
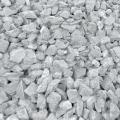 What types of crushed stone are there?