How to make an extension from aerated block - I share my experience
Just like a house, you also need to make a foundation for an extension. That's why:
- I am marking the base of the extension. I mark the base using wooden pegs and cord. I check the correctness of the angles by comparing the sizes of the diagonals.
- I start digging a trench for the base of the extension. I start counting the depth of the pit from the lowest point of the ground.
- Next, I make a pillow for the base of the extension. Sand and crushed stone are poured to a height of approximately 15-20 cm and compacted thoroughly.

- I make formwork from wooden boards; thick plywood may also work. Formwork is done along the entire perimeter of the foundation. After formwork, I begin to make reinforcement from reinforcing bars.
- I fill the pit with concrete. I do this in stages, approximately 20 cm of concrete per stage. The higher the base is made, the more layers there should be.
- Once the concrete pouring is completed, I make several punctures in the foundation so that air can enter from it.

Features of laying the base of the extension
A special feature of laying the base of the extension is the connection of the new foundation with the old one, with the base of the house. My house stands on a strip foundation, therefore, under aerated concrete extensions, we lay a strip foundation. Despite the fact that the walls will be made of gas blocks and lighter in weight.
- In the old base I drill holes with a diameter slightly larger than the reinforcing bars that are planned to be used for the tie.
- The depth to which the holes need to be drilled is (ø reinforcement 12mm × 35 = 420 mm). Length of reinforcement drilling depth × 2 = 840 mm.

- I determine how many rods of a new foundation are needed: 5 reinforcement rods per quarter of one meter square of the foundation wall.
- I hammer the rods into the holes and weld nuts onto the free end. During the work, this end will be filled with concrete in the new foundation and will provide a strong bond.

Next, I begin the construction of the reinforcing frame for the base of the extension to the house made of aerated concrete. For this I will need reinforcement bars (ø 12 mm) and a welding machine. Next, I make a sheathing of boards and begin to fill the foundation with concrete.
- Cement – 1 part M-300.
- Clean sand - 1.9 parts.
- Average crushed stone – 3.7 parts. Instead of crushed stone, you can use washed gravel.
Cement consumption is 320 kg per 1 cubic meter.
The base is filled with concrete mortar for an aerated concrete extension to a wooden house. I let it sit for about 20 days.

My extension has the following parameters:
- Base perimeter = 30 meters
- Foundation depth = 1.6 meters.
- The height of the foundation in the above-ground part, that is, above ground level = 0.4 meters.
- Width = 0.6 meters.
- Concrete grade M-300

For work I needed:
- Concrete = 36 cubic meters.
- Cement = 11520 kg.
- Sand = 21 tons.
- Crushed stone = about 40 tons.
- Reinforcing bars 600 meters
- Boards for formwork (with a thickness of 25 mm) = 6.6 cubic meters.
Cost of materials:
- Cement M-300 (50 kg) = 220-240 rubles.
- Sand (1 ton) = 800 rubles.
- Crushed stone (1 ton) = 870 rubles.
- Reinforcement (1m) = 25 rubles.

- I had prepared reinforcement bars 30 cm long in advance.
- Then, every two or three rows of brickwork of the old building, I made holes with a hammer drill into which I inserted these rods for the aerated concrete extension to the brick house. The depth of these holes should be half a brick.
- I started laying new walls from the corners.

For better adhesion of the blocks to the solution, the lower part of the block was moistened with water. To prevent further collection of capillary moisture. On the first layer of masonry, a waterproofing compound was laid in two balls. I strictly ensured that it was perfectly level both horizontally and vertically.
Errors were leveled using concrete mortar. The thickness of the solution between the rows is approximately 2 mm.

Now I need to make a reinforced belt:
- I make it on the wall itself.
- I make a wooden template and lay out the required size reinforcing bars.
- I weld these rods together.
- I align horizontally, as well as along the axes.
- I cover it with blocks cut to size.

The reinforcement of the base of the extension is laid at the bottom of the foundation, but so that it does not touch the ground itself. To prevent further corrosion. It must be filled completely with a monolith.
To make a distance of 2 mm when laying walls, you need to use a special adhesive solution for laying.
With the extension parameters specified above, the extension to the house is made of aerated concrete. I did the math: I have one front door + one window. I added the thickness of the masonry + the thickness of the mortar. And with the size of aerated concrete blocks 19*29*59. I needed 1002 pcs. blocks.

When digging a pit, you must strictly ensure that its walls are strictly vertical to the bottom, and the bottom of the pit is perfectly flat.
When making a cushion under the base of the extension, it is recommended to water the sand and crushed stone to make it easier to compact.

openings for windows and doors
Upon completion of the construction of the extension, it is necessary to make the formwork removable or permanent. Removable formwork is lighter, so I chose it. To install it, I used a ready-made block in the shape of the letter U. I installed blocks with a sawn base into the opening itself. Its length is about 20-25 cm.
U – the block was placed on glue. Then the frame from the reinforcement of the extension to the aerated block house photo was very rigidly attached using spacers. Next, the U-block was moistened with water and the structure of the openings was strengthened with concrete mortar.

Final works include roof installation and finishing work:
- To cover the extension I used well-dried pine beams.
- The beams and extensions to the house made of aerated concrete blocks, video, which were prepared in advance, were raised onto the walls.
- I treated the beam pillows with an antiseptic.
- I put roofing felt on the anchor and fastened it to the beams in which I had previously drilled a hole. I tightened it with nuts and washers for safety.
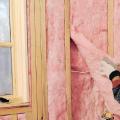
- I lined the bottom with plywood and boards. The space was filled with thermal insulation material.
Results
Thus, we have examined step by step how to make an extension for a house from an aerated block. I hope that everything turned out right for you and that your new premises will serve you for decades!
 Construction materials and list of works
 Proper insulation of a wooden ceiling in a private house
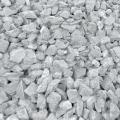 What types of crushed stone are there?