DIY house made from foam blocks video. Building a house from foam blocks with your own hands with videos and tips. What material is better to choose for cladding a foam block house?
Building a house is not as cheap as we would like; many people can’t even afford it. However, we should not forget that you can build any (almost) structure on your own. This requires only competent instructions and strict adherence to the sequence of all actions. We assure you that you will cope with this task no worse than professional builders. In addition, we will give examples of counting building materials.
What material is better to choose for cladding a foam block house?
Use whatever you find, and if there is more than one, order them according to what they have, such as shape or color. He then disarms everything he has done and does it again. Could you give me any explanation about this? It would be interesting to hear what your daughter says about her designs! What the girl does is apply logical and mathematical thinking to the decisions she makes when creating models, organizing them into shapes, etc. it's like he creates his own puzzles.
Where to start
The technology for building a house from foam blocks with your own hands is not very different from masonry of various types, there are simply some features and standards. We will definitely introduce you to them, but for now, let's start by studying this building material (briefly) and select optimal size.
Foam block - building material
Before you build a foam block house with your own hands, let's start by choosing a foam concrete product:
If you haven't played with them yet, you might want to introduce some of them that have less than 24 items to see if they like them. Maybe even ready for more complex ones. Sometimes children play the way you described because they want or need to create order. They like or are comforted by who can "put things together" to form patterns. This is similar to the feeling of well-being that some adults experience when rearranging furniture or cleaning the kitchen.
Perhaps your daughter also has a strong aesthetic sense. Their rows and patterns may appear to be beautiful or fascinating; Perhaps there is some form of sculpture or 3D work of art for her. If this is the case with your daughter, she may enjoy sketching or photographing some of her creations. You can also offer large beads made of wood or mud to see if she wants to make "decorations". Making necklaces and bracelets is something that is often enjoyed by children, who find the patterns pathetically pleasing.
- The ideal size is 200x300x600 mm, weight about 10 kg. This block is good because it is long enough to save on quantity, and wide enough to build a house in the northern regions. You will only need 50-100 mm of thermal insulation material and you will no longer have any problems with heating the room.
- optimal for building construction. . When purchasing foam concrete, you should carefully check it appearance for cracks and chips. Of course, small chips will not be a source of destruction of the load-bearing wall, but cracks on the end parts of the product reduce the resistance of the material to moisture.
- It is very important to pay special attention when choosing an adhesive solution; it is better to use special means and not resort to the “help” of cement-sand mixtures. Less glue is consumed, and the gaps between the blocks are not large, which reduces the likelihood of the formation of a cold bridge.
Well, now we are building a house from foam blocks with our own hands, so keep an eye on it - read and study everything carefully to achieve a positive result.
Video: building a house from foam blocks
Your daughter clearly feels intrinsically motivated for this activity, and you don't want to make her feel shy or embarrassed. You could tell her that you are interested in what she is doing. You can even ask to join her in a pattern game. She may have been able to create a pattern, then disarm it and allow you to recreate it from memory.
Many children like to know that their parents are interested in their creations. You haven't indicated that you are concerned about your daughter's play. Sometimes fathers and mothers feel a little worried when a child plays only one way, over and over again, with slight variations.
Calculation of materials will help you save
Never go to hardware store without thoroughly studying the design of your house. This will help you better understand what we are going to do:
- The first step is to obtain all the data about the object: dimensions, number of floors, presence of a basement, number of windows and doors.
- The second step is to familiarize yourself with the communications and find the most optimal solution for their location.
- The third step is the final count of building materials.
Now we will find out the almost exact cost of building a house from foam blocks with our own hands, and then we will describe the installation process.
Prices for building houses from foam blocks
If a child seems to be engaging in a particular type of play behavior and cannot or will not generalize to other types of play, parents may want to consult a pediatrician or counselor about what they are seeing. On the other hand, the kind of play you describe may be emotionally satisfying and developmentally appropriate and may lead to other constructive experiences in play.
Question: My child is 1 year and 4 months old. We live alone, my husband, my child and I, and are alone with me most of the day. No other relative or relative lives with us because none of our families live here in Tijuana. Parents and caregivers can be very busy looking past 16 months!
Note! We will look at the example of a one-story house 7 by 6 and 3 meters high, without an attic and a basement - to make it clearer. If you suddenly need an extension to the house made of foam blocks, you can attach it with your own hands at any time using a columnar or pile foundation.

But it can also be fun to spend time with children this age because they love to explore the world and communicate what they discover. You probably want your daughter to know how to play solitaire as well as socially. Solitary play allows children to have fun, although of course it is still necessary to have someone present to look after them. Social play with a parent, mother, teacher, or other children helps prepare children for social life.
Often when children play alone, their activities require excellent motor skills. During these games, your daughter could engage in things like toy animals, dolls, blocks, and the like. These and similar activities, even those that have little meaning to us adults, can contribute to a child's development and help her understand the world around her. It's fun to watch kids this age when they decide to play alone! For example, my granddaughter, when she was 16 months old, could spend up to half an hour playing with a basket of cardboard books.
Foam blocks - quantity and cost
- Add the lengths of all sides of your future home and multiply by the height - (7 + 7 + 6 + 6) x 3 = 78 square meters. This is our total wall area.
- Now we convert the result into cubic meters, to do this we multiply m2 by the thickness of the walls - 78 x 0.3 = 23.4 m3, which gives the total volume of the walls.
- The simplest thing left is to divide the total result by the volume of one block, so we will get the approximate amount of building materials that will be needed. Don’t forget that our block is 600x300x200 mm - 23.4 / 0.036 = 650 pieces, which is exactly how much you will need to build a house.
For your information! You can check yourself in the opposite way, calculate how many foam concrete products are in 1 cubic meter and multiply by the existing result. To do this, divide 1 m3 by 0.036 m3 (block volume) and get approximately 28 pieces, and now multiply this by 23.4 - we get 655 products.
Many times he turned the basket to throw books, then sat down on a pile of books and looked at the front pages until he found a favorite. He turned the pages for a few minutes and looked at the photographs. He will then take another book and repeat the process. She didn't want to be interrupted, even if someone suggested she read. He seemed to take great care of the pile of books. If someone put the books back in the basket before she had finished looking at them, it would frown and become empty again.
In this "game" he used gross motor skills, fine motor skills and eye-hand coordination. This activity was also good preparation for reading and writing. When you are inside, you can enjoy creative activities. Play music that the girl likes and dance with her, or waving colorful scarves in the air. Let your child "help" with household chores using a small brush and catcher or a clean rag. This activity stimulates motor development and teaches her that she can do many things.
It is very important, since foam concrete is easy to process, to stock up on additional blocks - 20-30 pieces on top are enough, and you don’t have to worry about defects or the wrong size. After all, we are building a house from foam blocks with our own hands, someone is doing this for the first time - they may make a mistake.

Video: construction of a light partition from aerated blocks
For fine motor skills and hand-eye coordination, you can also teach your daughter fingering and clapping games. These activities are also good for their social development. The girl may have to repeat them many, many times to learn how to do all the movements on her own, but she will probably enjoy the challenge. Finger puppets and puzzles with multiple large pieces are also useful for fine motor skills in children this age. You may have to teach her how to place puzzle pieces or play with dolls, and it may take some time for her to learn how to do this without help.
- The cost largely depends on various factors, the main one being density, and, of course, the more you buy, the cheaper the blocks will cost. On average in Russia, the price can range from 80 to 110 rubles; for interior partitions (where the foam concrete is placed thinner) it is lower - from 60 to 90 rubles.
- You can’t do without delivery, perhaps one of the most unpleasant factors that makes everything more expensive building materials at times. Delivery is small truck, the gazelle type, will cost you 350-450 rubles per hour.

If it allows you to avoid the weather and safety, your daughter will likely take advantage of outdoor activities. If you have access to outdoor play equipment such as climbing frames, slides and swings in sizes suitable for small children, your daughter will likely enjoy well-supervised rough-and-tumble car play for a few hours with you. Most 1 and 2 year olds love to play with balls or bags full of beans that can be dropped, dropped, or pushed around.
External cladding of the house
Parks and playgrounds are also great places for "play dates" with families with children close to their daughter's age. You may meet families with children this age and plan to meet them at the park. It is recommended that 1 and 2 year old children relate to other children, even if they do not always play directly with each other.
So calculate, building a house from foam blocks with your own hands at the first stage will cost you 60,000 rubles (materials with delivery). Now let's move on to the second stage - the construction of the foundation.
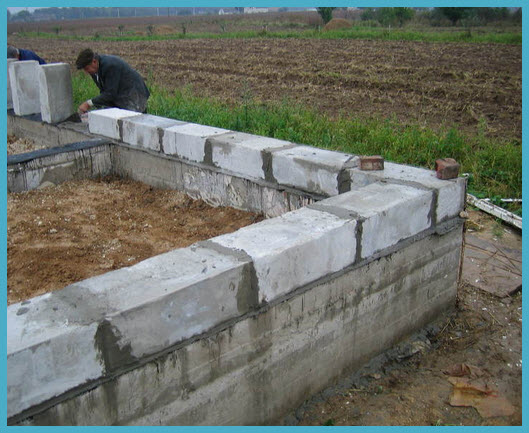
We build walls from foam blocks
- The foundation is treated with moisture-proof material.

Games for all young children. Here's what to expect during the main stages of construction. Building your new home is exciting, especially when you understand how the process works. The following summary outlines the typical steps your home builder will follow and will help you stay on top of what's happening at key stages.
Remember that the process of building a home can vary from one region to another and from one builder to another, especially if you are building a complex home that suits your needs. Be sure to ask your builder about their specific policies and procedures.
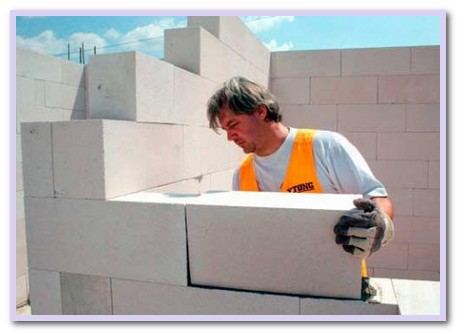
- An adhesive solution is prepared.
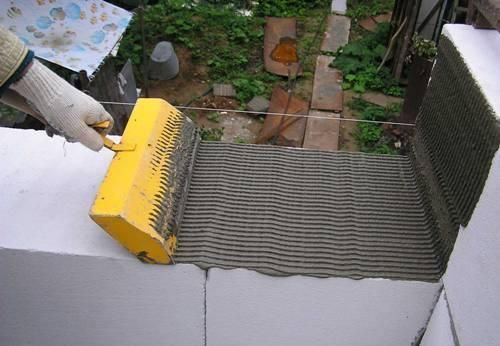
- Using a notched trowel, apply the mixture to the surface of the base.
- The block is placed on the mortar and tapped on top with a mallet.
- The parts of the foam concrete that will come into contact with each other are also coated with the mixture.
Preparation of the base and foundation. Ground preparation and foundation work are often completed by one team, but this may not be the case if the area is forested. Using a backhoe and bulldozer, the team clears the ground of rocks, debris and trees to build the home and, if necessary, takes care of the septic system. The equipment levels the terrain, places wooden forms that serve as templates for foundations, and digs holes and ditches. The bases are installed. If your house has a well, it will be dug at this stage.
Important! In order for the construction of houses from foam blocks with your own hands to have a positive result, it is necessary to lay horizontal rows with overlapping seams. Otherwise, load-bearing walls will be subjected to all sorts of loads, cracks will appear, and cold bridges will form.
If the house has a basement, the sink is excavated, the foundation formwork is placed and the concrete of the same is poured, and the foundation wall formwork is placed and the concrete of the same is poured. When it comes to installation concrete slabs at ground level, foundations are dug, forms are placed and concrete is poured; The area between the bases is level and facilities for services are implemented; And the concrete slab is poured.
Foam-, which is gas-
Once concrete is poured into holes and ditches, it will require setting or curing time. There will be no activity on the construction site during this period. After the concrete is installed, the equipment applies a waterproofing membrane to the foundation walls; install sewer, sewer and water faucets, as well as any plumbing installation that will be placed on the ground floor slab or basement; And then the hole is filled around the foundation wall with previously excavated soil.
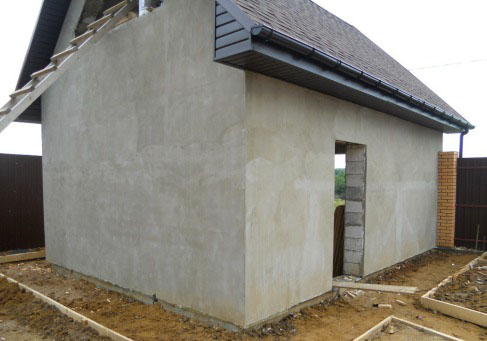
All seams on the outside and inside are coated with primer and leveling plaster. To fix warm plaster, a reinforcing mesh is attached as insulation.
If you want to get acquainted with visual instructions, then even our photo report - building a house from foam blocks with your own hands will give a visual representation of the process. At a minimum, you will be able to understand the correct sequence of work.
The check may be repeated depending on the type of foundation. Your builder will remove the formwork and begin coordinating step 2, the placement phase of the structure or frame. Full thickness construction: ceiling systems, walls and ceilings are completed. Plywood sheathing or fiber boards are installed against the exterior walls and ceiling, and exterior windows and doors are installed. The cover is covered with a protective barrier known as shell insulation, which prevents liquid water from leaking into the structure but avoids water vapor escaping.
This reduces the chance of mold and wood rotting. At the same time, electrical and plumbing contractors begin piping and running pipes through interior walls, ceilings and floors. Drain, vent, and water supply lines are installed for each unit. Installations such as bathtubs or bathtubs and showers are installed at this stage because there is more space to maneuver large and heavy objects.
We build the foundation - we count and take into account
Before building a house from foam blocks with your own hands, you should pay special attention to the foundation - the durability of your structure depends on it.
- First, let's decide on the dimensions of the future foundation - choose the most suitable option. Since our building is small, a shallow foundation may be enough for us belt type, however, it is easier and more affordable to make a columnar foundation. For private developers - the best option.
Note! You can, of course, lay a monolithic tape, it will be more reliable, but the costs will also increase.
- To determine the depth of the foundation, it is necessary to conduct a soil analysis to determine the freezing depth. This is very important, since the consequences of defects can be significant, including the destruction of load-bearing walls.
- Now all that remains is to purchase building materials, and you can begin work. To build a foundation you will need: reinforcing bars, bags of cement, sand, water and plywood.
In order not to fill your head with unnecessary information, we will reduce the calculations of the number of pillars - we will need 25 of them, the step is almost 1.5 meters. There are 5 pieces on the long side, 4 pieces on the narrow side. For example, let’s take the depth to be 1 meter and the cross-section of the sides to be 20 cm.
Approximate prices of building materials:
- Reinforcing bars– the cost depends on the thickness of the materials, on average it varies from 18 rubles to 160 rubles per linear meter. The optimal option is considered to be a thickness of 10-12 mm, about 25-50 rubles. per m.p. Our poles will require one hundred linear meters, which is about 4,000 rubles without delivery.
For your information! Inspect the appearance of the rods; if there is a large amount of crumbling rust on them, it is better to choose others.
- Cement– usually sold in 50 kg bags. One well is 0.04 m3, and we know that there are about 1000 liters in 1 cubic meter, and 36 liters in a 50 kg bag. It follows that one well requires 40 liters (a little more than 1 bag), and 25 pillars require 28-29 bags. The average cost of one 50 kg bag is about 200 rubles, which is around 5800 rubles. for the entire foundation.
- Plywood– it is enough to buy a sheet 10 mm thick to contain the stress from hardening cement. Based on the dimensions 1525 by 1525 mm, we will need 13 sheets, with an average cost of 480-530 rubles per 1 piece. = 6500 rubles without delivery.
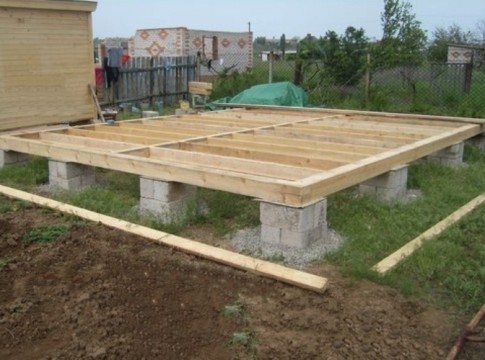
Foundation for construction
Building a house from foam blocks with your own hands begins with building a foundation:
- First you need to dig wells in the ground. Since it is quite problematic to make a recess with a cross-section of 20 cm, it is better to dig a hole with a diameter of a meter.
- Fill the base of the well with sand, 10-15 cm thick.
- Make formwork from plywood and install it at the bottom of the recess.
Note! In order for the plywood to withstand the cement pouring, it is necessary to place several spacers in the ground.

- Tie 4 reinforcing bars using steel wire.
- Lower them into the formwork and with several reinforced scraps, secure the frame in the center.
- Prepare cement-sand mortar.
- Fill with mortar up to the middle of the formwork.
- Using a steel rod, bayonet the cement to remove excess air.
- Pour out the remaining solution and bayonet again.
That, in fact, is the whole construction of a house made of foam blocks with your own hands, now all that remains is to purchase finishing materials and hide the inconspicuous gray facade. You can use anything: decorative plaster, paint, siding, decorative stone and other finishing options.
Conclusion
Now you know how to build a house from foam blocks with your own hands and how much it will cost you. You can get more accurate data by analyzing the construction market in your region; maybe you will be pleasantly surprised, or maybe the “surprise” will be in the opposite direction.
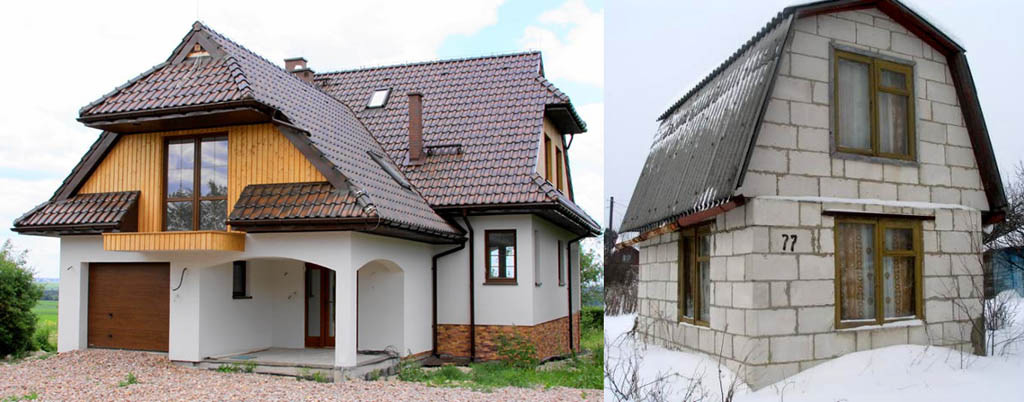
Foamed concrete is a modern promising material for low-rise construction; It is used primarily in the form of block modules of a certain size. The quality/price ratio for buildings made from it is significantly higher than for buildings made from other types of cellular concrete, not to mention stone and wood. The exception is expanded polystyrene concrete, but it has zero fire resistance. At the same time, you can build a house from foam blocks with your own hands, without resorting to special equipment and without having construction qualifications; Some idea of the range of possibilities for amateur “foam construction” is given in Fig. Therefore, the interest of individual developers in foamed concrete is completely justified and we will try, to the best of our ability, to cover the issues of constructing foam block (gas block) houses; There are more than enough inaccuracies in widely available sources.
What is “foam” and what is “gas”
First of all, often the meaning of the terms “foam concrete” and “aerated concrete” changes places; sometimes clearly intentional. For example, under the guise of an aerated concrete house, construction from monolithic foam concrete is described, foam blocks are called gas blocks, and vice versa. The psychological basis for this is obvious: a gas block, is it made of gas? A house made of thin air? And foam concrete appeared more than 100 years earlier than aerated concrete. But both materials are foamed cellular concrete, and in general it is legitimate to call an aerated concrete block a foam block, just as a diesel engine, a carburetor engine and a gas turbine are internal combustion engines. Moreover, the name “foam concrete” and its derivatives were already used by the advent of aerated concrete; it was necessary to somehow name the new material, which was very different from its predecessor.
This leads to the commercial factor: the cost of a foam concrete block is 3-5 times less, than an aerated concrete block of the same size, and the quality of foam concrete buildings in terms of all parameters is 1.5-2 times worse. By describing to a potential buyer the advantages of aerated concrete under the name of foam concrete and then offering foam blocks, you can make a lot of money: you can make foam concrete using a homemade method in the garage, but the production of aerated concrete requires industrial conditions and complex technological equipment.
Differences between foam concrete and aerated concrete. We will also have to mention them in this article, but for now, briefly: that very fragile and rough material that absorbs water like a sponge, gives it away just as easily and can withstand no more than 25 freezing/defrosting cycles - this is foam concrete. And aerated concrete is much stronger and more durable, it can be used to build up to 3-4 floors and lay reinforced concrete floor slabs on a box of aerated blocks. An aerated concrete block can float for days and months, but, once saturated with liquid moisture, it takes just as long to dry.
Note: The degree of absorption of water vapor from the air for foam concrete is up to 16% by weight, and for aerated concrete up to 5%. Both are quite acceptable for building structures.
We will further describe mainly how to build a house from aerated concrete, i.e. aerated concrete blocks; Monolithic aerated concrete cannot be made on a construction site. That's why Consider “foam block” and “gas block” with their word forms as synonyms later in the text, denoting the same class of products: building modules of standard sizes made of aerated concrete. In the same place where we'll talk about foam concrete buildings, “foam concrete block”, etc. will be indicated, or it is specifically stated that in in this case This means foam concrete, not aerated concrete, for example. "regular foam concrete".
Development stages
A general idea of the process of building a house from foam concrete blocks is given by the video:
Video: DIY foam block house
Variations of technology are possible, depending on local conditions and own capabilities. Foam concrete (aerated concrete) is a material that is very tolerant of fairly strong deviations from the approved rules for working with it, which largely explains its popularity. The purpose of this publication is to give the reader an idea of the technological aspects and operations that must be observed and performed accurately so that the house will stand, remaining warm and comfortable, for at least 70 years, provided that the local geology and soil mechanics may change significantly during this time. In general, according to the data collected to date, the durability of buildings made of foam concrete/aerated concrete can exceed 150 years without major repairs.
Construction of a house made of foam blocks (gas blocks) includes the following steps:
- Surveys at the site of future construction;
- Choosing the type of foundation;
- Determining the feasibility of building on your own;
- Material selection load-bearing structure(boxes);
- Design;
- Zero cycle and laying the foundation;
- Selecting a wall laying scheme;
- Construction of the box, including load-bearing partitions and ceilings, see below;
- Construction of the roof crossbar (supporting structure);
- Roof decking;
- Technological break for box shrinkage;
- Exterior finishing (cladding);
- Installation of interior partitions;
- Installation of floors, including heat and sound insulation;
- Installation of windows and doors;
- Interior finishing, including flooring.
Note: when they say “A house made of foam blocks in 6 (10, 15) days!”, this is, excuse me, a scam. Two or three people can actually install a box made of aerated concrete in a week. But - on an established foundation, which takes a year. And then a technical break is needed for dry shrinkage of the masonry, from 1 month. for aerated concrete and up to a year for foam concrete. The latter, in addition, needs breaks of 2-3 days after every 3-4 rows of masonry, so that the mortar sets and the next blocks do not slip.
Research
The purpose of this stage is to determine whether it is possible to build a house made of foamed and generally cellular concrete on this particular building site, or you need to use a different construction material. Foam concrete is lightweight; most of its structural grades, except D1000-D1200, are lighter than water and even wood. But they, unlike wood, are fragile: aerated concrete cracks from impact and long-term bending and shear loads, and foam concrete simply from any uneven load. Therefore, a foam (gas) concrete house, on the one hand, will lightly load the foundation and will do little to help it counteract the forces of frost heaving of the soil with its weight. On the other hand, a house made of foam blocks is not capable, like an elastic wooden one, of swaying together with the foundation in time with the seasonal movements of the soil. As a result:
- On weak ones, with a load-bearing capacity of less than 1.7 kgf/sq. cm, but stable, slightly heaving and little watered soils (dry sand, sandy loam, crushed stones, gravelly soils, etc.) - it is possible and necessary to build from any foam concrete.
- Under the same conditions, but on medium heaving soils (loam, fine silty sand) with soil water standing no higher than 1.2 m, you can build up to 1 floor with an attic from non-autoclaved aerated concrete (see below), and 2 floors and above from autoclave; preferably brand Η+Η.
- On highly heaving, high (over 0.9 m) watered and unstable soils (quicksands, wet sand, silty, peaty soils, etc.) - anything except any foam concrete, despite any promises. In such conditions, even a high pile foundation with a powerful concrete grillage will not save a foam concrete house from rapid soaking and deterioration.
Foundation
In any conditions suitable for construction from foam concrete, a house made from foam concrete will stand securely on a normally buried surface, i.e. with a tape depth of 0.6 m or more below the standard freezing depth. Anti-heaving widening of the tape base is not contraindicated, but in this case they do not allow reducing the depth of the foundation: the weight of the fragile structure is insufficient. For the same reasons, it is undesirable to use slab surface foundations: Swedish stove and other similar designs.
On stable dry soils to reduce volume earthworks, if the building is made of aerated concrete blocks, it is possible, according to the designer’s recommendations, to use a tape of incomplete burial, on the left in Fig. For the same purpose and also for an aerated concrete structure, but on medium-heaving and water-flooded soils up to 0.9 m, the TISE foundation is suitable, on the right.

The foundation strip of a house made of foam blocks should pass not only along the perimeter, but also under all partitions, except in the case of a reinforced concrete basement floor, see below. If the house has a basement, the edges of the pit under it should be no closer than 1 m to the inner edge of the surrounding tape. The same condition must be met for the stove foundation in a stove-heated house.
Vents in the tape under a foam block building should be made at least every 1.2 mm. It is convenient to use pieces of 70-80 mm asbestos-cement pipes for this. Their protruding ends are covered with fine steel mesh or, better, fiberglass mesh. Underfloor insulation - any kind, for example, filling with expanded clay.
Is it worth it yourself?
It is quite possible to install a box made of foam blocks without production experience construction work. When building brickwork, stumbling blocks for beginners and the features of laying foam blocks that eliminate them are as follows:
It remains to figure out the financial feasibility of independent construction from foam (gas) concrete. The price of a block of simple foam concrete 600x300x300 per piece is currently (April 2016) 30-42 rubles. depending on the region; foam concrete ceramic fiber blocks (see below) 600x300x200 are approximately twice as large. Non-autoclaved aerated concrete blocks the same size cost approx. 120 RUR/piece; autoclave class H+H – approx. 210 RUR/piece or approx. 3500 rub./cubic. m; on a pallet - 2 cubic meters. m. Real savings when purchasing pallets are less, because theoretically, there are 27.8 blocks of 600x300x200 in a cube, and suppliers, taking into account shrinkage and shrinkage and the size of the pallet, count 24-26 blocks per cube.
For a house 6x9 m you will need approximately 1000 blocks 600x300x200; in money - up to approx. 200 thousand rubles. in case of using “cool” H+H. Building a turnkey house from foam blocks will cost approx. 18,000 rub./sq. m; for our area – approx. at 972 thousand rubles.
And keep in mind that turnkey delivery means separated communications, without plumbing, gas, heating, stationary electrical appliances, and readiness for final finishing, without external cladding. Having gone through the sites and exchanges of craftsmen and calculated, we find that if you just install the box with the roof on a ready-made foundation yourself, and order the rest of the arrangement, up to the housewarming, in parts as needed, then the entire construction will cost approx. for 250-300 thousand rubles. cheaper than a turnkey order with subsequent “finishing”. Let us remind you that this is if you purchase aerated blocks of the highest quality category. In general, if we are not afraid to build, we should build.
Material selection
Foam-, which is foam-
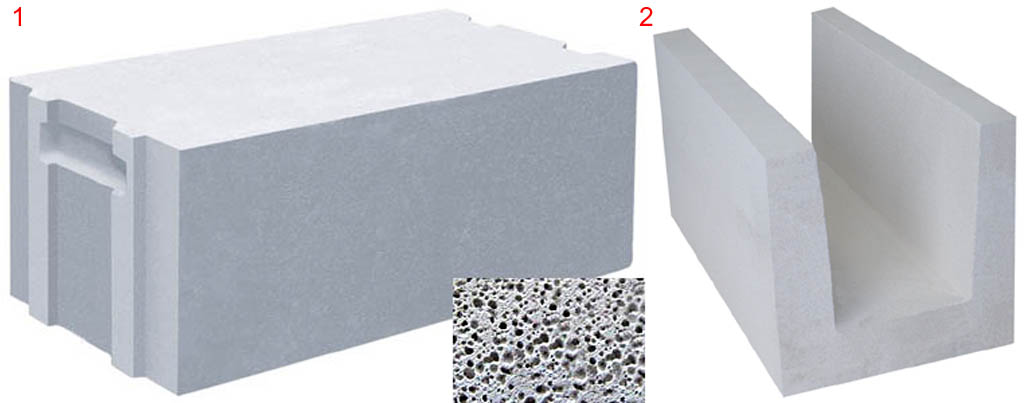
Foamed concrete, which is foam concrete, is produced using organic foaming agents introduced directly into the batch. The pores of foam concrete blocks are long, sinuous, interconnected, irregular in shape, pos. 1 in Fig. On a pallet, blocks of simple foam concrete can be recognized immediately: the dimensions are apparently inaccurate (additional deviation - 1% of the corresponding size), the color is uneven, the surface is conchoidal, pos. 2. Block size – 600x300x300.

However, simple foam concrete is not such a bad material. Firstly, as mentioned above, although it greedily absorbs liquid moisture, it is no less willing to part with it. For a seasonal home this is useful property; especially if we are talking about a commercial cottage, inhabited from warm to warm. In early spring, it will be enough to heat such a house with a stove that produces strong thermal (IR) radiation for 3-6 hours to make it comfortable. Stove - even a homemade potbelly stove or, better, an economical surface burning stove, for example. famous bubafonya.
Concrete foamed with organic matter can withstand up to 25 freezing cycles, which is bad in the current unstable climate. However, if a box made of it is surrounded by a simple ventilated façade (see below), then if frost strikes after a thaw, excess moisture from the pores will evaporate faster than the wall freezes.
In addition, simple foam concrete is made using cement-sand mixture. There is no point in using surrogates (lime + industrial ashes or slags): the blocks will crumble during transportation. Therefore, a box made of simple foam concrete gains strength over time; quite good buildings from it are known, which are about 100 years old.
The main disadvantage of simple foam concrete is its high fragility. Blocks made of foam fiber reinforced concrete and foam fiber ceramic concrete (foam fiber blocks, ceramic fiber blocks, fiber blocks) are largely devoid of it. They can be recognized by their more regular shape, precise dimensions and some regularity in the location of surface pores and poses. 3. In relation to liquid moisture, fiber blocks behave in the same way as foam concrete blocks, but are stronger, and can be used to build 2 floors. A significant drawback is that the market is flooded with lime-ash surrogates, which provide a building service life of up to 40 years; often – 20-25 years.
Foam-, which is gas-
Foaming of the mixture for aerated concrete blocks is carried out with hydrogen obtained as a result chemical reaction. The pores of the gas blocks are round, not communicating, pos. 4. Curing of aerated concrete can be carried out in a free atmosphere or under excess pressure in an autoclave; Accordingly, a distinction is made between non-autoclaved and autoclaved aerated concrete. The most commonly used is non-autoclave; it is almost half the price, but its characteristics satisfy most of the requests of private developers. The bulk is cement-sandy (slightly grayish color, item 5) or surrogate (color up to dazzling white, item 6).
Regardless of the composition of the bulk and the method of hardening, gas blocks can withstand at least 50 freezing cycles; most often – 100 cycles. Depending on the purpose, aerated concrete is produced in grades (numbers indicate density in kg/cubic m):
- Up to D400 – insulating. Weight load is not standardized; Simply, they don’t hold it.
- D400-D600 – structural and insulating. Weight class - B2.5, i.e. You can build up to 2 floors.
- D800 and higher, up to D1200 – structural. In private construction they are used to a limited extent in special cases, for example, see below.
Note: fire resistance of all types of aerated concrete A1, i.e. Let's allow short-term heating up to 300 degrees.
The standard size of an aerated concrete block is also 600x300x300, but due to the real needs of construction, there are more variety of “non-standard” ones on the market. The most popular size is 600x300x200. Such blocks can be used to build walls 400 mm thick, which is enough so that additional insulation is not required in the middle zone. The heat and sound insulating properties of aerated concrete are very high, see table. below. The nature of moisture absorption is discussed above; Here we emphasize: it is impossible to leave the outer surfaces of an aerated concrete house unfinished or otherwise unprotected from the effects of precipitation and capillary moisture, the house will become damp and it will be very difficult to dry it.
Table: parameters of thermal and sound insulation of aerated concrete
The accuracy of maintaining the dimensions of aerated blocks is 1 mm; dry shrinkage of non-autoclaved aerated concrete up to 1 mm per 1 m of stack height within a month. Autoclaved surrogate aerated concrete shrinks by only 0.1 mm/m within a week. High-quality surrogate aerated concrete provides a service life of buildings up to 70 years, so in this case the surrogate is not so bad. However, there are also surrogates for 20-25 years, so you need to take lime-ash aerated concrete from a trusted manufacturer.
Note: for inexperienced builders it is better to overpay approx. 5% and take aerated concrete blocks with locks, pos. 6. Maintaining the evenness of the rows and ensuring proper structural strength will be much easier.
H+H
For H+H aerated concrete, pore sizes are standardized (1-3 mm) and the degree of porosity is 85%. Therefore, it holds bending and shear loads much better. You can recognize H+H aerated concrete by its smooth surface, without visible porosity, pos. 1 in Fig. It is better to lay the lower chord from aerated concrete H+H grades 900 and above (see below), but its most preferable use is trough-shaped blocks for pouring the upper support belt (also see below), pos. 2. H+H gas blocks are often sold under the names wall or structural. And one more thing: recognizing H+H gas blocks by the presence of grips and a lock, as is sometimes written, is incorrect. H+H aerated blocks are also available as smooth ones, while blocks made of non-autoclaved aerated concrete can have grips and locks.
Project and zero
The design of a house made of foam blocks should be entrusted to specialists or you should use their services to link a standard project to the area. The reasons are the same combination of the lightness of foam concrete and its fragility. Errors that stone and wood, as they say, will not even notice, can make a foam block house initially unsuitable for habitation.
But it is also possible to save a bit on the project if you master one of the entry-level computer programs for construction design, for example. VisiCon and FloorPlan 3D + House-3D. The result will be a technically competent sketch, from which a specialist will understand what you want. This will reduce the design time and the number of consultations during the project approval process, and ultimately its cost.
It is also better to order a foundation for a house made of foam blocks, even if you have built a little before: its supporting surface should be as flat and horizontal as possible. Just in case, let’s mention: the formwork should be without cracks and not absorb a lot of moisture. The last 1-2 layers of the tape are filled with a more fluid solution, with an increased water-cement ratio (WC). Immediately after the tape has set, its supporting surface is ironed: dry cement is rubbed into the still wet concrete. The horizontal unevenness of a fully established foundation should not exceed 3 mm.
Wall masonry
Gas blocks are placed only with special glue; seam thickness – 2-3 mm. Experienced craftsmen apply the glue manually and disperse it with a notched trowel, but for a beginner it is advisable to use a dispenser, see above. Before applying the glue, the surface under it is moistened with a plaster brush. Watering and wiping off excess water with a rag is incorrect, unnecessary troublesome and increases water consumption.
Foam concrete blocks can be laid either on glue or on ordinary cement-sand mortar with a standard joint thickness of 10-13 mm. But practice shows that ordinary masonry mortar is better. Foam concrete absorbs water too greedily, especially in summer, and the inaccuracy in the dimensions of foam concrete blocks is greater than the permissible thickness of the adhesive joint. The lower strength of the cement-sand joint does not matter, because the blocks themselves are weaker.
Insulation
Waterproofing between the foundation and the masonry is the most vulnerable point of a house made of foam blocks, because... Here, capillary damming between the foundation and the masonry and dampening of the wall are very likely. The likelihood of accumulation of capillary moisture in the base joint of the masonry is significantly reduced by non-layered waterproofing materials: linkrom, steklorubit, stekloizol. You cannot lay roofing felt on the foundation for laying foam blocks at all.
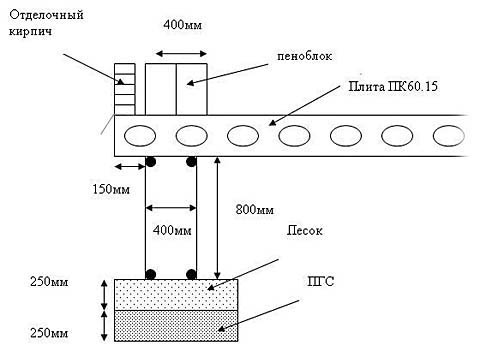
However, a radical way to protect a house made of foam blocks from midges is a reinforced concrete basement floor made of hollow-core slabs, see Fig. right. They are not cheap, and you will have to rent a truck crane, but the walls can be erected from non-autoclaved aerated concrete blocks, which will most likely provide savings that cover the costs, and there will be no need to worry about rotting of the wooden floor. And you will be able to save a lot on the foundation, because... There is no longer any need to run the tape under all the partitions.
First row
If the lower floor is made of wood, the problem of the first masonry belt arises: it must be well adhered to the foundation. It is unrealistic to bring the supporting surface of the foundation to the horizon with an accuracy of half an adhesive joint of 1-1.5 mm, so the first row of gas blocks has to be placed on simple solution. However, the low weight and lower adhesion of aerated concrete to the cement-sand mortar reduce the adhesion of the box to the foundation.
Without the skill of a mason, you can bring the adhesion of the walls to the foundation to an acceptable level by laying out the first row of half-thick aerated concrete blocks D900-D1200, pos. 1 in Fig. below. Both seams of this belt, both lower and upper, are reinforced with fiberglass mesh (see below); The top seam is already glued. If you know how to lead brickwork, That best solution- the first 3-4 rows are made of good, even working red brick, then a row of working gas blocks in a cement-sand mortar, and then everything is glued.
How to lay blocks
There are several ways to lay foam blocks. Some do not even adhere to the “cornerstone principle”: the laying of the row goes from the middle to the corners. Experts argue a lot about this, but it is better for a beginner not to enter into the discussion: the cornerstones (lighthouse) stones should be laid from 2 solid blocks, laid in an L-shape. The beacons along the cord and level are set into the horizon by tapping with a rubber hammer, the contour is outlined with a mooring cord, the row blocks are placed dry along it in advance, pos. 2, and now you can quickly and accurately lay them out along the dock.
There are 3 points here. First, dry blocks are placed on the butt so as not to be confused with those already placed on glue and not to leave a dry block in the wall. The seam is thin, you can even overlook it. The second is that a whole number of blocks rarely fit in a row. So, it is highly advisable to place sawn blocks away from corners and openings, i.e. closer to the middle of solid sections of the wall, which in amateur practice is ignored rather than respected. Third, the amount of ligation between rows (see below) for aerated concrete blocks is permissible up to 5 cm. But experienced masons avoid such a “tolerance”, and beginners are strongly recommended to adhere to full ligation, i.e. half the length of the block; for blocks 600 mm - 300 mm.
Note: For those who are completely inexperienced, a simple device made of 4 boards, pos. 3.
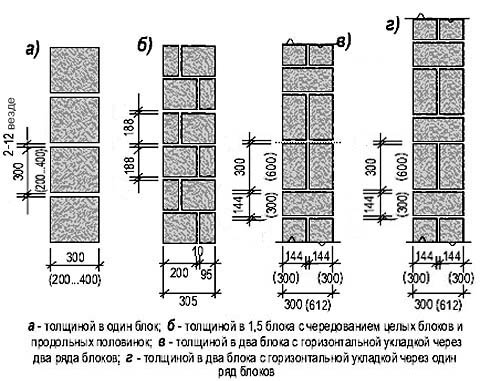
Dressing schemes
In most cases, walls made of foam blocks are erected using glue in the same way as half-brick masonry, pos. a) in Fig. on the right, with ligation of seams only between rows. It is advisable to carry out masonry with ordinary mortar from blocks of whole and half thickness, which will also provide bandaging in rows, pos. b). Scheme c) is used in difficult climatic conditions; diagram d) in the same place with a number of storeys greater than 1-1.5. A smaller joint thickness corresponds to glued masonry; large - on cement-sand mortar.
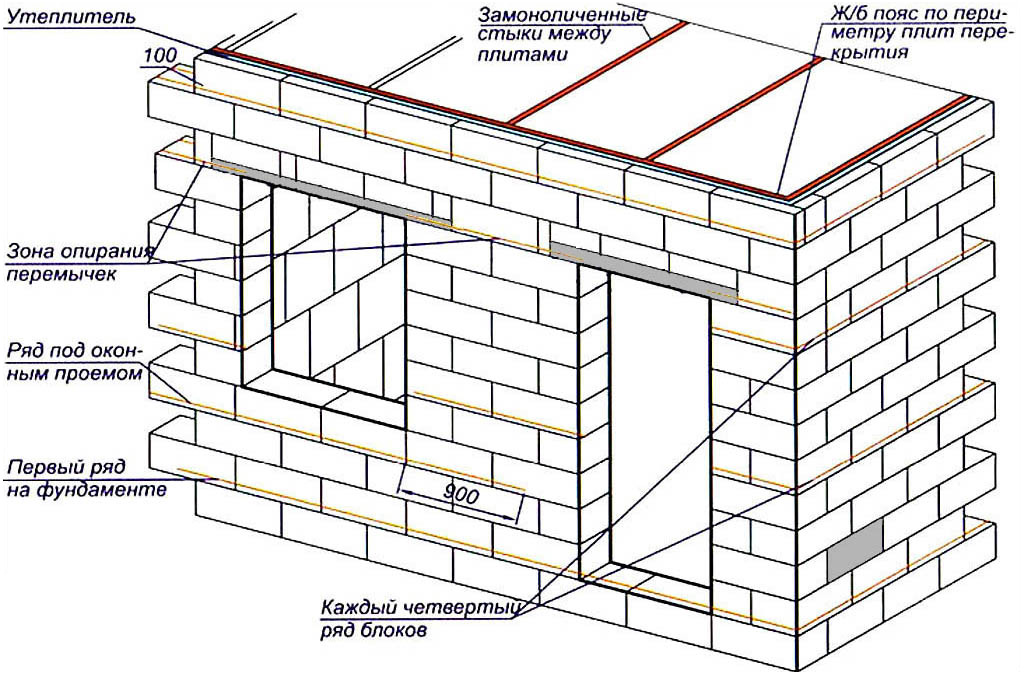
Seam reinforcement
The seams of masonry made of foam blocks must be reinforced: every 4th along the entire length, and the seams under and above the openings - to the distance of the length of the support of the lintels, see fig. below. The minimum permissible placement of jumpers in a wall made of aerated blocks is 150 mm, but it is better to give it for the full length of the block, i.e. in 600 mm; in extreme cases - half a block, 300 mm. In all cases, the length of the support will be one and a half blocks, so that the load from the jumper is better spread to the sides.
The least labor-intensive way to reinforce the seams of masonry made of foam blocks is with a steel or fiberglass mesh with meshes of 40-60 mm and a total thickness equal to the thickness of the seam. The latter will cost approx. 1.5 times more expensive than steel, but will distribute the load better. The mesh is placed dry on the previous row, pos. 1 on next Fig., fill the cells with solution to the length of the block, apply the solution also to the end of the previous block in the row, place the next block, etc. Due to the high fragility and low load-bearing capacity of foam concrete blocks, it is strongly recommended to reinforce the seams of their walls only with fiberglass mesh, the total thickness of which is then taken to be half the thickness of the seam, pos. 2.

The greatest strength of the masonry is ensured by reinforcing the seams (8-10) mm with reinforcing bars, also steel or fiberglass, in grooves; for a house more than 8x10 m in plan with a service life of over 30 years, this is the only acceptable option. They cut foam concrete with a manual wall chaser, see fig. right; The work is not particularly dusty or hard. From the outward-facing edge of the groove to the edge of the block there must be at least 70 mm, and between the inner edges of the groove - from 150 mm. Before laying the reinforcement, the grooves are carefully swept out with a hard brush.

At the corners of the groove and the reinforcing bars in it should bend smoothly. Branches reinforcement cage in the middle of the walls they are made T-shaped from solid rods, pos. 3 in Fig. higher. If the wall branches less than 0.8-1.2 m from the corner, the reinforcement is branched into the overlay; the bends of the outgoing branches should be facing the corner, pos. 4. The grooves with laid reinforcement are sealed flush cement-sand mortar, pos. 5, and laying on the glue continues after it has set.
Note: what is on pos. 6 – gross error in reinforcing foam block masonry. Such reinforcement will only prevent lateral displacement of the blocks, but will not help the wall bear bending and shear loads.
Load-bearing partitions
A light and fragile box made of foam blocks by itself will not bear the weight loads from the upper structure of the building and lateral winds. Therefore, the strength diagrams of houses made of foam blocks almost always include connections of general rigidity - load-bearing partitions are 1.5-2 times thinner than the walls.
Take a look at the top row of diagrams in Fig. In the design of your house, you will almost certainly find partitions that correspond to one of these, the most common, spatial power schemes for houses made of foam blocks. Such partitions are erected simultaneously with the walls, and cut into them by 1/3 of the wall thickness, as shown in the middle in Fig. The methods of branching seam reinforcement described above are intended specifically for load-bearing partitions. A well-designed project for a house made of foam blocks must indicate which partitions need to be cut into the walls and reinforced along with them.
![]()
Brick partitions in a house made of foam blocks cannot be load-bearing and do not cut into the walls. Their seams are reinforced with single branches, only for connection with load-bearing wall(below in the figure). In this case, the reinforcement ties are taken only from fiberglass; they should fit seam to seam. Sticking the reinforcement of a brick partition into the body of a foam block is unacceptable!
Note: non-strengthening brick partitions may be needed in a house made of foam concrete blocks for hanging something on the walls, because simple foam concrete is not capable of bearing concentrated loads. Otherwise, you will have to determine in advance exactly where the TV, shelves, kitchen cabinet, etc. will hang, and during the construction process, lay through anchors in those places. But then, suddenly you need to reweigh something, you will have to rearrange the anchors and at the same time spoil the finishing of the adjacent room.
Along the way, more about partitions
Partitions made of foam blocks (gas blocks) may be needed to partition a city apartment without filling out a lot of documents for redevelopment. And when buying an apartment with an open plan, it is simply necessary to install them. In this case, we offer a video about the construction of lightweight partitions from aerated blocks:
Video: construction of a light partition from aerated blocks
Topside
A building made of foam blocks must bear the weight and climatic and meteorological loads of at least the roof and, possibly, the weight reinforced concrete floor. In the first case, the Mauerlat needs a reliable support capable of distributing tangential loads along the load-bearing wall, and in the second, the weight load must be distributed over as large an area as possible. For both purposes, the box of a house made of foam blocks is completed by an upper load-bearing belt made of reinforced concrete, on the right in the figure; Its diagram is also shown on the left. Concrete grade – from M200. The load-bearing belt is spaced further from the outer edge of the wall than from the inner edge, because shear loads from the roof are directed predominantly outward. The best material for the top chord of foam block masonry, as mentioned above, is H+H blocks with a longitudinal recess.

At pos. 3 and 4 – errors when making the upper load-bearing belt. Here and there it is not monolithic and therefore is not capable of distributing loads. And the one at pos. 3 will also load the wall vertically in shear, which is completely unacceptable for foam concrete and aerated concrete.
About beams
The upper (attic) floor, in contrast to the basement floor, in houses made of foam concrete is preferably wooden in all respects. And its beams, in turn, are best made as composites (3 boards from 150x40 with inserts), as in Fig. Stacked beams resist torsion better and, accordingly, transfer less lateral loads to the wall.

Facing and something else
The remaining stages of work on building a house from foam blocks do not have any significant features compared to other buildings, except for laying communications, installing windows with doors and external cladding; optionally with insulation. The first is made easier by the fact that ordinary tools with ordinary steel working parts are used, and pipes and wires are easy to hide in walls.
The fastening of anchor plates of window and door frames must extend into the foam concrete wall by at least 150 mm, and the anchors themselves must be spaced at intervals of no more than 650 mm. That is, to install a single metal-plastic window, you will need to purchase 2 more anchors for the long sides; double - 4 more, etc.
With external cladding the matter is more complicated. Foam and aerated concrete must be protected from liquid atmospheric moisture, otherwise the house will become damp. Here it is necessary to observe the principle: the vapor permeability of the cladding should be greater than that of foam concrete, but the latter is already high. One of the possible options is cladding with siding, metal siding or blockhouse - a type of metal siding that imitates a log house. The cells of the sheathing can be filled with mineral wool or ecowool, but in no case with foam plastic or other dense insulation!

Another, most effective option is a ventilated façade made of facing bricks; Foam concrete itself is an excellent insulation material. A diagram of the design of a ventilated facade of a house made of foam blocks is shown on the left in the figure, and on the right it is shown how not to do it. What's the right way? As follows:
- Anchor plates should only be placed flat in horizontal joints of the masonry and be steel with deformation bending. The resilient plastic anchors will become stiff and break within a few years, and the entire cladding will need to be redone.
- The anchors should, as in the case of a brick partition, go seam to seam. Walling up anchors in weak foam concrete means helping the wall to quickly crack and begin to crumble.
- The cladding should form an overhang of 30 mm over the base. If there is a shelf there, then instead of a dropper (tearpiece) you will get a collection of condensation just where it is easiest for it to seep into the wall.
 Legislative framework of the Russian Federation Law on the state border 4730 1
 Law on the State Border Law on the State Border of the Russian Federation 1993
 MTPL Law - amendments and new editions MTPL insurance from April 1