Frame house diagrams. Do-it-yourself frame house: construction step by step.
An important advantage of such buildings is that a person has the opportunity to build a house in full accordance with his preferences. After all, you can choose any suitable project.
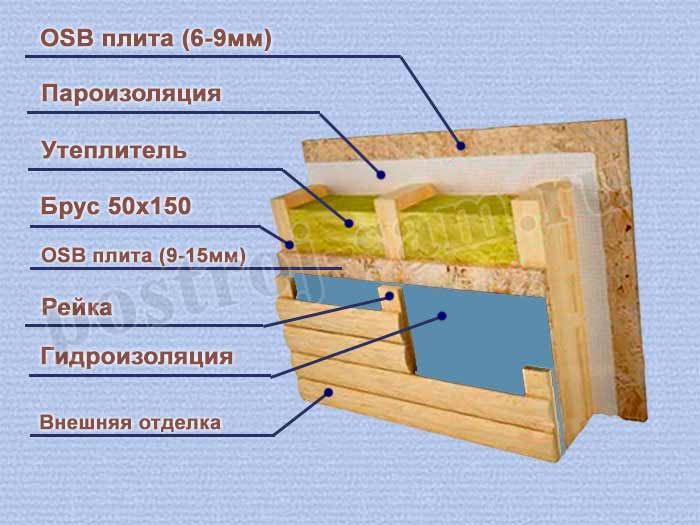
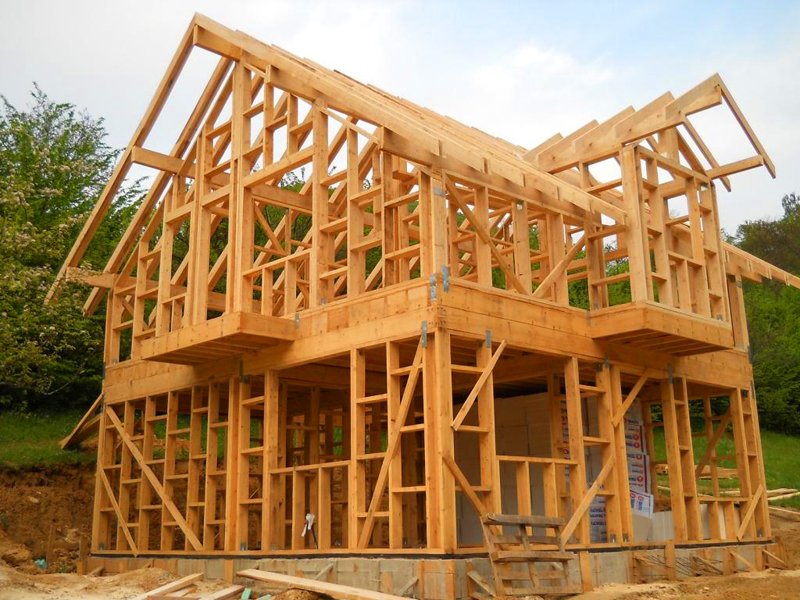
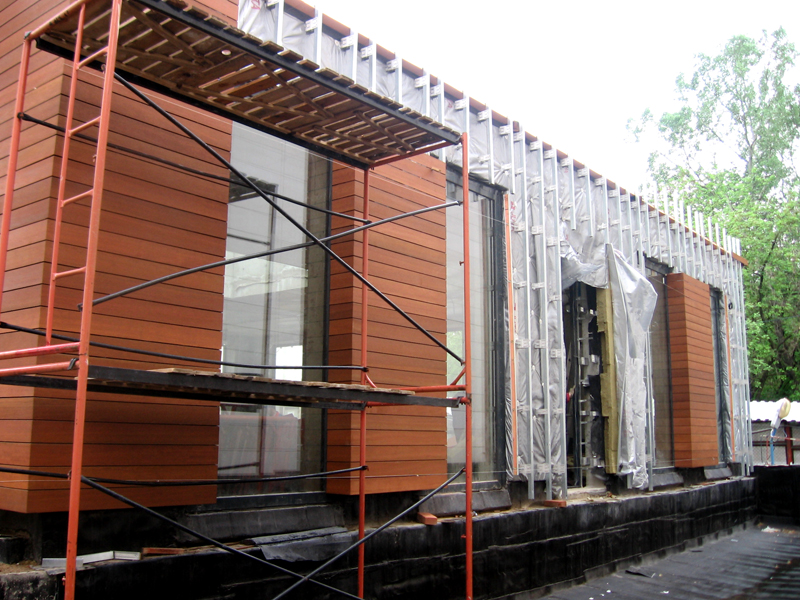
The peculiarities of building houses using frame technology are that first a rigid frame of the house with a roof is constructed. After this, finishing with sheet material and thermal insulation begins.
Further construction is also carried out using the frame-panel method. If you take on the construction with your own hands, the construction of such a dwelling can be completed within six months.
Frame house: phased construction
When building a house using this technology, it is very important to take into account the expected time of residence there. Because if it is seasonal, then the house will have the same requirements, but if the home is planned to be used year-round, then it must be thoroughly insulated. 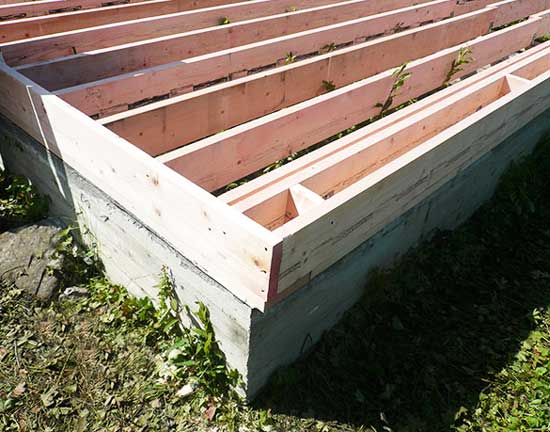
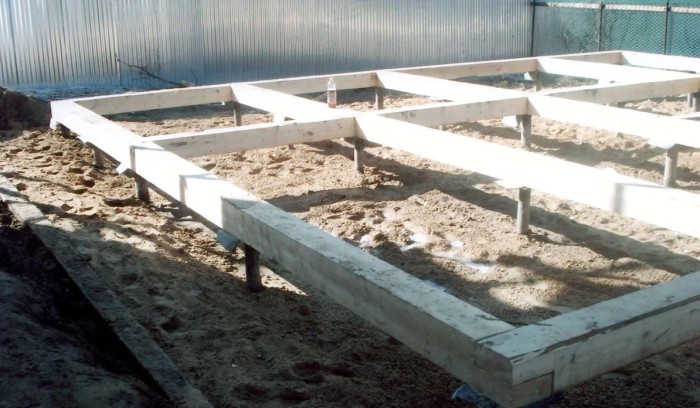
Construction technology: foundation
All frame buildings are quite light in weight, so they do not require capital
You can get by with one of the following foundations:
- not buried.
The final choice of foundation depends on the number of storeys of the future house and the type in the area.
For a low-rise building, a simple one will be enough, which is suitable even for capricious soil.
Recesses are made in it with a diameter of about 20 centimeters and about a meter deep, at a distance of 0.8 m from each other.
 Recently, a pile-screw foundation has been in demand, the peculiarity of which is that it can be installed without the involvement of specialists. It is better to do this manually so that the piles are screwed in without deviations, strictly according to the level.
In this case, you must try not to make a mistake, since it is not recommended to screw them in again, otherwise the already compacted soil will be disturbed.
Most often, two different technologies are used - and. Despite the fact that they have different names, the construction principle is actually the same. In both cases, the basis is a frame, made of wood. Frames made from different types of timber are very popular.
Construction in stages: piping
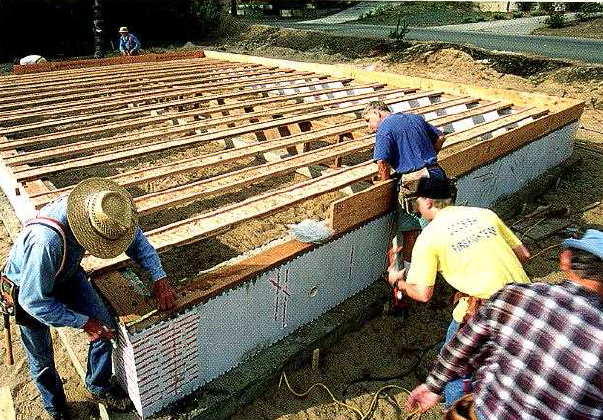
 You need to prepare wooden beams that have a cross-section of 20/25, 15/15, 20/20 cm. Before starting installation, you need to prepare. It is treated with a special one. A double layer of mastic is, in turn, applied to the tops of the piles and covered with a double layer. The timber should cover the entire area inside the perimeter of the future house. The individual bars are connected to each other with nails.
Metal corners at the corner joints will provide the structure with greater strength. The frame structure is attached to the foundation with special screws. The timber is inserted into the grooves and screwed. A board is laid on top of the frame, covering the joints of the beams. Later, the racks of the main frame will be installed here. Like all wooden parts, the board is treated with an antiseptic.
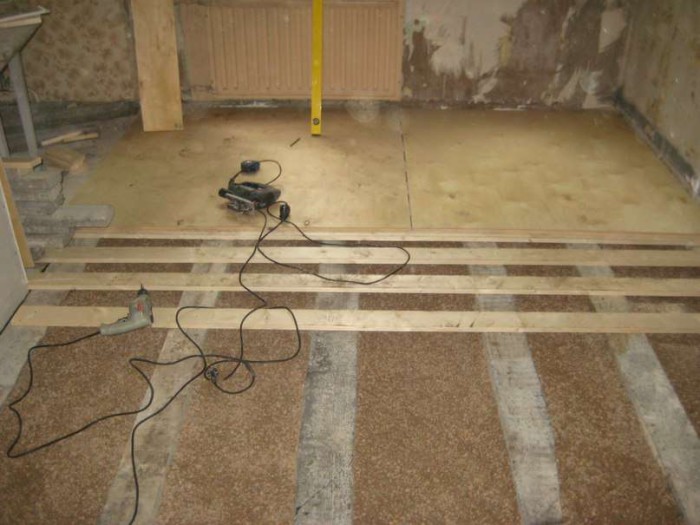
Do-it-yourself: subfloor
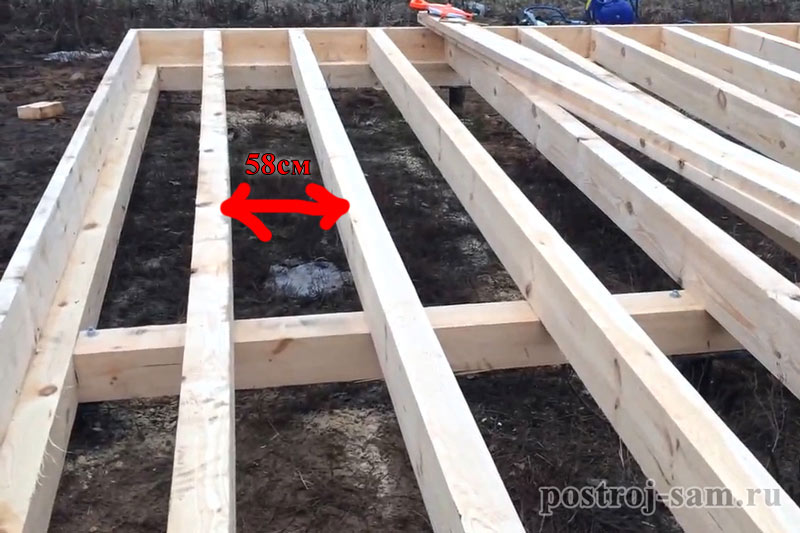
 You will need to make logs from timber. The material used is size 15/10, the step width between individual bars is 0.6 meters.
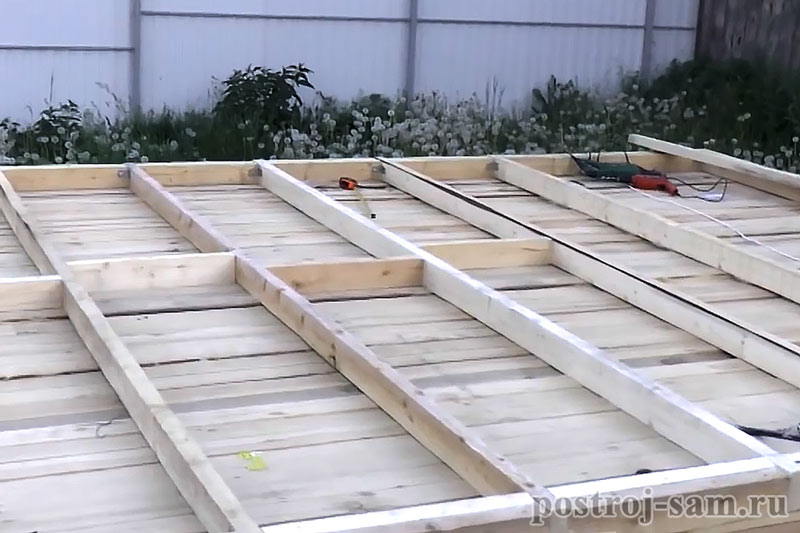
The subfloor itself is usually made from unedged boards, the cheapest material.
But it must also be treated with means. The boards are fastened to the joists with nails, and the joists are fastened to the frame with metal corners.
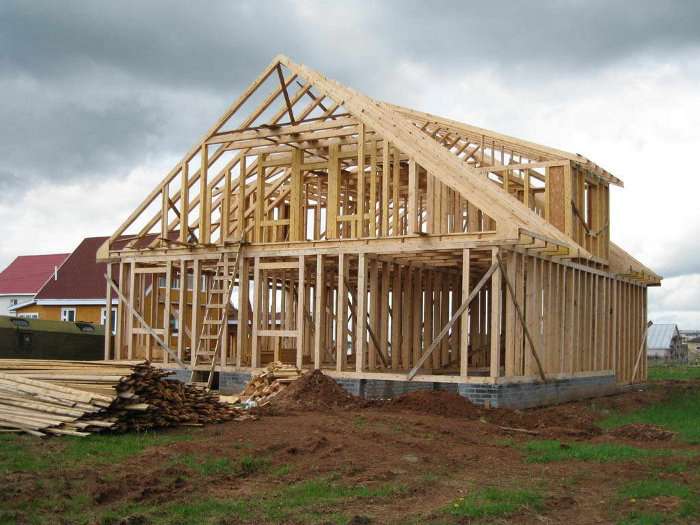
House in stages: mounting the frame
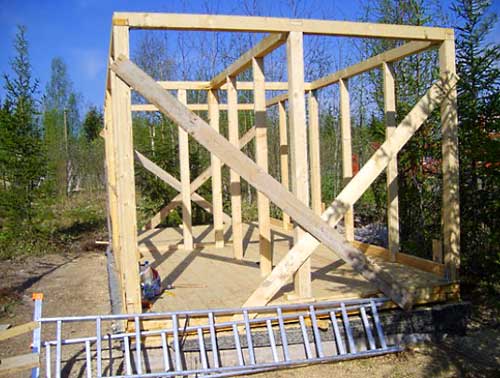 You will need a board of different formats: 10, 20, 5 and 15 by 5 centimeters. First, corner posts are made, which are secured with already reinforced steel corners. Using the same corners, the rest of the installed racks are attached. To ensure the reliability of the frame, jibs are made along the walls to prevent it from loosening.
By means of cutting, the timber is fastened at the corners, in other places with steel corners and self-tapping screws.
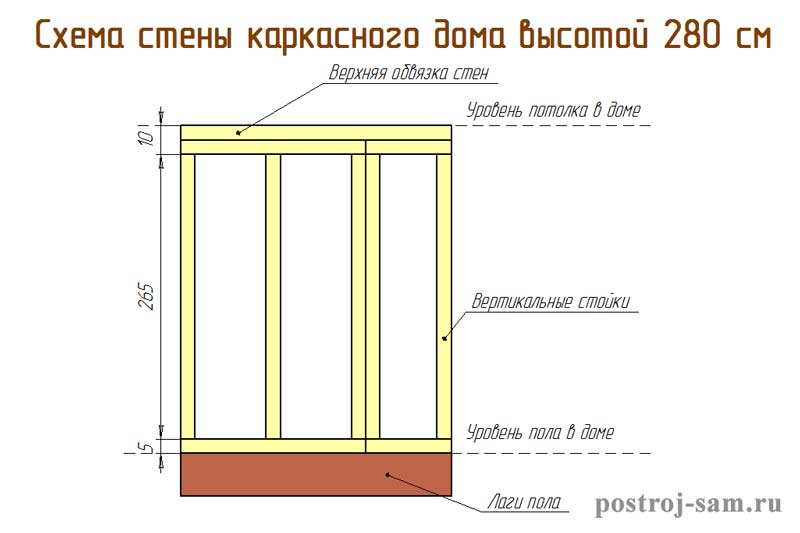
Diagonal bevels also serve to ensure strength. When erecting, remember about, or rather, its height. The optimal value would be about 2.5 m. After finishing and decoration, it will remain no less than 2.3.
Installation of ceiling beams is carried out in one of three possible ways:
- steel corners;
- cutting method;
- using perforated brackets.
The choice of the most suitable one depends on the mounting location. The strapping beam will serve as a support for the beams. The latter are secured with self-tapping screws.
Phased construction: roof installation
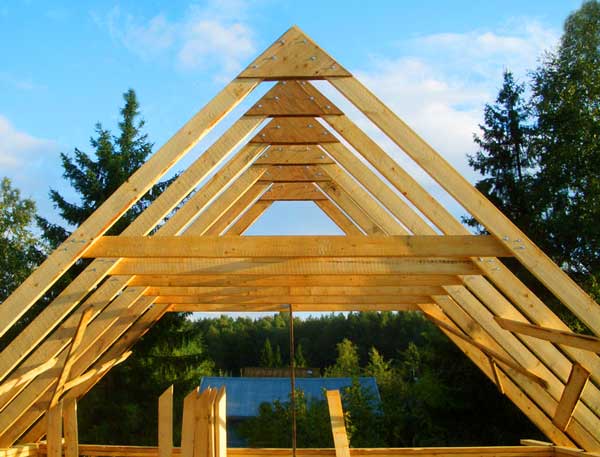 The individual rafters at the top are fastened together using nails. For strength, they are reinforced with boards. Next, the rafters are laid on the wall so that a protrusion measuring 20 cm is obtained. Using several bevels and nails, the rafters are secured, starting from the edges. After fixing their central elements, the ridge board is mounted.
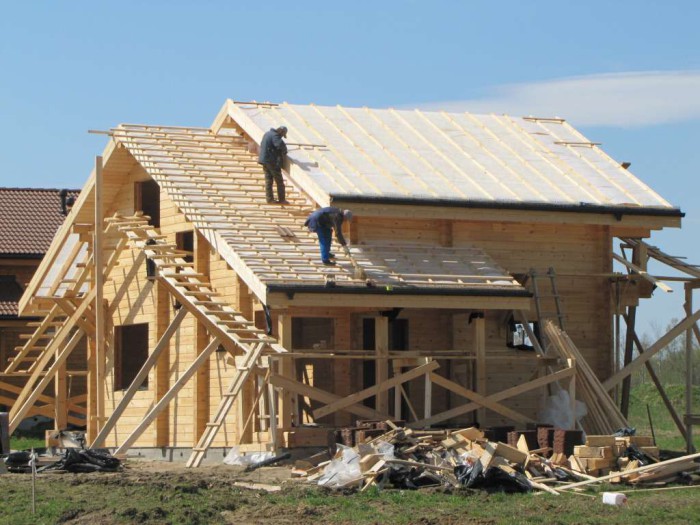
Then the sheathing is made using an edged board. It is laid and attached onto the made sheathing.
It is fixed with nails with large heads. Installation occurs at the very last stage. If the method of using the material used allows, then all activities can be carried out with your own hands.
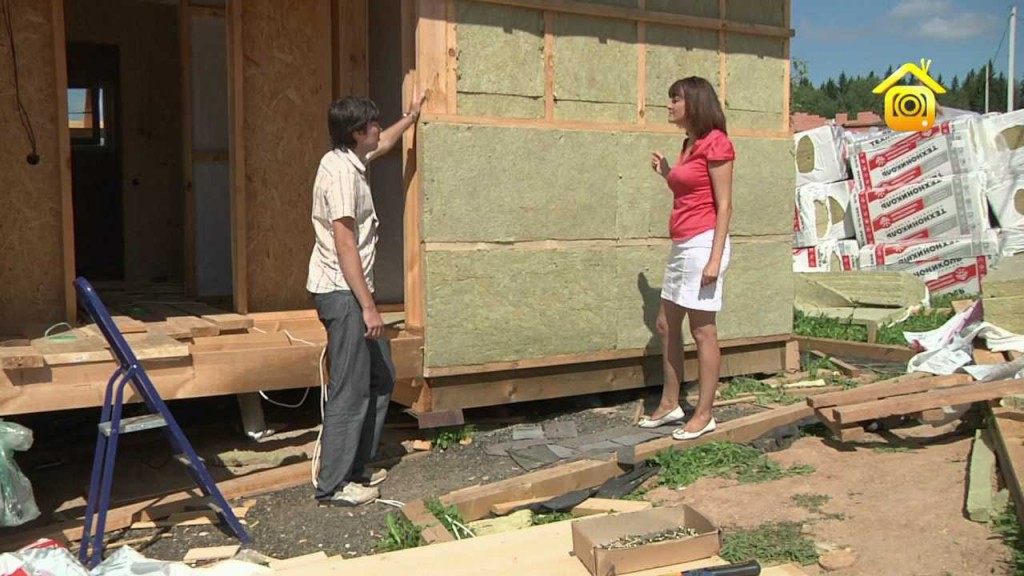
House in stages: insulation and finishing
 There are many various materials used for exterior decoration. This is a simulator of timber, chipboard, etc. The final finishing is preceded by the installation of sheathing made of 50/40 beams, with a distance of 0.6 m between them. Metal profiles are successfully used for this purpose.
If the sheathing is wooden, then it must be treated with fire-fighting and antiseptic agents.
Then manual finishing is carried out in accordance with the technology of the material used for finishing.
In order for a frame house built with your own hands to be warm and cozy, it must be. This will require both internal and. The outside of the building is insulated (even before finishing), on which it is mounted.
Mineral wool and are used as internal thermal insulation materials. All existing cracks and holes are filled with foam from a gun. Everything should be insulated - ceiling, walls, etc. A layer of vapor barrier material is placed between the decorative trim and the insulation.
The final stage of work is the installation of all necessary communications and final finishing, the type of which depends on the preferences of the owner. Today's choice of finishing materials will satisfy the most biased taste. You can make any of your fantasies and projects come true. There would be a desire! Good luck in your construction.
Construction of a frame house is a long-term matter and requires strategic thinking of many things in advance, step by step. It is very important to follow the construction technology that was developed in Canada and Scandinavia. What material to use and what type of flooring and walls should be depends on the technology chosen, but there are clear rules that everyone must follow.
The southern and central regions of Russia are more suitable for Canadian technology, and the northern regions are more suitable for Finnish technology. Using any of the technologies, you can build a durable home for your family, and do it yourself.
My step-by-step instructions for building a frame house are written according to the diagram: what needs to be done on at this stage+ additional links to how I DID IT and how it SHOULD be done. Do not skip links, otherwise the information will be incomplete.
Frame house. Project
It’s better not to build a frame without a project. It is quite possible to do the project yourself (especially with a size of 6x6), but it will take a long time if the house is large and has a complex roof. Even a garden house using this technology may require design.
You can do the project gradually, on days off from construction. We drew the frame - we built it, we drew the floor joists - we implemented it, and so on. True, this may lead to you doing something at some stage that was not foreseen in advance, but if there is no way out, then do it this way.
Solve the issue with the number of storeys. Building two floors with your own labor is very difficult. That's why I chose a one-story building. And I have a lot.
And if you don’t have time, then order a standard or individual project from us (typical projects 12×9, 7×7 on 2 floors or 11×9):
Build a frame yourself? Need tools and fasteners
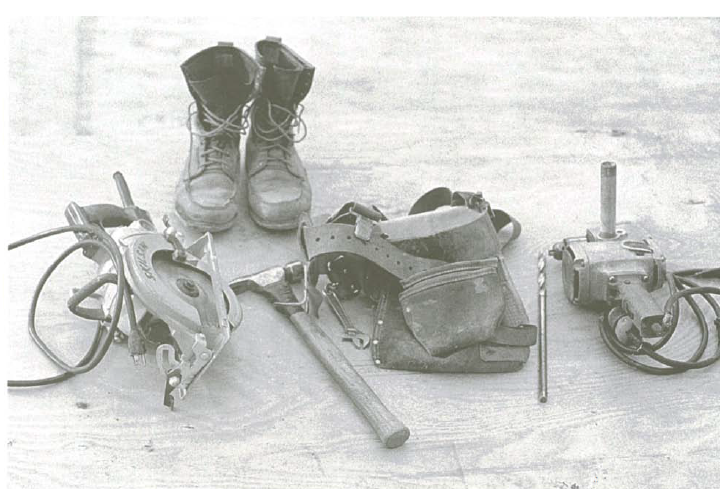
If you are planning to build a house with your own hands, it will be difficult without tools. List the right tools already exist .
It is also better to purchase fasteners in bulk in advance. In a frame house, the following are used: 3.1-3.5×90 smooth nails, as well as 60 mm rough nails (for covering walls with OSB) and 70 mm (for covering floors or roofs with slab materials). Read more detailed text about fasteners.
Build the frame yourself It’s better to use a nailer, since it takes 10-20 thousand nails for an average frame frame. Take care of your hands! You need to purchase a hose, adapters, oil and a compressor for it. Well, don’t forget about special nails, I took 100 kg at once and there were almost no leftovers, and I also chopped 50 kg of ordinary nails by hand. Also buy 5 kg of 120 mm nails, sometimes they come in handy (but I didn’t tell you that).
You may also need self-tapping screws for gypsum plasterboard and gypsum fiber board, and it’s simply useful to have self-tapping screws on hand to temporarily screw on some element, and then nail it properly.
Also needed for frame construction are 6-9 mm staples. They are convenient for nailing hydro- and vapor barrier films.
Surely you will need concrete dowels (for installing windows) or anchor plates (for the same purposes). But it’s better not to use perforated fasteners; they are rarely useful in a frame house and only for special purposes.
Video about tools:
DIY frame foundation.
Lately it has been fashionable to make a USP under a frame, but not everyone can do it on their own, although this is also possible. I did TISE for myself and I also recommend it to people who turned to me for advice (see my link detailed instructions), they are more universal and easier to implement independently.
It’s better to do a bored pile yourself, it’s better to order a screw foundation with installation (just avoid piles welded in a homemade way and painted with something unknown, their service life will be several times less than real screw piles, it’s better to have good piles, but screw them yourself).
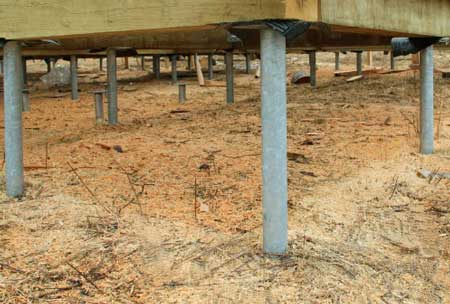
On top of the piles is required (or a concrete grillage, which is more monolithic, but heavier and much longer)
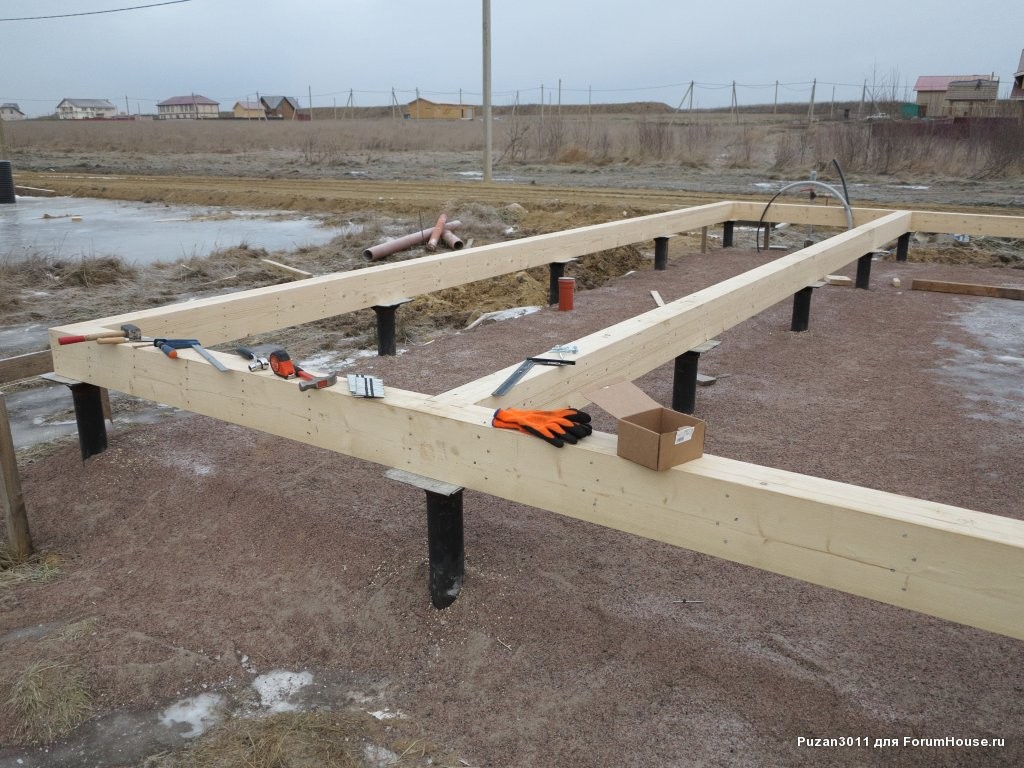
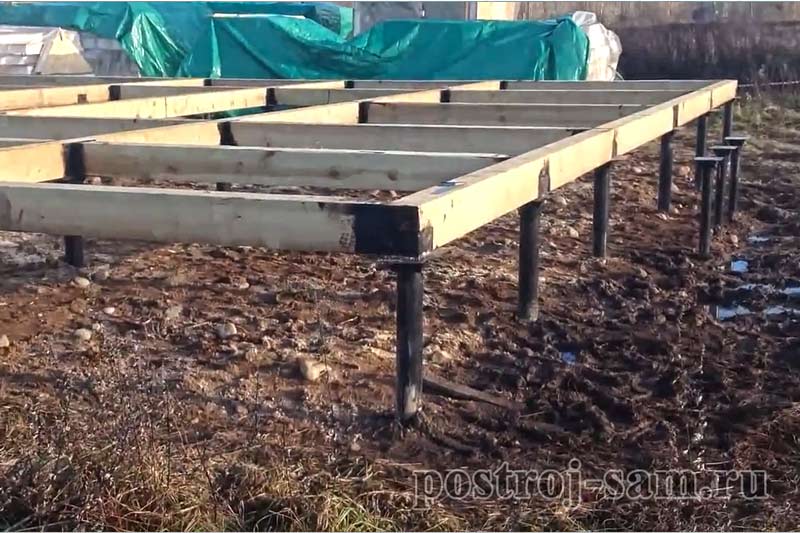
DIY floor beams
Once we have a support (wooden frame), we can nail logs to it (in the case of a concrete grillage, you must first screw a wooden board flat onto it, as in the photo above).
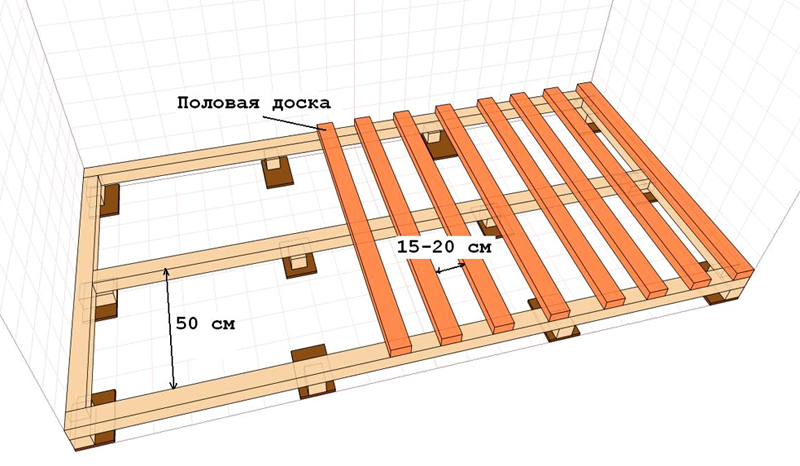
Joists (or floor beams) are usually made from 200x50 (195x45) boards with a pitch of 400-600 mm. Read more at the links below. It is important to nail them both to the intermediate supports and to the joist frame (this is the same joist, only across others along the perimeter of the building)
By the way, ceilings are made using the same technology using the same logs, and then they are hemmed underneath with plasterboard or clapboard.
DIY frame floor.
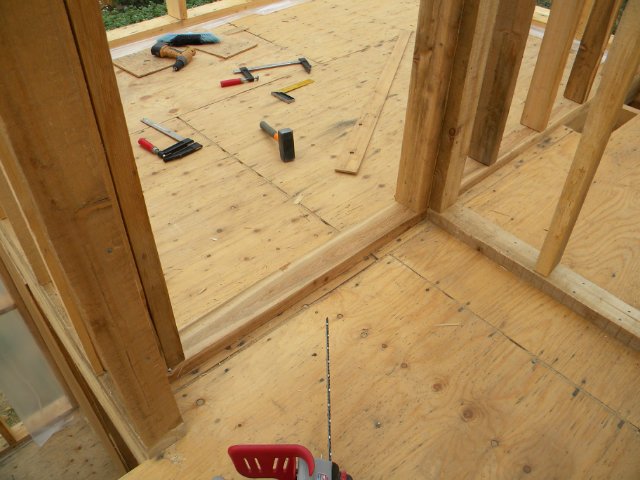
If you are building using the “platform” technology, then you must put a subfloor on the joists in front of the walls - usually plywood (FK 1525x1525 or FSF 2440x1220) or OSB-3 (2500x1250). FC plywood is used only in the case of a non-classical platform, when the subfloor is already under the roof, since it is not very moisture resistant.
Platform technology in a frame house is especially popular and for good reason. It is much more convenient to build on it, since the walls can then be assembled on a flat floor.
Additional subfloor information and instructions:
Frame house yourself: racks, frames (walls)
Using the “platform”, the frame walls are assembled on the subfloor and raised ready-made. This allows you to assemble the walls very quickly. Remember - timber is not used in a frame house. Neither in the walls nor in the floor. The beam is a bridge of cold that “twists” very well.
Here in this video a house is being built on a platform:
There is also a “balloon” system, in which we - I did it this way, in some ways it is even more convenient, but still much slower, I would not recommend this system.
Additional information and instructions on framed walls:
Do-it-yourself panel house! Openings in walls
Openings in Canadian and Finnish frames are made differently. And there is also Norwegian, which is something in between. In any case, any of these houses are not panel houses, as they call them.
Now popular Finnish technology frame house construction, when a crossbar cuts into the wall along its entire length, and the pillars of the openings do not double.
Additional information and instructions for openings:
Roof and rafters of a frame house. Is it possible to do it yourself?
Installing the roof of a frame house is a very important undertaking. The rafters (pictured) of the roof can be made both before and after sheathing the wall. I did the sheathing first, but often the rafters are done before the sheathing (especially the Finns, who very quickly install trusses on the roof from the factory)
I delegated this stage, I couldn’t handle it myself, the boards for the rafters are very heavy, you have to drag them to the very top and do everything very precisely.
Read more about rafters before going further:
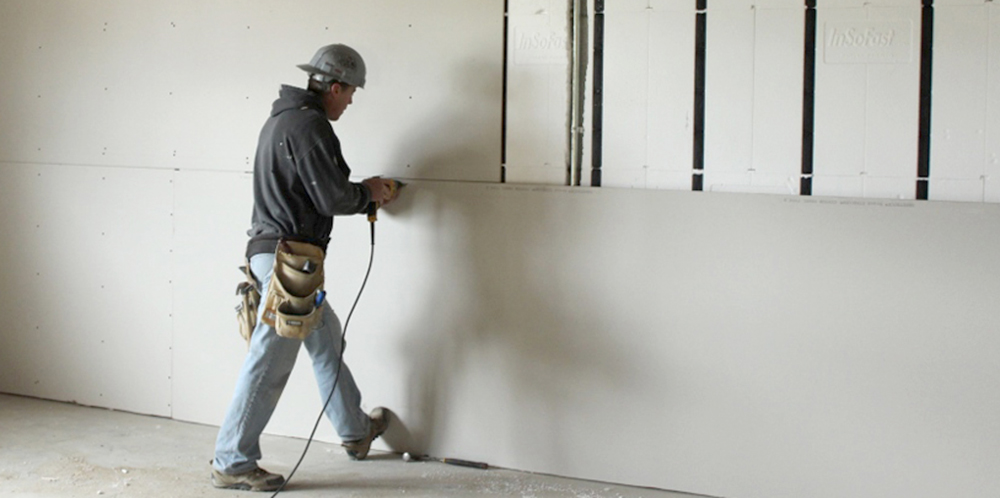
Do-it-yourself frame-panel house. Wall cladding
Before covering the walls, you need to check their vertical slope. It is better to completely sew up the walls, and then cut openings in the sheathing, this will make it stronger.
Usually the walls are covered with OSB, but I don’t like this board, it doesn’t let off steam. It’s better then to use either an inch (as in my photo).
How to build a frame house yourself. Selection and installation of roofing covering
Now is the time to cover the roof. We select the material, then we choose the right pie roofing (depending on the material and the room - whether it is warm or not). Do not forget that it is often necessary to design ventilation in advance in order to lay penetrations for ventilation pipes before covering the roof with the same flexible tiles (all this can be done with metal later).
Additional information and instructions on films:
Windows and doors in a frame house
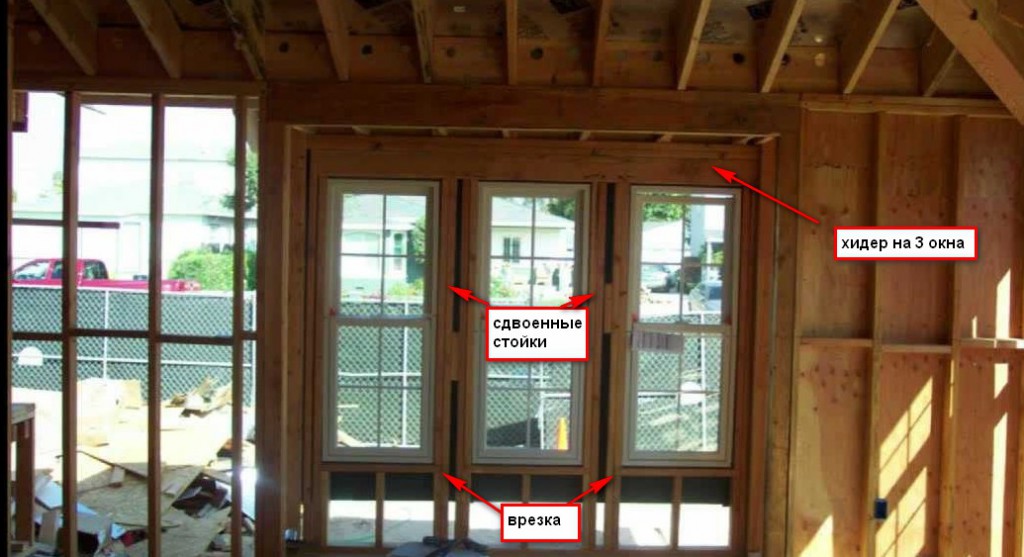
It is better to install windows before façade materials and insulation. So that later there will be no problems with the design of slopes and getting the insulation wet. Doors and windows can be purchased with installation (expensive, but they provide a guarantee), or installed yourself (budgetary, but difficult). Large windows from 2 sq.m. It is better to place them on concrete dowels; small ones can be placed on plates. Do not forget about professional foam, special plastic spacers, as well as the use of films (to form a closed loop of vapor and waterproofing.
DIY frame house facade

The sooner we make the facade, the faster our structures will be protected from moisture, and the film from sunlight (from which it gradually loses its properties).
Almost all facades in a proper wooden house are made with a ventilation gap, so don’t forget to buy dry sheathing (buy 100x25 and cut lengthwise, as well as 50x50 in the case of the option with external insulation up to the ventilation gap).
Additional information and instructions on façade materials:
DIY frame house. Communications
Before insulation, it is better to carry out the main communications in the house: sewerage and water supply. You can wait a bit with electricity and heating, since they are done either openly or hidden, but in lathing (after the main insulation and vapor barrier circuit).
The bathrooms of our frame-panel house are a separate issue:
- bathroom floors must be well waterproofed;
- the ceiling must be vapor barrier;
- walls must be vapor-insulated.
Additional information and communication instructions:
Do-it-yourself insulation of a wooden house.
Frames are usually insulated with mineral wool, but ecowool is becoming more and more popular. I will also insulate my house with eco-wool, it has many advantages: price, absence of cracks in the insulation, speed of insulation, environmental friendliness (compared to mineral wool), lack of a clear step of structural elements (you can make a lag step of at least 300 mm, the same thing with racks, you can safely install them at 600 mm intervals).
Do-it-yourself frame: step-by-step instructions. Electrical and heating
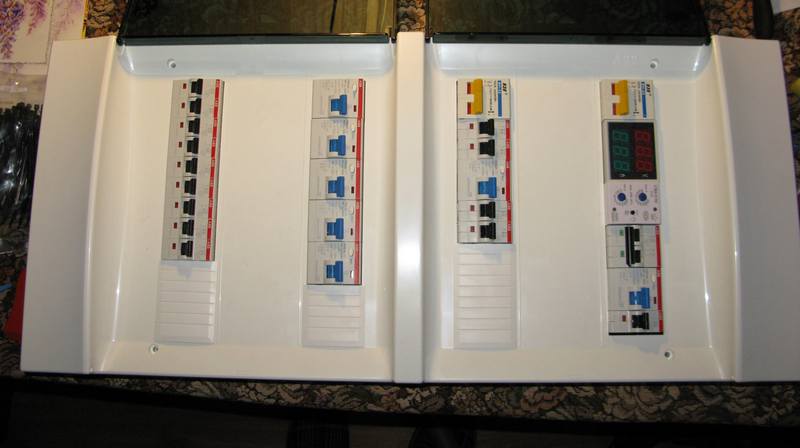
Now is the time to connect electricity from the pole to your electrical panel (it is better to design and assemble it in advance, and before that, obtain permission to connect a specific amount of kW).
After the house is insulated, but before the finishing stage, it’s time to also start heating. We start with choosing heating fuel (wood, gas, electric, gasoline), a boiler, and then the material for the heating pipes. Recently, heated floors are increasingly being chosen for frame houses instead of heating radiators.
Canadian wooden house- very warm, you need to insulate it well once, and then you can even heat it with electricity. Of course, spending on electric heating will be 3 times more expensive than gas, but still less than what you pay in an apartment.
Interior decoration: step-by-step instructions
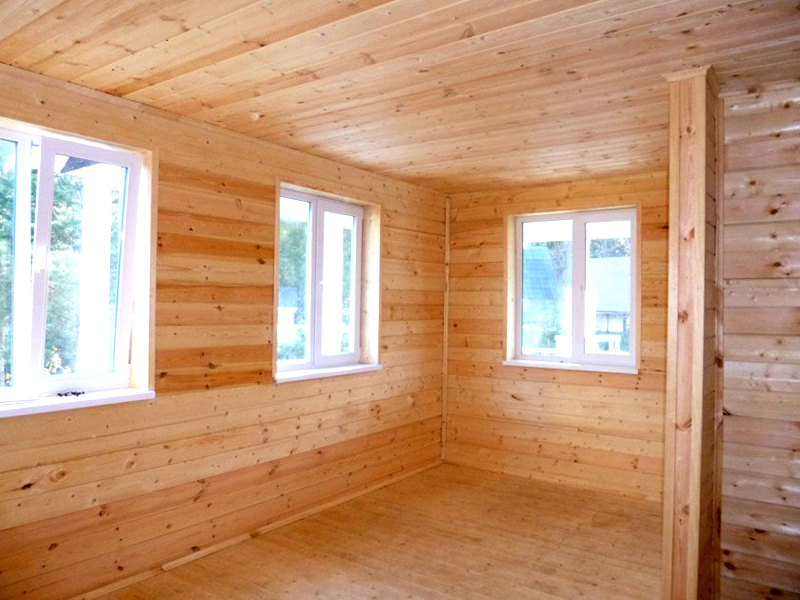
The walls and ceiling in a frame house are usually finished with gypsum board (plasterboard), and then it is painted or wallpaper is glued to it. GCR is good because it does not burn well. In Canada, it is generally prohibited to build frames without gypsum boards due to fire safety requirements. And here we are increasingly nailing lining or imitation timber to the ceiling and painting it (I especially like white at this place).
After finishing the walls and ceiling, you can pour a concrete screed, finish the floor with tiles or laminate, and then install interior doors. Finnish interior doors are especially good; many people praise them, but their prices are now exorbitant.
© 2014-2016 site
Today, building a frame house is one of the cheapest and most practical options for purchasing your own home. And if you take into account the fact that it will be built with your own hands, then it will have no equal in price.
Our step by step instructions We will divide the construction of a frame house into several stages:
It is worth noting that each stage of building a frame house deserves a separate article, in addition to everything, if you describe all possible options for foundations, roofs, etc., you can get a whole book. In this regard, to improve readability, some steps in construction are described in detail in separate articles, but here - only what concerns the features specifically frame house.
Step No. 1: Preparatory work for the construction of a frame house
Preparatory work for the construction of any house are the same and include:
- Site preparation
- House marking
Site preparation
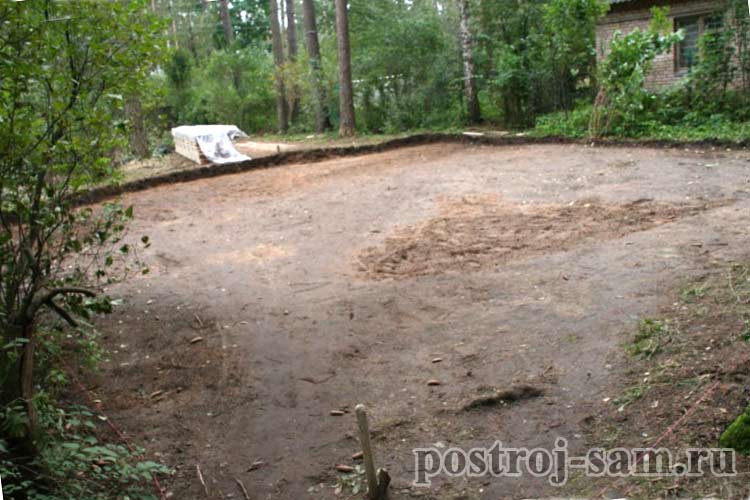 First, you need to clear the area of vegetation, if not all, then at least the place where the house will be built. This will greatly facilitate the marking and allow you to make it more accurately.
If the construction site has a large slope, then, depending on the type of foundation and desire, it can be pre-leveled using special equipment.
Attention! Do not neglect this procedure, spending 1-2 hours on clearing, in the future you will make your work much easier, and measurements in the grass may be subject to a large error.
House marking
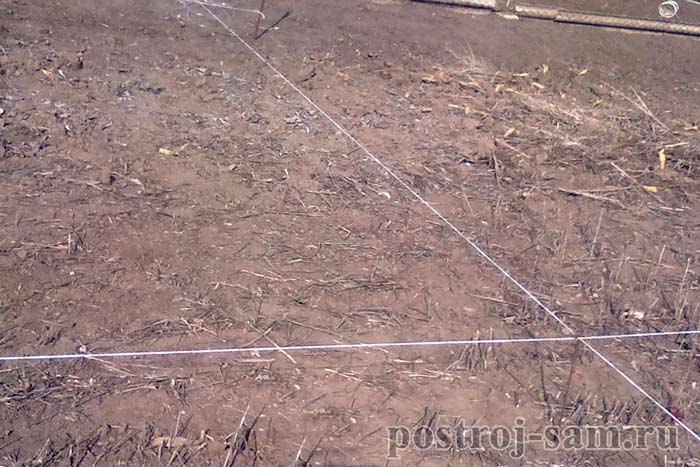 Marking is a very important stage, because the layout and evenness of the corners of the walls depends on it. If the marking is inaccurate, it will be very difficult to correct this error in the next stages.
Marking the foundation of a frame house, as well as any other, as a rule, includes preliminary placement of pegs (all external walls are marked), as well as marking all interior walls.
If you want to learn how to correctly mark the foundation for a house with your own hands, and so that all the walls and corners are level and correspond to the project, I advise you to read my article about this. Given the large amount of information, it had to be submitted separately.
Step #2: Foundation for
The great advantage of a frame house is that almost any type of foundation is suitable for its construction. The only limitation is the type of soil on the site and your capabilities.
It is worth saying that laying the foundation for a frame house with your own hands deserves individual topics discussion and included in separate articles. Moreover, there are several types of suitable foundations, and it’s up to you to decide which one to choose.
Here I will tell you in a nutshell about suitable foundations for a frame house, and in what cases each of them is used, and also give links to their detailed description.
 The most common type of foundation for a frame house is a pile-screw foundation. This is practically the simplest and cheapest option for such a house, especially since installing a pile-screw foundation is not difficult even with your own hands.
Such a foundation is suitable for almost any soil, except rocky ones. Particularly suitable for swampy soils, where dense soils are located deep and other types require huge costs.
In general, all the pros and cons of pile-screw foundations are discussed in another topic that will help you decide on the choice of support for your home.
Shallow strip foundation
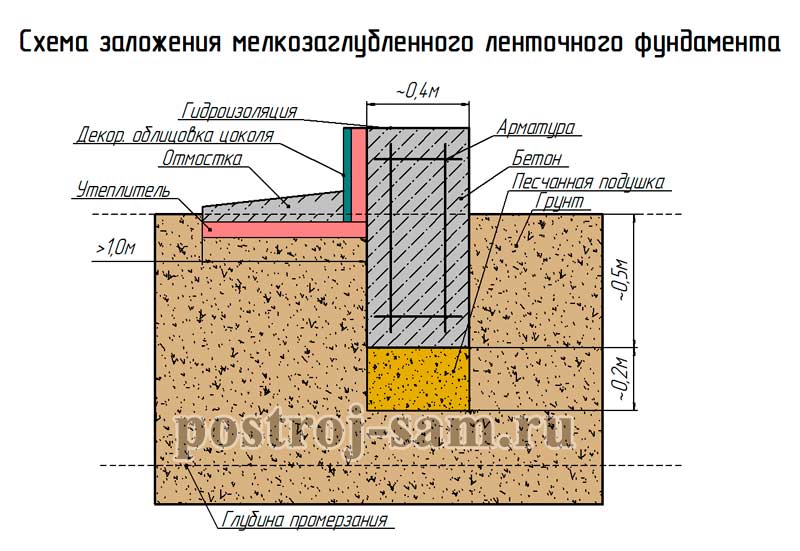 Shallow strip foundation, also used for construction DIY frame house quite often. This is due to the relatively low cost of laying it, as well as the possibility of using concrete floors in the house.
Such a foundation, due to its relative fragility, requires strict adherence to laying technology.
As a rule, a shallow strip foundation is used in good soils, and is strictly contraindicated in soils with very high level groundwater and marshy soils.
Slab foundation for a frame house
 Recently, slab foundations have become increasingly popular for building a frame house with your own hands. Despite its considerable cost, it has obvious advantages, such as versatility, reliability, durability, and it can also be used as a subfloor in the house and not spend money on it separately.
Often, instead of a classic monolithic slab, a slab foundation with stiffeners is used. This allows you to save a little on laying, and also strengthens the entire structure as a whole.
Step No. 3: Installing the floor of a frame house with your own hands
The floors in a frame house are not much different from the floors of other types of houses and can be wooden or concrete. The choice depends entirely on the type of foundation, capabilities and desires. 
In this step-by-step instructions, we will look in detail only at the wooden floor, concrete - in a nutshell, since it is used less often, and it is not possible to fit everything into one article.
Concrete floor installation
 It is worth noting that a concrete floor in a frame house is installed in cases of a slab foundation or a strip foundation. With a slab, everything is clear - the slab itself will be the floor of the first floor.
But if the foundation is strip, the concrete floor is made of lightweight concrete, such as expanded clay concrete, for example.
Wooden floor installation
Let's look at the construction of a wooden floor using an example pile-screw foundation. For a strip one, in principle, everything is done in exactly the same way, with the exception of the lower trim, which can be made of thinner timber. But first things first.
Tying the foundation of a frame house
The installation of a wooden floor begins with tying the foundation. As a rule, the piping is made from timber 150x150 or 150x200, depending on the thickness of the wall and the distance between the piles. The greater the distance, the thicker the timber should be to avoid sagging. 
The strapping is necessary, firstly, in order to give rigidity to the foundation, secondly, to evenly distribute the load on the foundation, and thirdly, it will serve as a support for the future floor of the frame house.
In order to easily carry out the tying process with your own hands, we will divide it into several stages:
When the piping of the foundation of the frame house is ready, we proceed to the next stage of our instructions - the construction of the floor frame.
Floor frame in the house
It is worth noting that already at this stage it is advisable to provide for all communications entering the house, such as water and sewerage. Electricity and gas can be supplied later, but if everything is foreseen in advance, it will be much more less problems after.
The next step is to install the joists on top of the trim. If the distance between the supports is about 4 meters, then it would be better to use timber measuring 100x200mm or 100x150mm. You can use a 50x200mm or 50x150mm board, sewing them together in twos. 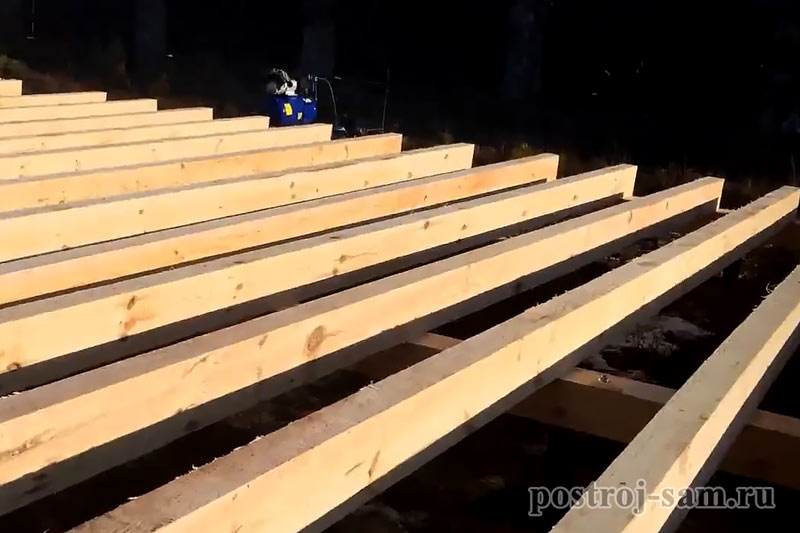
If the distance is less than 3 meters, you can use a board measuring 50x150mm or better 50x200mm.
Installation of logs is a simple stage in assembling a frame house, but there are some nuances that must be covered in these instructions:
Do-it-yourself waterproofing and insulation of the floor of a frame house
It is worth noting that waterproofing, as well as vapor barrier, must be installed with an overlap, according to the instructions for the material, while preventing moisture from entering the insulation, both from the outside and from the inside. And the insulation itself is laid tightly, without gaps.
So we have looked at the instructions for installing the floor of a frame house, now it’s time to start working on the walls.
Step No. 4: Construction of the walls of a frame house
Our next step instructions I will be installing the walls myself. Just like with the floor, we will fasten all the boards and beams with nails and (or) mounting metal corners; some fastenings can be made with studs.
It is worth noting that almost the entire frame is assembled from boards measuring 50x150mm or 50x200mm, depending on required thickness walls and the required thickness of insulation. 
Some people think that it would be better to install timber in the corners of a frame house, but this is not entirely correct, and I’ll tell you why a little later, during the installation process.
So, let's start assembling the frame of the walls of the future house.
For better understanding and assimilation, we will divide our instructions for installing the walls of a frame house into several stages:
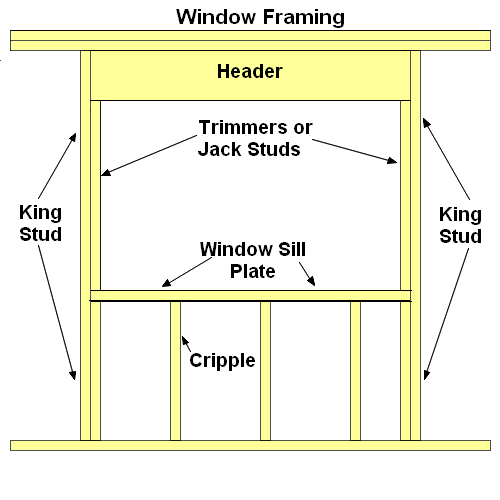
- Assembling the walls of a frame house. Windows and doors
- Installation and fastening of walls vertically on site
Assembling the walls of a frame house with your own hands. Windows and doors
We will assemble the walls on the already finished floor of the frame house; this is the most convenient option. But we must take into account that in this case, it is necessary that all dimensions be accurate so that the walls do not turn out to be longer or shorter than the already installed floor.
To make it clear what I'm talking about, first look at sectional wall of a frame house , and then I will tell you everything in order.
Now let’s look at step by step how to assemble all the walls of a frame house with your own hands:
The most common mistake when assembling the walls of a frame house is that many people forget to take into account the thickness of the board when calculating, thus the wall is not as long as we would like.
Putting the walls in place

It is worth noting that when assembling walls, it is necessary to use a cord, pulling it from one corner to another, otherwise the corners will be even, but the walls will not.
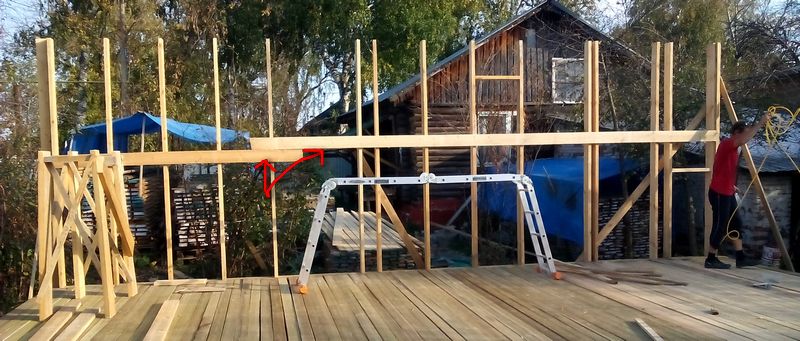
Top trim and structural reinforcement
So, the frame of the walls has been assembled, now you need to make the top frame from the same board as the walls.
The top trim is necessary, first of all, for stronger adhesion of the corners, and will also give unity to all parts of the frame walls and distribute the load between them. 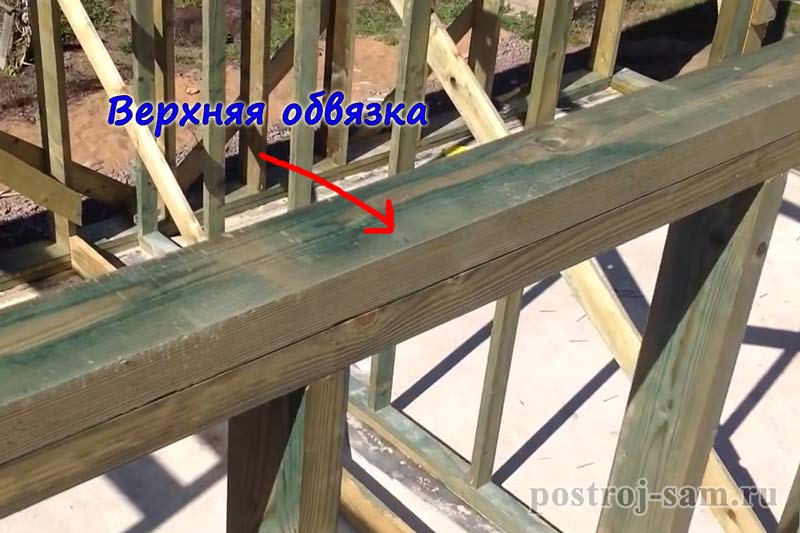
To do this, it is necessary to pierce the board with 120-150mm nails over the walls, along the entire perimeter, including the internal load-bearing ones, so that all joints are covered with an overlap of at least 25-30 cm. Except for the corners, where the overlap will be equal to the thickness of the wall. 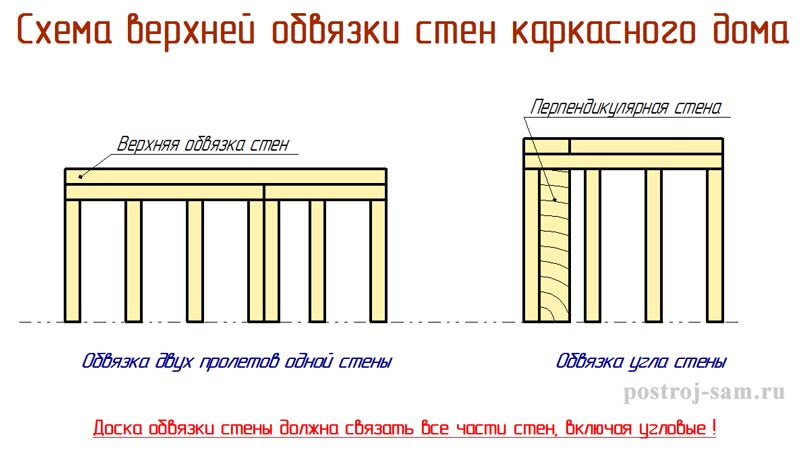
The next step in our instructions will be to strengthen the entire structure as a whole. There are several options, the most common is reinforcement using plywood or OSB board. 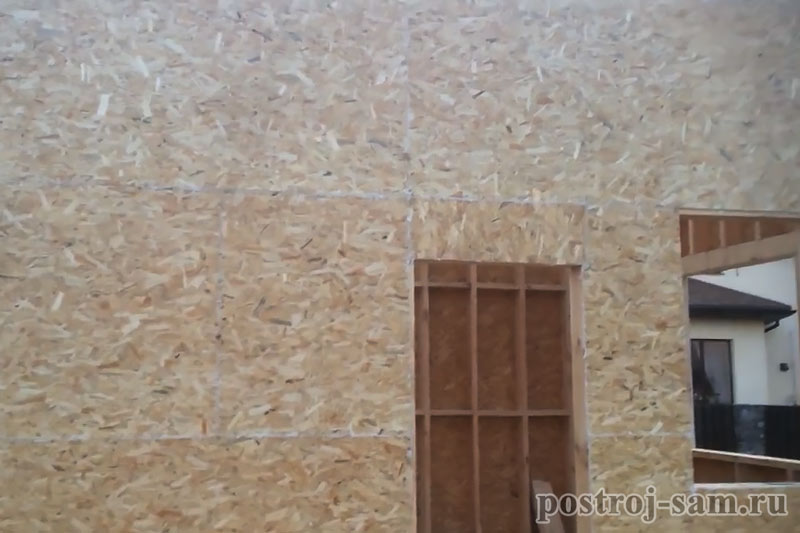
As a rule, having pierced one side along the entire perimeter (internal or external) with sheets of OSB boards, the frame of the house already becomes very rigid.
Internal partitions of a frame house
The construction of internal partitions is almost no different from the construction of external walls, except that they have more lenient requirements in terms of thickness and insulation. 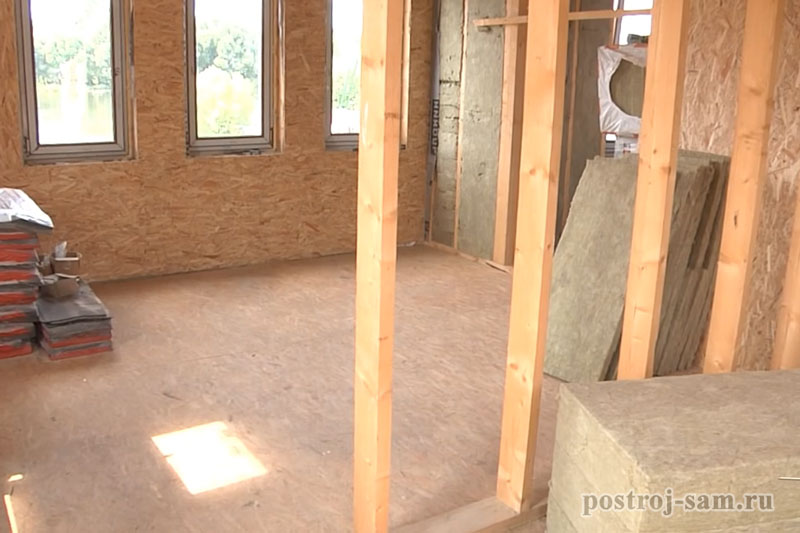
- Internal partitions, unlike external walls, can be made thinner. Everything will depend on preferences and comfort in terms of sound insulation.
- The insulation inside the partitions will serve primarily as a sound-absorbing material rather than as thermal insulation.
- Internal partitions can be insulated without waterproofing and vapor barrier materials.
These are all the main differences between internal walls and external ones, otherwise they are arranged in exactly the same way.
Step No. 5: Roof of a frame house
The roof of a frame house is practically no different from the roof of other houses, be it concrete, brick or any other. I’ll even say more that installing a roof for a frame house will be less labor-intensive than, for example, for a block or brick house, because its fastening to the walls will be much simpler. 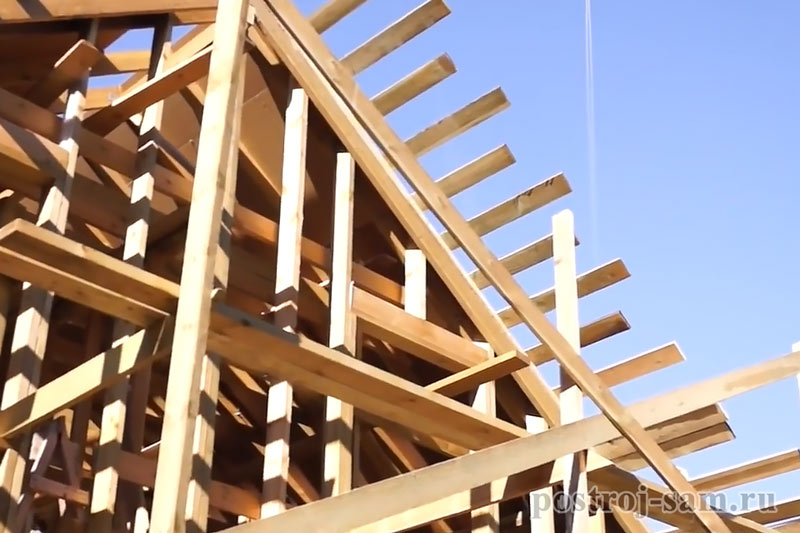
It is worth noting that building a roof is a very responsible process, but if you do not have a complex house layout, then you can easily do it yourself.
Building the roof of any house, including a frame one, is a very large topic with many nuances. Firstly, there are many types of roofs, and it is not possible to describe everything in detail in one article. Well, secondly, in order not to confuse you, I will probably move this topic to a separate article.
Step No. 6: Insulating the frame house
So we have come to the final stage of building a frame house - its insulation. Everything needs to be insulated - floor, walls and ceiling.
You can read more about insulating a frame house with your own hands in another step-by-step instruction; here we will discuss only general points.
When choosing insulation for the walls of a frame house, it is necessary to take into account not only the characteristics of the insulation itself, but also the characteristics of wood, with which not all types of insulation will interact well.
Here is a short instruction on how to insulate a frame house with your own hands
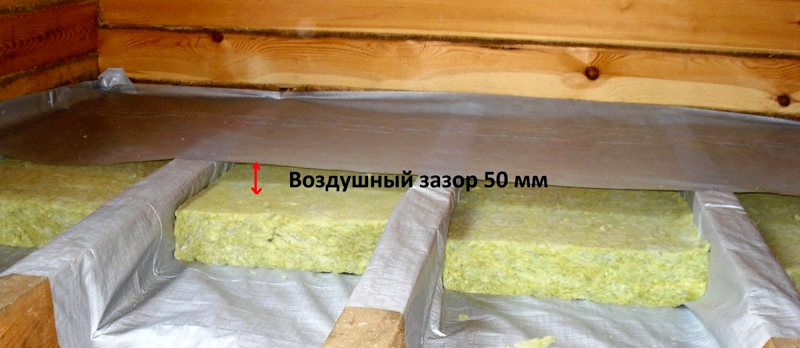
- Outside, over the OSB sheets, a special waterproofing membrane is stretched. Which side should be in the instructions for it.
- From the inside of the house, between the studs, insulation is laid in several layers, depending on the requirements for the house and the thickness of the wall. Each layer is laid overlapping the joint of the previous one to avoid cold bridges.
- Floor insulation occurs in the same way.
- It is better to insulate the ceiling from the attic by first filling a vapor barrier film from below onto the ceiling beams and hemming them with boards or plywood.
- After laying the insulation, it is necessary to fill a vapor barrier film over it; it will protect the insulation from moisture from the inside.
- Depending on the needs and further finishing work, sheathing material is placed on the walls on top of the film - boards or slats, but most often - OSB sheets, on top of which, in the future, finishing is carried out.
As you have already seen, there was a lot of text. But, I believe, all stages of construction were described in detail here DIY frame house, despite the fact that some points were included in separate topics, but this is only for your convenience.
I hope that by following these step-by-step instructions, you will be able to acquire a warm, cozy and reliable home without much difficulty and at minimal cost.
Everyone who is going to build a house or is just thinking about it is concerned about one sensitive issue - the cost of the project. You can endlessly select building materials, to reduce the cost of construction, but in the end you will get a structure made of low-quality materials, which may affect the reliability of the structure. And you won’t save much money, because it’s much more difficult to work with such materials, and builders will demand higher payments. But there is a solution, you need to build a frame house with your own hands. The step-by-step instructions given in this article will help you understand all the nuances of this topic.
Everything about a do-it-yourself frame house. Step-by-step instructions, photo examples and recommendations
Building a house is a very labor-intensive and time-consuming task. Here you cannot neglect the little things or skimp on materials, make false calculations or underestimate the importance load-bearing structures. This also applies to frame housing construction, only there are several parameters that put such buildings a step higher than houses with reinforcement and brickwork, namely:
- low cost of construction;
- increased heat transfer;
- fast construction;
- environmentally friendly materials;
- lightweight design.
To understand how to build such a house, the stages of work are given below.
Preparing the site for the foundation
The layout of the site for building a house is organized based on the location of the site, the depth of groundwater, the evenness of the surface and the planned outbuildings near the future building. To make it easier to perceive information, the actions will be described in tables with photographs based on a columnar foundation.
| Type of work | Required action | Execution method | Illustration |
| Location determination | Plan the exact location of the house, taking into account all distances to other objects | Using a tape measure, measure all sides of the planned foundation and write them down on paper |  |
| Drawing | Create a small copy of the foundation layout | Using a ruler and pencil, draw the boundaries of the foundation indicating all dimensions of length, width and trench sizes in millimeters |  |
| Land marking | Transfer drawing data to site | Using pegs and a cord, organize the marking of the area for the future foundation | 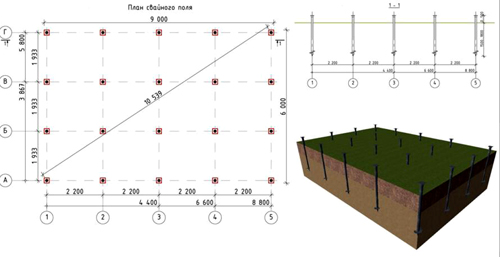 |
| Digging trenches | Dig trenches according to the dimensions in the drawing | You can dig trenches using a mini excavator or by hand. The width is adjusted according to the stretched cords, and the depth is determined depending on the total area of the building and the number of floors |  |
| Marking for pillars | Determine the distance between the foundation pillars | In the trench you need to mark the places where the recesses for the pillars will be dug | 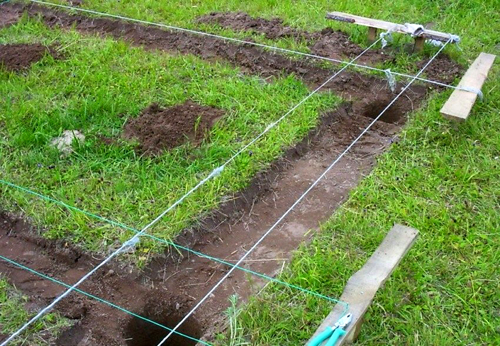 |
| Drilling wells for piles | Dig wells suitable for the diameter and height of the pillars | Using a drill or shovel, all holes are dug at the places where they are marked in the trench |  |
Note! Preparatory work also includes completely leveling the site around the perimeter and filling in all recesses, if any. In the case of loose soil, dense compaction of all trenches and wells will not hurt.
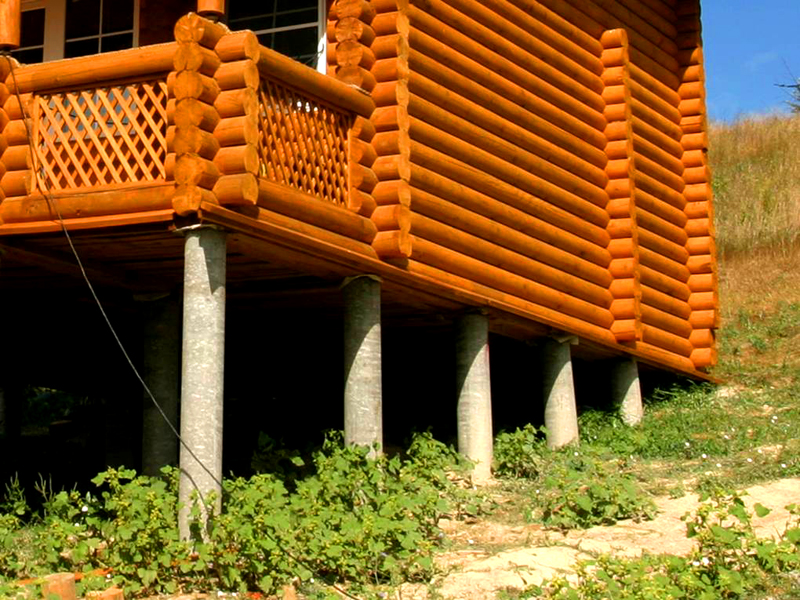
Laying a columnar foundation with your own hands for a frame house
There are several ways to organize a columnar foundation, each of which has its own technological subtleties.
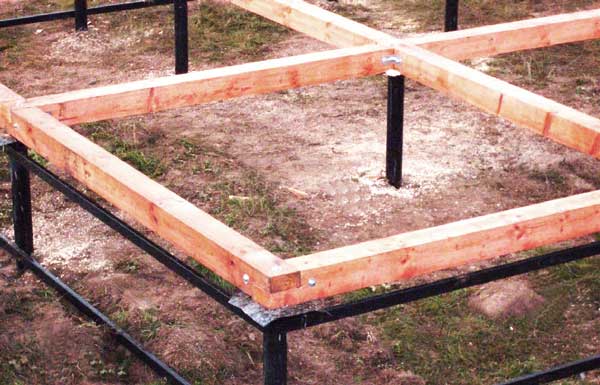
- Laying the foundation using asbestos or metal pipes. After fully marking the site according to the project, in the places where the piles will stand, wells with a diameter of 20 centimeters and a depth of 50 centimeters are drilled. After this, pipes are placed of such a length that the top edge is 30 cm above the ground. Next, you need to fill the inside of the pipes with concrete, after inserting an anchor into them so that it sticks up 15 cm. After pouring, you need to raise the piles by 10-15 cm so that a concrete cushion is formed under them. The pipes should be filled so that there is 10 cm of void left to the top. The soil that you got from the well must be poured around the pillars and compacted. After installing the columns, it should take about two days for the concrete to harden well and to be able to continue working on the foundation. The next stage involves installing the bars perpendicular to the pillars. They are attached to anchors sticking out of the pipes. The size of the timber, which also serves as a frame for the future floor, should start from 150x150 mm. Regarding the principle of placing piles along the perimeter, it should be noted that the columns should be located under all walls and partitions, since these places have the greatest load. The distance between piles must be at least 1.5 meters.
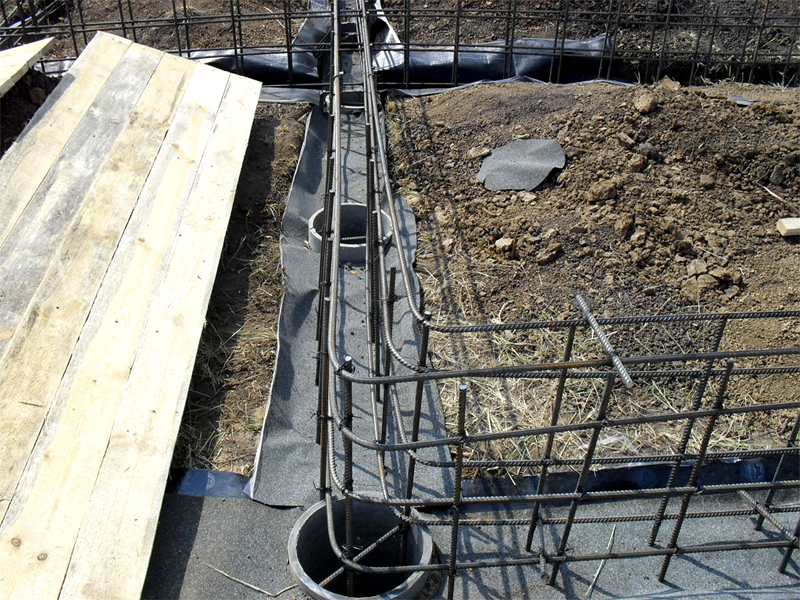
- Columnar foundation with strip elements. In this case, things are a little more complicated. Here you will need reinforcement, formwork, imported concrete and waterproofing. First of all, you need to mark the plane according to the documentation. Then, using an excavator or shovel, dig trenches; their dimensions will be 30 cm wide and 40 cm deep. Next, the places inside the trench for the piles are marked, the hole size is 20 cm wide, 20 cm long and 1.5 meters deep. After earthworks assembly of frames from reinforcement begins. Pieces equal to the length of each trench are cut. The frame must have four identical rods on which clamps are attached square shape, in increments of 20 cm. The parts are fastened using a knitting wire and a special hook. The size of the frames for such trenches should be 30x30 cm. For piles, frames are also knitted using the same technology, but their size should be 15x15 cm, and the length, taking into account the fact that the end of the reinforcement is located inside the trench frame, which means plus 30 cm. When all The structure is assembled; you need to install formwork along the entire perimeter of the trenches so that the height of the foundation is at least 50 centimeters. The formwork is made from boards that are assembled into panels of the required size. They are placed along the edges of the trenches and reinforced with spacers, tied with wire and secured with supports from the outside so that the boards do not fall apart when pouring concrete. The prepared form for the foundation is filled with concrete brought by special mixer machines or made by yourself using a concrete mixer. After several days, the formwork is removed, all sides of the foundation that are above the ground are lubricated with waterproofing resin, and the top is covered with roofing felt. A 150x150 beam is laid on roofing felt and secured to the concrete with anchors.
Note! When constructing a columnar foundation, a basement or cellar is not provided under it. The implementation of such a construction is very labor-intensive and requires additional manipulations in the form of filling the space between the pillars, digging a pit and concreting the entire surface of the basement.
The latest technologies for building frame houses step by step with your own hands + photos
Any construction of a house begins with a project that takes into account all the dimensions of the elements and their placement. It is better to order a frame house project from professionals, because without a proper string of knowledge in this area, it will be difficult for you to draw everything correctly.
Now you have a project and a ready foundation, you can start building a house. Below we will describe how to build a 6x6 frame house with your own hands, step-by-step instructions and illustrations.
Floor assembly
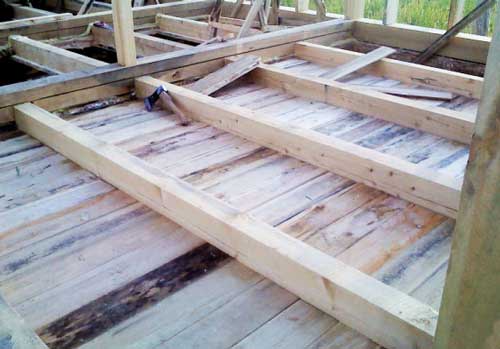
All boards that will be involved in the construction of a frame house must be cleaned of bark (if any) and treated with an antiseptic. Since the main bars have already been laid in the description of the foundation, you can begin installing the logs. Logs are the base of the subfloor in the form of a series of beams. Under the logs you need to lay boards 150 mm wide and 30 mm thick. They need to be positioned so that they cover the entire floor area and there are no gaps anywhere.
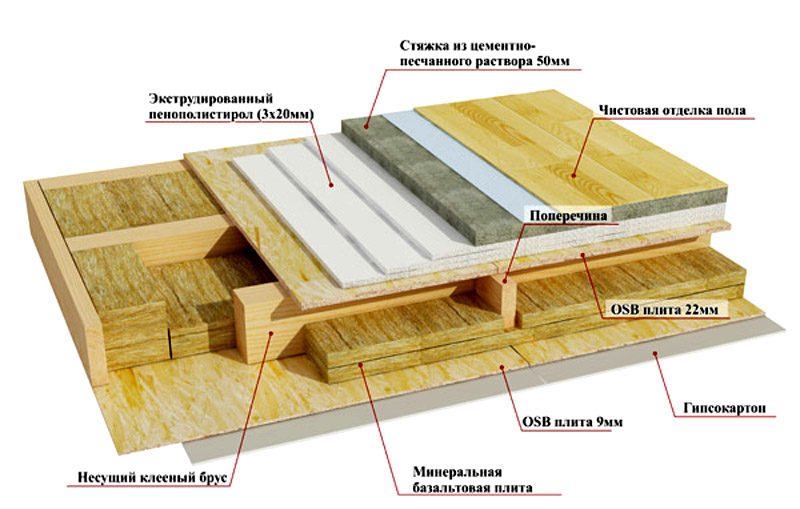
In order not to place supports under the floor to avoid sagging of the logs, their size should start from 150x100 cm, and the maximum length is 4 meters. Therefore, you need to design the project so that the load-bearing interior wall divides the area according to the limitation. For example, in the middle, which will determine the length of the log of 3 meters. The step between the beams should not exceed 50 centimeters, otherwise the finished floor will sag between the joists. It is better to secure the timber along the edges with wooden wedges, since metal corners will provoke rotting.
Now you can install the insulation between the beams, it will work well mineral wool or thick foam. It is necessary to cover everything on top with a vapor barrier, fixing the film with staples to the boards.
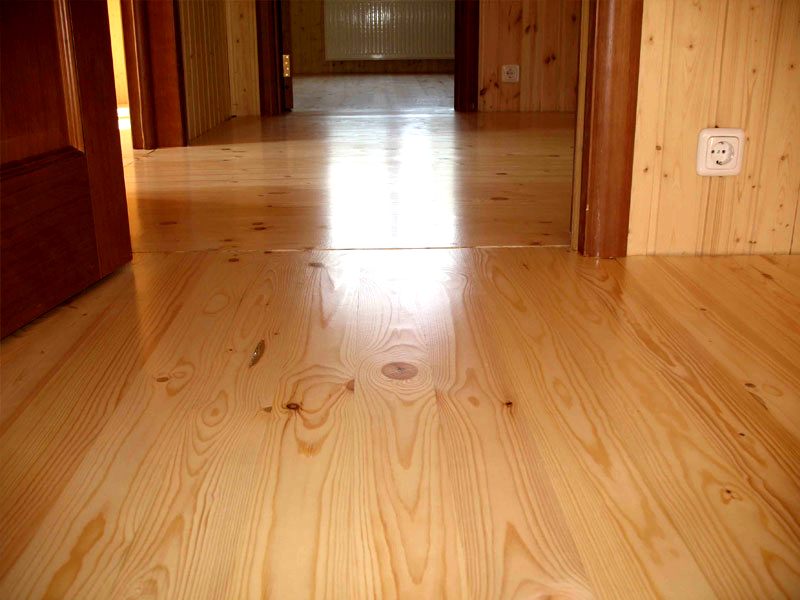
It's time for the finishing boards. For this purpose, it is better to buy a factory floorboard with locks, because it fits tightly and is well dried. The entire board needs to be soaked in drying oil and allowed to dry, after which you can lay it perpendicular to the joist. Next comes painting or varnishing, although this procedure is carried out at the final stage.
Important! All the wood that makes up the frame of the house must be of the same species, because each wood has a different degree of drying out, which can lead to deformation of the geometry of the house.
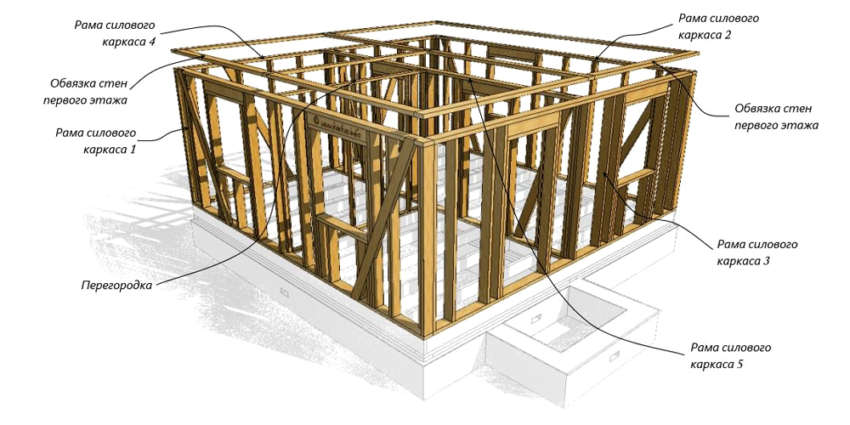
The principle of constructing the walls of a frame house
To understand the technology in the construction of frame housing, study the instructions step by step. You need to start by placing the bottom trim around the perimeter and along the lines of the walls. The timber must be laid flat and grooves must be made every 50 cm for the vertical boards. Having strengthened the lower belt, you need to install corner boards, supporting them with spacers. The height of the boards must correspond to the height of the ceiling; to prevent them from falling, they are connected with temporary slats. All timber must be strictly vertical and free from defects.
Next, there is the process of installing the upper trim, which must completely match the bottom, this also applies to the grooves. The ceiling is assembled in the same way as the floor; the logs should be positioned flush with the vertical wall posts. There is no need to make the bottom backing from boards; the bottom will be sewn up during the interior finishing process.
The insulation is installed in all the voids of the walls and ceiling, and the hydrobarrier film is fixed on both the outside and the inside of the frame. If you are planning a second floor, then simply repeat all the steps carried out with the first, and the layout of the rooms may differ.
To learn more about the technology of building a frame house with your own hands, you can watch the step-by-step instructions in the video.
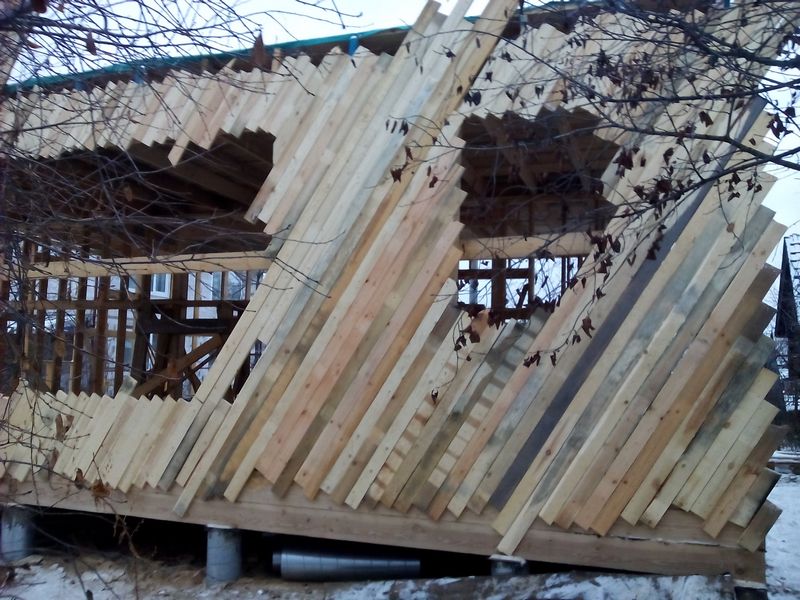
Roof construction
Eat different types roof organization - one, two, three and hipped, but the simplest and most popular is the gable roof. The construction of the roof begins with the installation of the rafter system. Beams measuring 150x100 mm are installed in the letter “L”; to do this, their ends need to be cut obliquely so that they fit tightly and form an angle of 50 degrees. For a stronger structure, each “L” is connected with a crossbar to form the letter “A”. Starting from the edge of the building, rafters are fastened every meter.
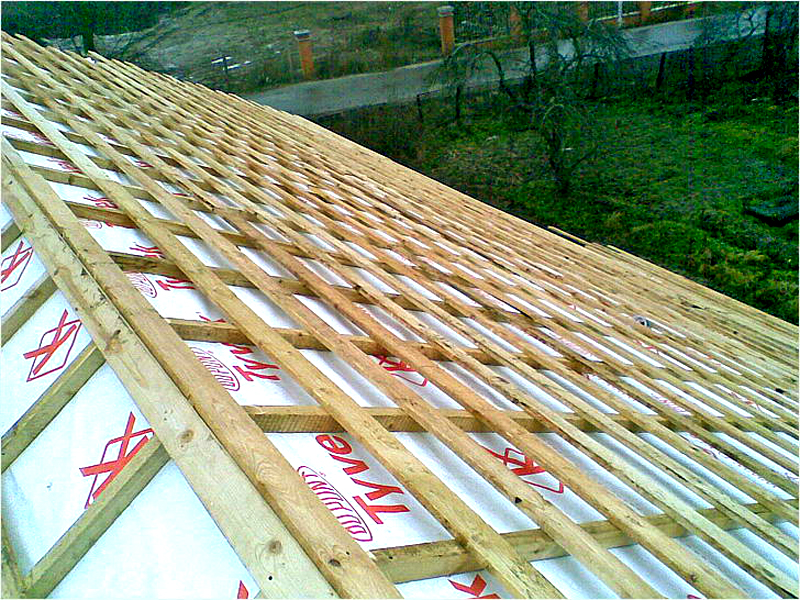
Next comes the sheathing - these are slats that are fastened with nails perpendicular to the rafters along the entire length of the roof. The sheathing should protrude 30 cm on both sides of the roof, and the step between them is 10 cm.
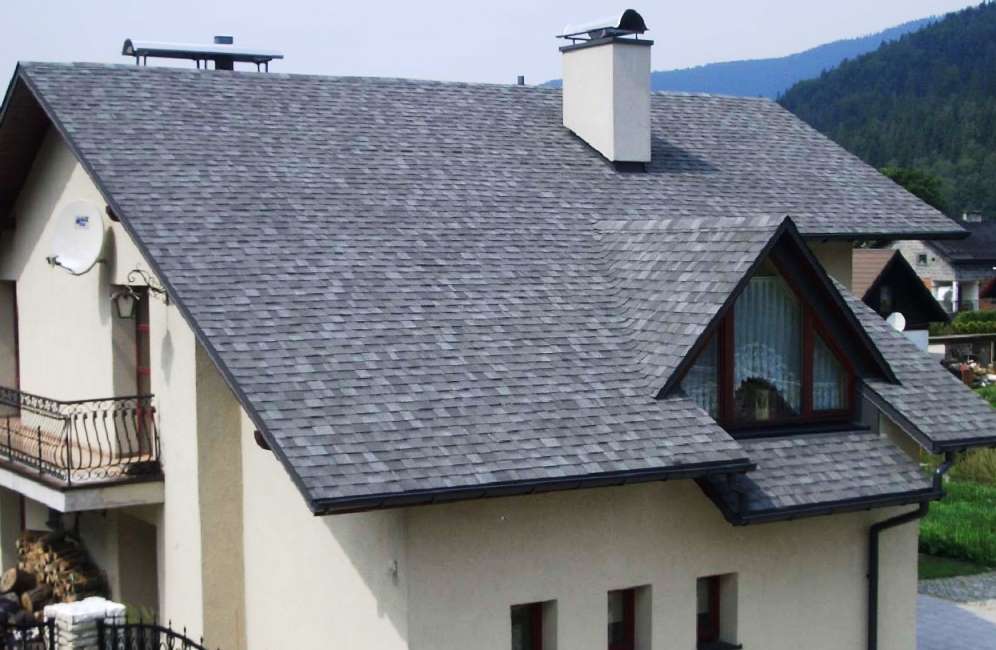
Now you need to choose a roof covering, it can be metal tiles, bitumen shingles, slate, corrugated sheets, etc. If you choose metal tiles, then you need to start attaching the sheets from bottom to top, overlapping the top sheet with the bottom one. A ridge is installed at the very top.
A ceiling is formed from the crossbars that connect the rafters; mineral wool is laid between the boards, covered with waterproofing and covered with plasterboard or OSB.
Façade cladding and interior work
To fully create a frame- panel house You need to cover all the walls with your own hands. The most suitable material for external cladding is OSB boards(moisture resistant). The sheets are screwed with self-tapping screws so that there are no gaps left. Inside the house you can use drywall, which is also fixed with self-tapping screws. After this, the walls are plastered and decorated with either wallpaper or paint.
Do-it-yourself method for insulating frame houses step by step + instructions
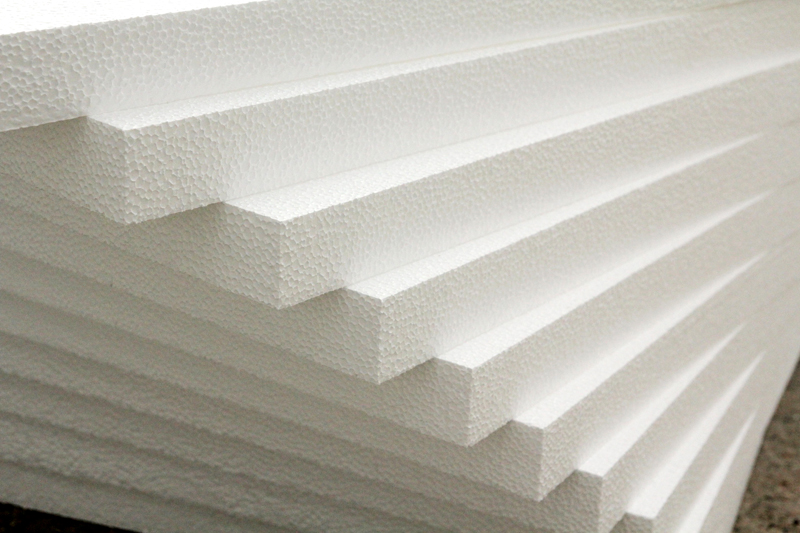
Insulation of walls can be done from the inside, but it is more convenient and practical to do it on the facade. The most popular material for such work is foam.
- The first sheet is glued from any lower corner; liquid nails or special umbrellas are used to fix it to the OSB.
- When all the foam is glued, you need to tighten it with a mesh, coating it with tile adhesive.
- After the glue has hardened, you can make finishing decorations, for example, cover it with bark beetle.

Ready-made solutions for turnkey frame houses
When a person does not want to know how to make a frame house with his own hands, he can resort to purchasing ready-made solutions.
House price table
| Image | Name | House dimensions | Number of floors | Cost, rub. |
 |
Reference | 7x8 | 2 | 893 000 |
 |
Forester | 6x8 | 1 | 432 000 |
 |
Lukomorye | 8x8 | 2 | 764 000 |
 |
Premier | 9x10 | 2 | 1 010 000 |
 |
Brig | 4x6 | 1 | 372 000 |
 |
Giant | 9x10 | 2 | 1 325 000 |
Conclusions
The principle of building a frame house with your own hands ( step by step instructions presented in the article) is not that complicated, the main thing is to follow all technological processes. This building is very warm and comfortable, wood creates a cozy atmosphere, complement it with a fireplace and you will have the best housing in the world!
Frame construction is becoming increasingly popular due to the speed of installation and cost of construction. If we talk about the technology of assembling a frame house, then this is inexpensive and high-quality construction, which has long been used to solve housing problems in Western countries.
Before you start building a frame house, you need to decide on your financial capabilities, the amount of time that can be spent on construction, as well as the design and interior of the house.
To do this, you need to familiarize yourself with what types frame houses exist, study their advantages and disadvantages. Having chosen the appropriate option for a frame house, you can begin its construction.
Using frame technology during construction, a post-baroque structure made of metal or wood is erected, which will serve as the frame of the future structure, and the walls are filled with inexpensive heat insulators.
Advantages and disadvantages of this type of construction
First, let's look at the advantages of frame buildings.
- The lightness of the structure makes it possible to save on the foundation.
- Fast construction: you can build a house from start to commissioning in six months; when using frame-panel technology, the time required for installation is reduced to three months.
- The building does not require shrinkage.
- No heavy construction equipment is needed to install the walls.
- High seismic resistance.
- The use of natural materials makes the house environmentally friendly.
- Thanks to frame walls, it is possible to remove all communications from them.
Many advantages relate to specific types of frame buildings, but now let’s look at their main disadvantages, of which there are only three:
- Fragility. You should immediately take into account that the frame structure has a warranty period of 75 years. If you care for it properly, it can practically be used for up to 100 years.
- Limited number of floors. Frame buildings can be erected no more than 2 floors; basically, they are still one-story.
During construction two-story houses their cost becomes comparable to the cost brick house, which deprives the house of the advantage of being cheap.
- Redevelopment. Frame house cannot be redesigned; to do this, it will have to be completely disassembled and reassembled.
Types and varieties
In fact, all frame buildings can be divided into two types: frame-panel and frame-frame.
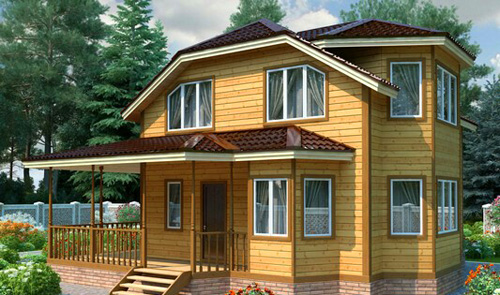
Frame-panel buildings
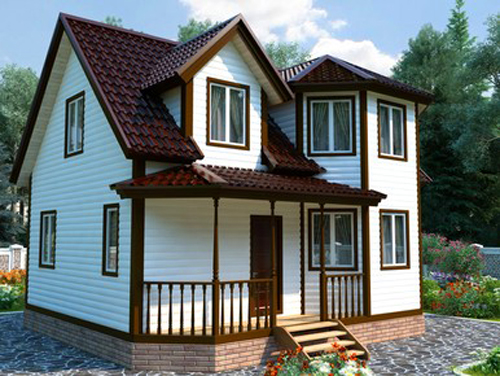
The concept of a “panel house” is often found in the northern regions; it is better known as a Finnish house. Most often it is one-story or two-story house with a gable symmetrical roof. The panels of these houses are manufactured at the factory according to a standard design.
They can be of varying degrees of readiness: starting with an assembled frame and ending with ready-made wall panels, in which windows have already been inserted and utility lines have already been installed, with multi-layer floor slabs and even a roof.
The dimensions of the prefabricated elements correspond exactly to the design ones. Assembly on a construction site consists only of connecting elements to each other, which speeds up the pace of construction.
Frame-panel buildings certainly have a number of advantages. They are quickly assembled thanks to ready-made panels. The box is erected within 3-7 days. Since the panels are manufactured in a factory under the required humidity conditions, they are of good quality, which extends their service life.
The main disadvantage of frame-panel construction is the use of special equipment. In order to install the finished panel in the desired place, a crane is needed. Therefore, this type of frame houses is not very convenient for assembling a house with your own hands.
The technology for installing buildings with your own hands using panels is as follows:
- a lightweight foundation is installed: usually strip or in the form of screw piles;
- a base is created for a frame of wooden trusses, which are later used as joists when constructing the floor;
- panels are installed according to the project;
- a roof is installed and covered with a soft roof;
- At the final stage, all communications are laid and interior and exterior finishing is performed.
Construction takes from 2 to 3 months. Frame-panel buildings weigh little, so they do not shrink. The table below shows an example of the cost of building a frame house with your own hands:
| Construction of a one-story house with an attic | |
|---|---|
| House up to 100 sq.m | 6930 RUR/sq.m |
| House over 100 sq.m. | 6600 RUR/sq.m |
| Construction of a house with an attic floor | |
| House up to 100 sq.m | 5940 RUR/sq.m |
| House over 100 sq.m | 5610 RUR/sq.m |
| Complete set: foundation made of screw piles, piping and frame are made of wooden beams, finishing is made of OSB-3 boards, mineral wool is used as insulation | |
| Additional equipment | |
| Interior partitions | 1848 RUR/linear meter |
| Veranda on screw piles | 2640 RUR/sq.m |
| Finishing | |
| 1700 - 3300 rubles/sq.m for each cost (depending on the chosen finish) | |
Frame buildings
The main advantage of these houses is the opportunity to build the house of your dreams; during construction, you can use any project.
Namely, frame-frame technology allows you to build a house with your own hands.
The difference between frame houses and panel houses is the combination of the installation process and the manufacturing of panels.
The peculiarity of the technology is that first the frame of the future structure is created along with the roof, and then thermal insulation and finishing are carried out with sheet materials. As for further construction, it is carried out similarly to frame-panel construction. When building with your own hands, a frame house can take up to six months to build.
Step by step construction
When building a frame house with your own hands, it is important to take into account the period of residence in it. If we are building a frame house for year-round use, then it will need to be insulated.
Foundation
Frame buildings are very light, so they do not require a solid foundation. You can build one of the following types of foundations:
- screw pile;
- columnar;
- non-buried strip foundation.
The choice of foundation depends on the type of soil and the number of storeys of the frame structure. For a one-story house, a columnar foundation is quite suitable, which can be installed even on capricious soil. The drill makes holes in the ground approximately 20 cm in diameter and about a meter deep in 80 cm increments.
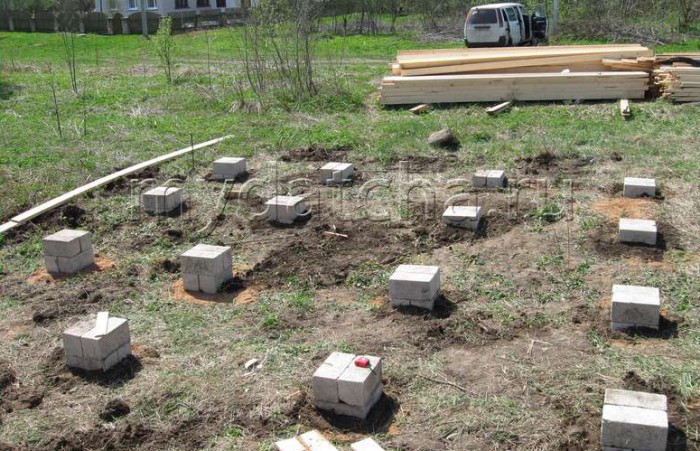
Next, asbestos pipes are inserted into the prepared holes, the free space around which is filled with crushed stone and sand, and then compacted. The holes of the posts are filled with cement. After installing such a foundation, you will not need to wait for it to harden before continuing work.
A screw pile foundation has been very popular lately, which you can install with your own hands without the help of specialists.
This foundation is best installed manually, since the piles must be screwed in strictly to the level so that there are no deviations. When screwing in piles, you must remember that they cannot be screwed in again, as the compacted soil will be disturbed.
For the construction of a frame structure, two technologies are used: Finnish and Canadian. Regardless of the technology, the principles of construction are the same. The basis of these houses is the frame. It can be wooden or metal. The most common frames are made of timber.
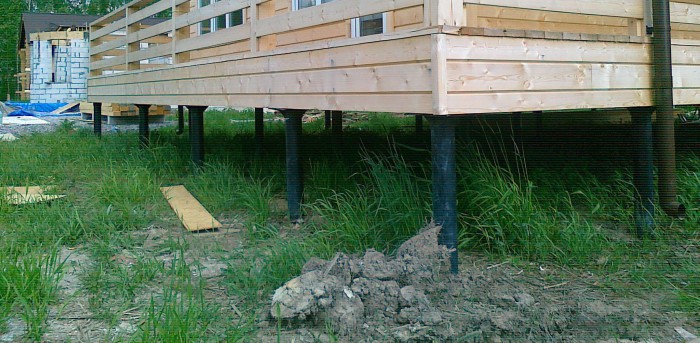
Harness
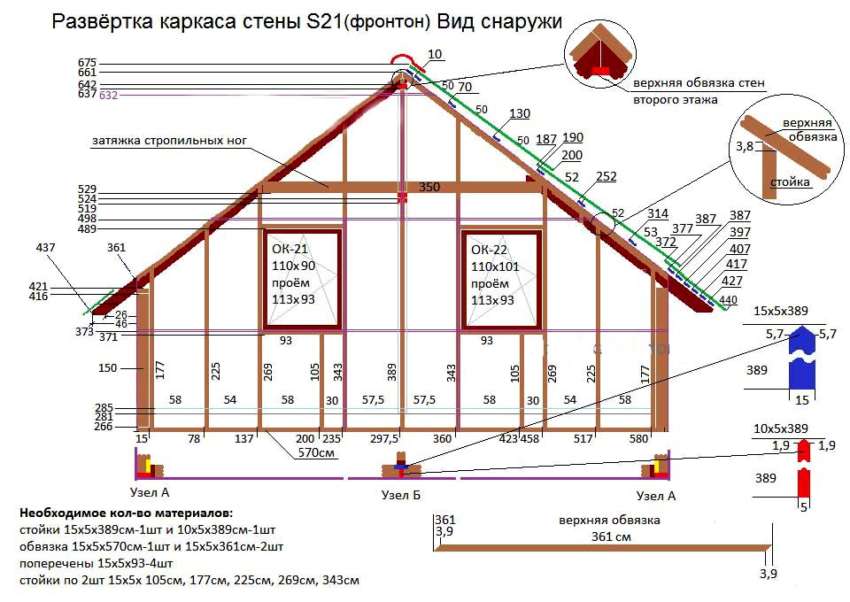
For tying, it is necessary to prepare beams with a cross section of 15*15 cm, 20*20 cm, 20*25 cm. Before laying the timber, it must be prepared. The tops of the piles are covered with a layer of mastic and two layers of roofing material. The entire timber is treated with an antiseptic. The beam is installed along the entire perimeter of the base.
The beams are fastened with nails. To make the frame structure stronger, the joints in the corners are secured with metal corners. The harness is attached to the base with mounting screws. The timber is placed in special grooves and screwed.
A board is laid on the strapping, which covers the joints of the timber. Frame racks will be installed in these places in the future. The board must be treated with an antiseptic.
Mounting the subfloor
To install the subfloor, logs are made from timber with a cross-section of 15*10 cm in increments of 60 cm. Insulation is laid between them to protect against cold and moisture, and the insulation is covered with a vapor barrier film on top.
For the subfloor, the most cheap material– unedged board. Boards must be treated with antiseptic agents. The logs are attached to the frame with metal corners. The boards are nailed to the joists.
Mounting the frame
For the frame, you can take a board 10, 15 and 20 cm by 5 cm. First of all, corner posts are installed. They are secured with reinforced steel corners. Then all other racks are mounted using corners.
For better fastening of the frame, jibs are made along the walls. They will not allow the frame to become loose.
At the corners, the timber is fastened with the help of cutting, in the rest with the help of steel corners. The corners are secured with self-tapping screws. To add strength, diagonal bevels are also made.
When installing walls, you must not forget about the desired ceiling height. It is better to do it within 2.5 meters. In this case, after decorating with finishing, the ceiling height will not fall below 2.3 meters. When installing walls, communications are carried out, since they can be hidden in the walls.
When installing ceiling beams, three methods are used:
- cutting method;
- using perforated brackets;
- using steel angles.
Depending on the mounting location, you can use different ways. The support for the beams is the strapping beam. The beams are secured using self-tapping screws.
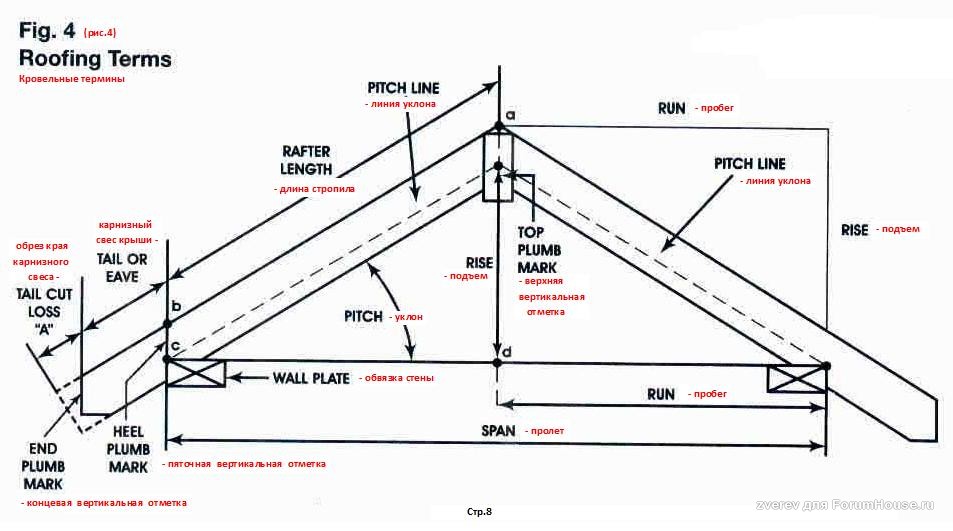
Roof installation
When installing a roof at the top, the rafters are fastened to each other using nails. In addition, for strength they are fastened with boards. Then the rafters are laid on the walls so that there is a protrusion of 20 cm. First, the rafters are fastened along the edges using nails and several bevels. When the central rafters are secured, the ridge board is installed.
Next, make the sheathing with edged boards. Roofing felt is laid over the finished sheathing, secured with nails with wide heads. At the last stage, the roofing material is installed, the installation of which can be done with your own hands, if the technology of the material used allows it.
Exterior finishing and insulation
For external finishing, there are many types of finishing materials, for example, siding, lining, timber simulator, etc. Before finishing, lathing is done using bars measuring 40*50 cm and 60 cm in increments. You can use a metal profile.
Wooden sheathing must be treated with an antiseptic and fire-retardant agent. Next, the finishing is done with your own hands according to the technology of the finishing material.
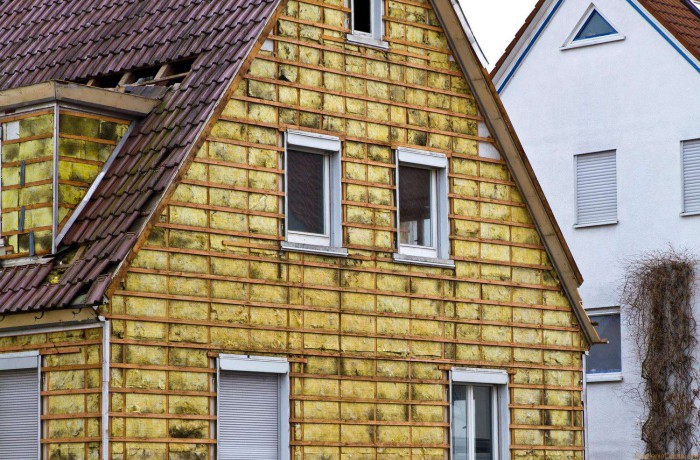
In order for the frame house we are building to become suitable for habitation, it must be insulated. External and internal thermal insulation is carried out. External insulation is carried out before finishing with mineral wool, on top of which foam plastic is nailed.
Mineral wool and plasterboard are used for internal thermal insulation. The cracks are foamed with polyurethane foam. Everything is insulated: floor, walls, ceiling, roof.
A vapor barrier is installed between the insulation and finishing materials.
At the final stage, it is necessary to carry out all remaining communications and carry out interior decoration, which depends on the wishes of the owner. The construction market has a large selection of finishing materials, purchasing which anyone can decorate a house according to their taste with their own hands.
Watch the step-by-step construction video:
Feasibility of construction and cost
As an example, we can give the estimated price for sets of frame-panel houses:
- the price of a one-story house ranges from 9 thousand rubles/m2 to 10 thousand rubles/m2;
- a two-story house costs from 8.7 thousand rubles/m2 to 9.5 thousand rubles/m2;
- the price of houses with an attic floor ranges from 8 thousand rubles/m2 to 9.5 thousand rubles/m2.
If assembly is carried out on site, then the cost is about 15 thousand - 17 thousand rubles per square meter. The cost of a frame house depends on the specific project, it includes the amount of work and complexity of installation.
Analyzing all the pros and cons frame construction, we can conclude that frame-frame technology is most suitable for DIY construction. For the most simple house a lightweight strip foundation is selected.
The base is assembled from logs or timber. Frame racks are installed on it. It is recommended to install the racks at intervals of about 1 m.
Thus, the load will be distributed optimally. The racks are fastened with staples and nails.
The upper and lower connections are made using beams. To enhance stability, diagonal jibs are made. After the frame is assembled, the roof is installed. First of all, the rafters are installed, then the sheathing necessary for installing the insulation and roofing is installed on them.
Next, the frame is finished, both external and internal. Along with the finishing, utilities are laid: sewerage, water supply, gas, etc. Such a house is on average 15% cheaper than a panel house.
I would like to know about the region you are in and how much the price will increase when shipping to other regions? Do you have a team that is assembling houses in other regions?
 A tumor in the throat symptoms is benign How to determine a benign or malignant tumor of the throat
 Can there be quotes within quotes?
 B1 in English what level?