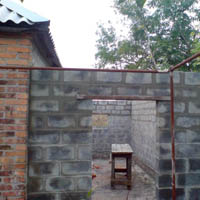
Extension to the house of a bathroom made of foam blocks. Do-it-yourself wooden extension to a house made of foam blocks
Even in ancient times, it became clear to humanity that air is the best heat insulator.
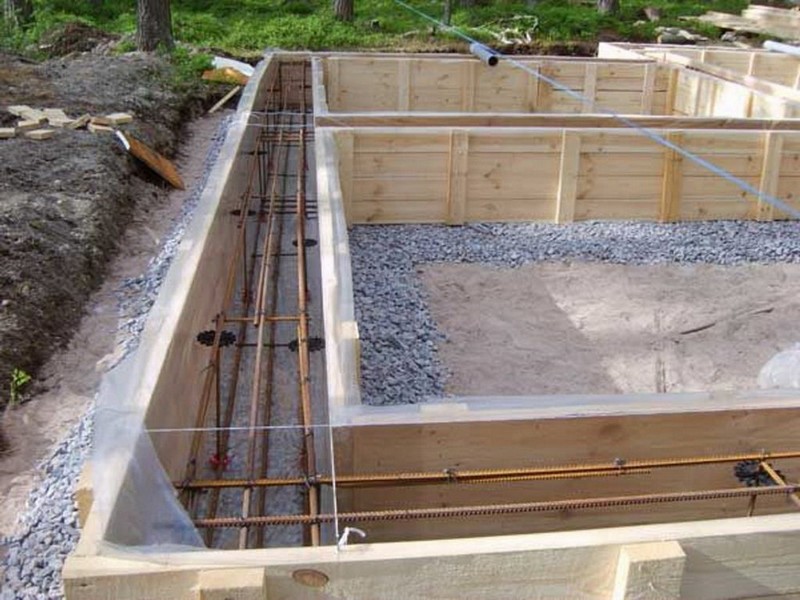
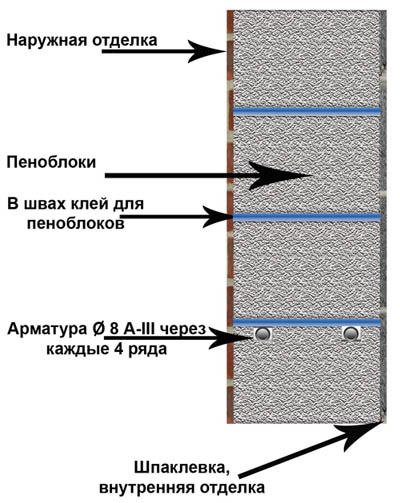
Layout of reinforcement for a house extension made of aerated concrete blocks.
People decided to take advantage of this property. And today, with the availability of modern materials and the use of nanotechnology, this has not been forgotten. Except that the methods of using air insulation have changed.
Today, the most effective, from the point of view of thermal insulation, are materials that have a low density and contain many air pores inside.
These include fiberglass or basalt, polyurethane foam, polystyrene foam, hollow brick (the more voids there are, the more heat-saving the brick is). Foamed concrete is considered the most effective of modern materials. About one of its varieties, namely, about, we'll talk. It is especially indispensable when you need an extension to the house, and not an entire building.
Scheme for adding an additional room.
Aerated concrete is considered environmentally friendly material, which, thanks to its porous structure, has strength, lightness and excellent thermal insulation. The combination of all this makes it more popular among all other types of building materials and allows it to be used both in the construction of entire houses and various extensions to the house. This could be a sauna, veranda, bathroom or heating unit. Easy, fast, without any extra costs. The main thing to remember is that before you start building an extension to your house, it would be a good idea to objectively assess the condition of the building itself. If it is new enough, then an extension makes sense. Perhaps it would be much more profitable to demolish old house and build a new one, rather than use this inexpensive way to expand living space.
The basis of any building

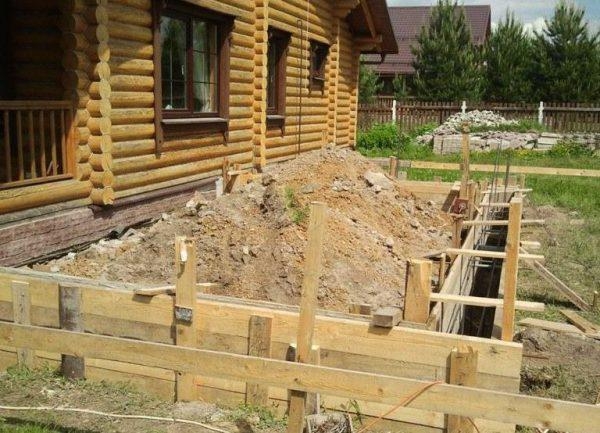
Scheme of connecting the new foundation to the old one.
Before you start making an extension to the building, you need to measure the corners of the future structure. Their diagonals should be at the same distance from the wall of the house and have the same length. Next, you need to determine the thickness of the foundation; for the middle zone, 40-50 cm will be optimal. The depth should be 40-60 cm, which is due to soil freezing in winter. A metal belt is made according to the size of the dug trench. For this purpose, fittings are used. Then holes are drilled in the old foundation and a welded metal belt is attached.
Then the foundation itself is poured, for which it is prepared sand and gravel mixture and cement is added clean water. You will need a lot of water: 125 liters for 1 cubic meter of concrete. You should also know that the strength of the cement used directly depends on its shelf life: the longer it is stored, the more of its strength it loses. After pouring, the foundation is given time to settle, about 2 weeks. Next, a brick base is laid out. And only after this the extension is made directly from aerated concrete.
Concrete foamer
An attempt was made to improve the properties of concrete using a foaming agent.
Scheme of technology for constructing a columnar foundation.
As already mentioned, in modern conditions this is the most popular building material with the greatest heat-saving ability, but there is another side to the coin: the lower the density of the material, the lower its load-bearing capacity. Concrete is known to be the strongest of modern materials and its load-bearing capacity is quite high. But the walls made of it are very cold, so the extension requires mandatory insulation. It is because of this that they came up with the idea of foaming concrete. This is done using foaming agents (most often it is aluminum powder), then it is placed in molds and left to harden either naturally (foam concrete blocks) or in autoclave ovens (aerated concrete blocks). Thus, aerated concrete blocks are produced only industrially, while foam concrete can actually be produced directly on construction sites.
Naturally, this factor cannot but affect the quality and price. Modern manufacturers claim that a thickness of 30-40 cm replaces brick wall 1 m thick; it is also said that the high vapor permeability of this material does not require the construction of ventilation in the room. Only to attach the blocks you need special fasteners, and in order to screw a self-tapping screw into the wall, you need anchor-type fasteners, otherwise nothing will work. Nails in such walls simply do not hold and fall out. Aerated concrete has another remarkable quality: blocks can be sawed with a hacksaw for metal and planed with a plane, like wood. To install the blocks from which the extension is made, it is better to use special glue.
Deformation of building materials
It must be said that deformation of any building materials is inevitable.
In fairness, it should be noted that no masonry, even 2.5 bricks, is completely airtight. Therefore, it is advisable to seal and coat absolutely all cracks, seams and joints on both one and the other side of the wall. For ventilation gaps between the blocks and facing brickwork, 20 mm will be sufficient. Bandaging blocks and facing masonry done using nylon fittings. It is indispensable when working with tension. In addition to brick, you can use other facade materials. Walls made of aerated concrete must be closed from the outside, since, having high absorbency, they will be extremely fragile. And heat loss in the cold season will be much lower, this is especially true for the middle zone. As practice shows, it is best to plaster a wall on both sides. Then the built extension will be warmer.
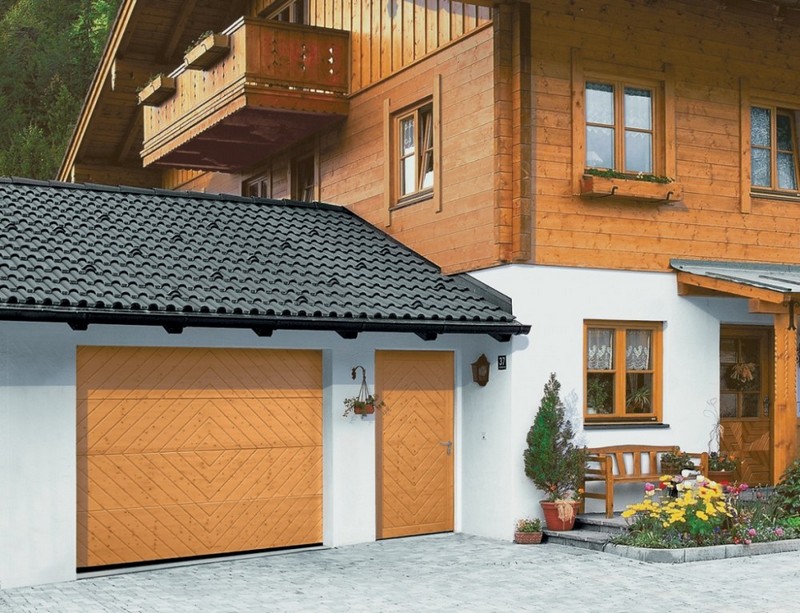
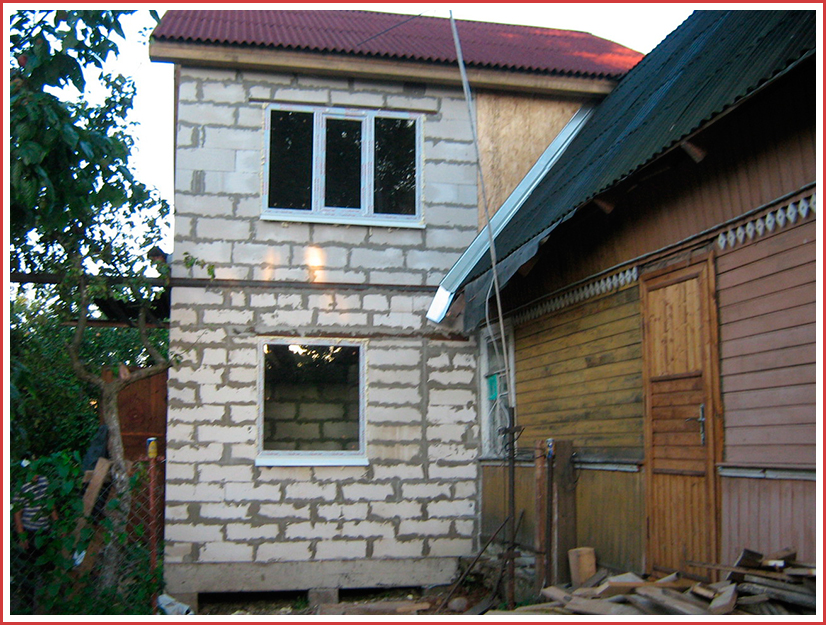
Sometimes people, living in their cozy wooden house, realize that they need to expand its area. This can be done today with the help of an extension.
It can be made of any material, but most often foam blocks are used for these purposes. The erected structure can be used as a veranda, dining room, guest room or even bedroom. In addition, the extension can serve as an exit to the garage directly from the living room.
- 1 How to build
- 1.1 Foundation
- 1.2 Construction of walls
- 1.3 Jumpers
- 1.4 Floors
- 2 Projects
How to build
Building an extension for a wooden house is not at all difficult. Today, most owners do this work themselves. To do this, you need to follow a number of simple steps. Since foam blocks are used to build the extension, this allows you to increase the living space of the house.
Foundation
The first step is to determine what type of base is suitable for the intended structure. Most often, a strip or column foundation is chosen. The first option has a significant advantage. After its construction, you can build walls immediately. But when choosing a strip structure, further work will have to be carried out only after it sits down. But what foundation to choose for a house made of aerated concrete, and how to make it right choice, indicated in this article.
Foundation for extension
To do this you have to wait at least 6 months. It is necessary to erect the foundation for a new structure made of foam blocks at the same level as that of the main structure. Then it will be possible to obtain a similar shrinkage.
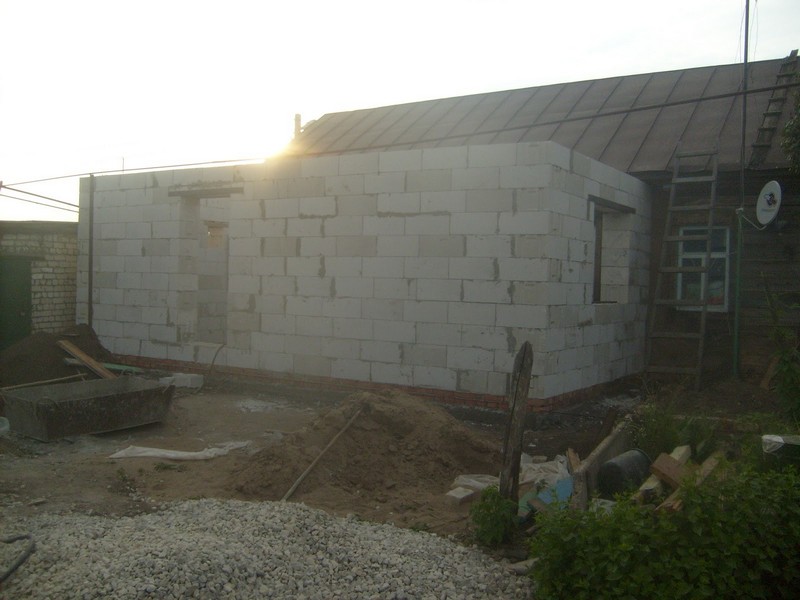
Construction of walls
You can proceed to the construction of walls after the foundation has been erected. You can do such work yourself. The fact is that working with foam blocks is very simple, so no preliminary preparation is required. Lay a layer of roofing felt on the finished base. Next, you can build walls, starting to lay out blocks from the corner.
The first row is laid out using cement mortar. But the installation of subsequent rows is carried out using special glue for foam blocks. There is a summer and winter variety. The thickness of the seam when constructing walls made of foam blocks should not be higher than 3 mm. This will avoid cold bridges during winter frosts. To strengthen the building, it is worth using additional reinforcement. It is driven directly into the foundation and is located between the blocks. It is worth using reinforcement whose width is no more than 10 mm. But this article will help you understand how to choose insulation for walls under plaster on the outside.
In the video - laying foam blocks:
There is another option for constructing a massive structure. It is necessary to saw through the horizontal hollows. Moreover, they need to be done in a set row of blocks. Mount the reinforcement there and then fill it with glue.
Jumpers
They are used when the opening width is no more than 1.75 cm. If a wider opening is to be made, then construction work better done using sand-lime brick required size. First, the wooden sheathing is installed, and then a row of elements with a U-shaped cutout is laid on it. Reinforcement is placed in it and everything is filled with concrete mortar. But this information from the article will help you understand how to install a concrete blind area around the house.
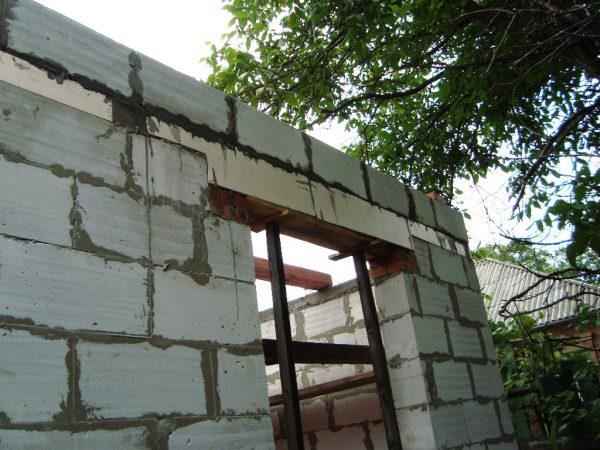
Jumpers for extensions made of foam blocks
When the concrete becomes completely hard, it wooden sheathing can be removed. When working with foam blocks, it is quite problematic to make an opening in one design or another. If the design assumed an arched lintel, and in the wall round window, then this cannot be done using cellular concrete.
But this video will help you understand how to attach a garage to a house made of aerated concrete, and how to do it correctly.
Floors
Installation of floors is carried out from timber or logs. Material is placed and fixed in predetermined spaces. After this, ceilings are attached to it, which are necessary for the subsequent installation of the roof. The roof of the extension can be made of soft tiles, metal tiles or roofing felt. The type of coating required should be chosen taking into account the purpose for which the structure is being built. What an insulated veranda attached to a house looks like in the photo can be seen in this article.
The video shows how the extension is made:
Projects
Today there are several options for extensions to a wooden house:
- Lateral, when the roof is common with the house;
- Attic extension. But this article will help you understand how to insulate attic walls from the inside;
- Side with its own roof;
- Second floor extension.
The first version of the extension cannot be called simple in terms of construction. But it is the most budget-friendly. The essence of this project is that the roof remains in place, but is just made a little longer. This length will correspond to the size of the extension to the house. The main house is completed on one side or both. Then a passage is made between them. Then the total area of the building will increase by the size of the new building.
If you want to build an attic room, then this project requires more cash. And this is due to the fact that an add-on needs to be completed.
The third extension project to a wooden house requires its own roof. In other respects, the design resembles a side one. Self-supporting roof requires more materials, so the extension will be more expensive, and it will take longer to build.
On the video - how to add a full-fledged room:
For a project that involves adding a second floor, you first need to determine whether the foundation can support the load placed on it. If at first the house was not planned to be multi-story, then certain difficulties may arise with the completion. The foundation may not be able to support the auxiliary load. So there are situations when it needs to be strengthened.
According to the law, any extension to the house is a functional room. It doesn’t matter what you choose – a balcony, a winter garden or a loggia, all of this is considered an extension. Its obligatory parts are the walls and the base.
Compared to the main house, there may be no floors here. In this case, you will have to adhere to the following design solutions:
- Adjacent to the roof slopes of the main house. New nodes are already attached to the existing rafter scheme.
- Connection to the pediment. This option is considered the most budget-friendly.
- Shared with the main house. The rafter system is dismantled from the edge that touches the extension. Only some parts need to be replaced, and everything is under the general roofing material.
- Separate design. If the number of storeys increases, the walls will have to be joined to the roof.
The base of the extension should be built separately. This is due to the fact that the operation of the extension can occur under any conditions.
An extension to a wooden house using foam blocks is considered one of the most popular options today. And this is not surprising, because foam block is a material that has a low cost, is quick to build, and has a long service life.
To expand the usable area, an extension to the wooden house is being built from foam blocks. The construction of wooden houses has not lost its relevance, despite the fact that wood is one of the rather old and not very durable building materials.
However, the advantage of wood is its light weight, which makes the construction of a capital foundation for buildings made of this material unnecessary. Therefore one of the best materials for the extension there is lightweight foam concrete. This material appeared not so long ago, just a century ago, but has already earned its recognition. How to make extensions from foam concrete blocks to wooden houses, is described below.
Description of material
Foam concrete is called concrete that has a porous structure. It is made from cement-sand mixture(as with ordinary concrete) with the use of various additives - foaming agents. The foam block obtained in this way has all the advantages of ordinary concrete, as well as:
- good thermal insulation;
- good sound insulation;
- does not shrink;
- does not absorb moisture;
- due to porosity it has a small mass;
- resistant to temperature changes;
- high fire resistance.
At the same time, the strength of the foam block is several times greater than the strength of brick, cinder block or wood. Despite the almost century-long existence of this material, it became more widespread in the late nineties and early two thousand. This is due to a significant simplification of production technology, which led to a significant reduction in prices for foam concrete. Now it is one of the cheapest and most durable materials.
If you need to expand your house, a foam block extension would be the best choice. In this case, you should determine in advance the type of extension: veranda, open gazebo, barn, living room, summer kitchen, etc. This is due to the fact that various types of extensions require different type foam concrete and, accordingly, different foundations. So, for a major extension (room, kitchen, garage), foam concrete grade 1200 (not lower) should be used. For temporary or simple buildings, grades 800-1000 can be used. Since different grades of material have different weights, different foundations are required for the construction of walls.
Planning and preparation
First, you need to create a plan (project) for the future design and coordinate it with the competent authorities (BTI). After creating the project, we begin to calculate estimates for materials. You can build an extension yourself, but if you plan to involve a team of builders, then the costs for it should also be taken into account. When all the “paper” work is completed, the state of the foundation should be analyzed by “location”. If before drawing up the project it was tested for strength, then this is not necessary.
If necessary, you should create a project for supplying communications and lay them to the required point. It is also worth considering the connection point between the extension and the house.
Next, determine the type of foundation. The most the best option is the construction of the same foundation as the main building. However, if it is not known what the main building stands on, then the foundation for the extension should be made either monolithic or strip. It is worth remembering that under wooden houses usually a pile or columnar foundation is erected, however, the construction of such foundations for an extension is not always correct, since it depends on the type of soil. At the same time, the type and capitality of the foundation is significantly influenced by what function the extension will perform. If it is a barn or gazebo, then a capital foundation is not necessary.
For a living space, bathroom, kitchen, a permanent foundation will be required. But it’s still better to give up saving and make a reliable foundation even for a light extension of the room, since this will prevent it from sagging and sliding. When building a foundation, it is very important to correctly connect the existing foundation with the newly created one. To do this, you should dismantle the old foundation at the junction, reinforce the area and fill it again.
It is also important to organize a passage in the house (if required), through which there will be communication with the new room. To do this, it is not enough to cut a doorway (which is done at the end of construction). It is also important to think about the levels of floors, ceilings, etc. It is advisable to make the doorway itself instead of a window. If there are no plans to place windows in the extension, then the doorway is cut out immediately.
Only after all preparatory operations have been completed can construction begin.
Construction
When the foundation is ready, it is important to make a reinforcing belt that will affect both the extension and the foundation of the main house. It should be remembered that wood needs waterproofing, which can be provided by placing roofing felt.
After the construction of the foundation is completed, markings are made for the construction of walls (on different levels). The construction of the walls of the extension begins from the corners. The rows of foam blocks in the corners should be in a checkerboard pattern - one row from one wall, the second row from the other is laid on it. During the masonry process, ordinary blocks should be used to connect the blocks. cement mortar. Laying blocks is carried out in the same way brickwork, if necessary, reinforcing elements should be laid.
Final stages
When constructing, you should remember the connection points of the new main wall. Before construction wooden walls should be carefully leveled (almost to a perfectly flat surface). After which you need to treat all wooden parts with moisture-repellent, fire-resistant solutions and stick roofing felt as waterproofing.
After the walls are erected, they do the rest of the work: roof, finishing, etc.
More articles on this topic: 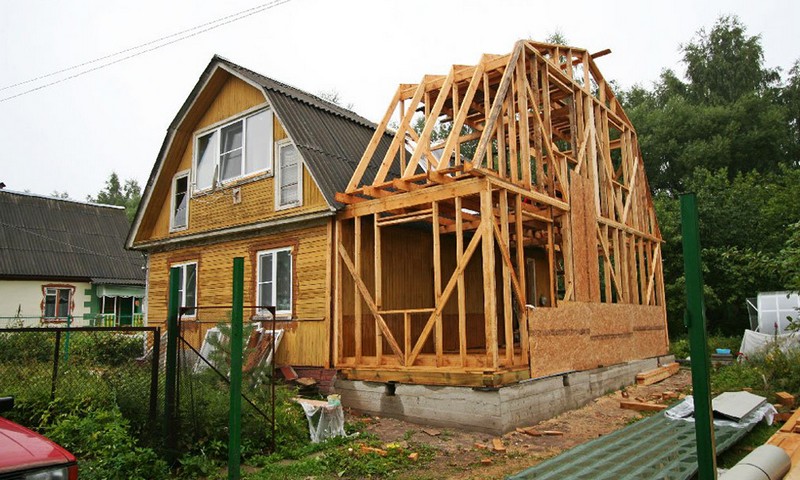
Foam block is a material in demand in individual construction with good insulating properties and fire resistance. Lightness and simplicity in fitting and laying allow you to do the work yourself; the large size of the products reduces installation time. The most popular is the construction of an extension to the house from foam blocks in order to expand the usable area.
Depending on the functional purpose of the extension, attached ones are distinguished: verandas, bathhouses, garages, utility rooms, additional living rooms. There are no size restrictions; even two-story houses over 100 m2 can be built from foam blocks. Common footage:
- The standard attached veranda is 3x9 m.
- Additional room - 5x10.
- Baths - 9.5x4.
- Garage - 4x6, 6x8.
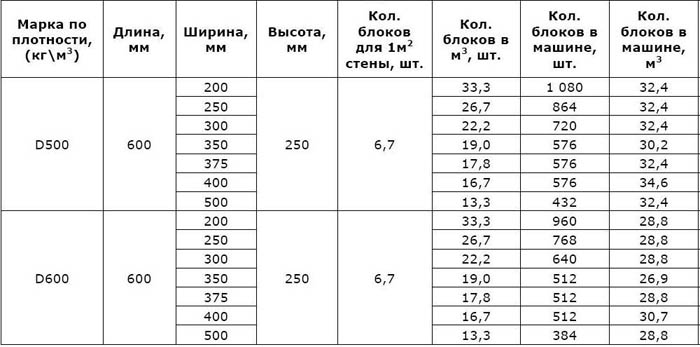
Calculation of the amount of foam block
It is easy to cut into the required parts; there is no need for a large margin for adjustment. But future losses during transportation and unloading should be taken into account; their value is clarified with the supplier. If not finished project extensions for a house, then the standard dimensions are taken as a basis: length, width, height, minus window and door openings. All data is converted to meters. The thickness of the masonry and the method of placing the foam blocks are taken into account: depending on whether it is an external, internal load-bearing or ordinary wall, the blanks are placed flat or on the ribs. Thus, the calculation of blocks for an extension to a house takes place in several stages:
- Divided into groups by thickness, for each the required number of products is located separately.
- Calculation of the length of the walls and the area of the extension openings.
- Calculation of the volume of masonry (the previous data is multiplied by the thickness of one product) for each category of walls, minus doors and windows.
- Obtaining the required quantity by dividing by the volume of one foam block. This value must be clarified, especially when using non-standard types.
- Accounting for delivery split (about 3% or exact supplier data) and stock (5%).
Important: when calculating openings, you need to consider the type and area of the lintels; there are special U-shaped blanks for these purposes. But standard blocks can also be used.
Sequence of actions when constructing an extension
It is only possible to correctly attach a living space made of foam block to a house if you follow a strict sequence of steps:
- Pouring a new one and joining it with an already established foundation.
- Construction of foam block walls.
- Installation of jumpers.
- Increasing the load-bearing capacity of extension walls through reinforcement.
- Construction of the ceiling.
What to consider when laying the base?
There is a high probability of the new foundation subsiding and moving away from the old one. It’s good if their composition and depth coincide. Ideally, you need to let the foundation of the extension stand for 1–2 years and only after inevitable shrinkage lay foam blocks. Positive factor: light weight building material, the subsequent load on the base of the extension to the house is minimal.
There are two methods of coupling: rigid reinforcement and the use of an expansion joint. The first is advisable if the old foundation is already well established and the addition of another will not cause settlement of the entire structure. The second is much more common and economical, it is used for a strip base, columnar or on screw piles. The use of this method involves laying an expansion joint - a gap between the old and new foundation (no more than 6 cm). The higher the foam block building, the smaller it should be; any type of insulation and sealant is suitable as a filler.
Masonry and reinforcement technology
The process begins with the construction of the corners of the extension. The underside of the foam block is wetted to increase adhesion to the solution; each time before laying the next row, the previous one is also moistened. Compliance with horizontal and vertical level control is mandatory. The first row is checked with special care; the quality of the entire masonry depends on it. Horizontal deviations are eliminated by changing the density of the solution layer.
The thickness of the seams should ideally not exceed 1 mm. Adhesive mixtures have good performance; they are applied first to the horizontal side and only then to the vertical. All rows of the extension (without exceptions) are checked for level deviations and leveled, if necessary, with a sanding float. Dust and particles are cleaned out before laying the next layer of foam blocks. Connecting fittings are placed every 5 rows in height; grooves can be easily cut for them in the porous material.

The foam block extension to the brick house. The recommended type of foundation is closed, not tied to the building. It is advisable that such an extension should not be higher than a one-story house. Dissimilar walls imply rigid adhesion (bandaging at least two rows instead of the usual five, connecting reinforcement - at least 6 mm in diameter). To do this, holes for the rods are prepared in advance in the foam blocks, which, after adhesion, are sealed with cement masonry mortar. It is also used between seams instead of adhesive mixtures, as it gives less sediment.
Cost of foam block and installation work
| Name | Density | Dimensions, m | Volume, m3 | Price for 1 piece, rubles |
| Thermal insulation | D 400 | 600×300×200 | 0,036 | 100 |
| 600×400×200 | 0,048 | 130 | ||
| 600×300×250 | 0,045 | 120 | ||
| D 500 | 600×300×200 | 0,036 | 100 | |
| 600×400×200 | 0,048 | 140 | ||
| 600×300×250 | 0,045 | 130 | ||
| Structural thermal insulation foam block | D 600 | 600×300×100 | 0,018 | 60 |
| 600×300×200 | 0,036 | 110 | ||
| D 700 | 600×400×200 | 0,048 | 150 | |
| Structural | D 800 | 600×300×200 | 0,036 | 120 |
| 600×400×200 | 0,048 | 160 |
If all the work is carried out not with your own hands, but with the involvement of specialists, the cost of an extension made of foam blocks approximately doubles. Prices for masonry are most often indicated per 1 m3 and range from 1200–3000 rubles.
An extension to a house made of foam blocks is most often used to increase the usable area, less often - to improve the external characteristics of the building. In addition, many developers value this material for its distinctive properties.
Features of an extension to a foam block house
This material is characterized by the number of voids, and the more there are, the more significant it retains energy-saving properties, which has been confirmed in construction practice using the example of hollow bricks. The pores in the foam blocks are distributed evenly over each product.
It is worth noting that foam block, unlike standard aerated concrete, is considered most suitable for the construction of an extension (not a full-fledged building).
In fact, this type of premises is inexpensive and rational method solving the problem of lack of usable space, especially if it is being built with one’s own hands.
This material has increased strength and ease of use, is environmentally friendly and does not contribute to dampness. It is easy to install without a lot of time investment.
In addition, foam blocks have such positive properties as:
- installation does not require professional skills;
- the process of laying foam blocks is much less than that of brick or wood;
- does not burn, and meets absolutely all fire safety requirements;
- the porous structure prevents shrinkage;
- has low thermal conductivity and cheap material;
- service life exceeds 50 years;
- easy to construct on difficult soils;
- easy to fit, easy to drill;
- It is lightweight, which is important when designing and constructing a foundation.
Among such an abundance of positive characteristics, a foam block extension also has negative ones, namely:
- increased hygroscopicity necessitates the creation of special protection, otherwise there will be a rapid loss of thermal insulation properties;
- appearance, why mandatory external finishing work is required.
What kind of houses can such an extension be made to?
Before planning an extension, builders pay special attention to the strength of the room. Professionals say that regardless of the type of building, the age of which is more than fifteen years, it is only possible to access it taking into account a careful calculation of the strength of the room.
But because The extension is a cadastral change (redevelopment), it requires an individual project and approval from local authorities in the form of permits to increase the area of the premises through construction.
Construction stages
The construction process is somewhat specific, and requires strict adherence to the order of its stages.
Preparatory work
Before building an aerated concrete extension, they obtain official permission to carry out construction from the relevant authorities. To do this, you first need to make a design of the planned part of the house.
It is advisable to do this under the supervision of specialists in order to avoid major mistakes, or to completely entrust them.
An extension can be a room, a kitchen, a loggia, a veranda, etc. During the construction of an extension the most important elements the foundation and walls are listed.
Important! Due to differences in load, it is recommended to carry out the foundation separately in order to prevent the occurrence of cracks from seasonal heaving of the soil.
Foundation
The main thing in construction is the correct choice of foundation and its proper connection with the existing foundation of the building.
Building a foundation for an extension has its own nuances:
- The work is not being done from scratch, which already causes some difficulties, including when connecting with an existing building under the main foundation.
- A rigid connection from reinforcement is made with an established foundation, when settlement of the extension has already occurred, and the new foundation will not contribute to a critical settlement of the entire room. It is not advisable to perform rigid docking in heaving soil conditions.
- An expansion joint is considered a more economical joining method. It can be columnar, strip or on screw piles. Roofing felt or other insulating material is laid on the top layer.
Walling
- It is better to moisten the bottom side for better adhesion to the solution;
- On 1 layer, many layers of waterproofing composition are applied to protect against moisture;
- then, before applying the second layer, the first one is moistened;
- it is important to take into account that the first row must be made with strict adherence to the vertical and horizontal positions, because the quality of the construction of the walls depends on this;
- It is recommended to level out all horizontal errors with a solution;
- so that the seams are about 1 mm, the foam blocks are placed on glue;
- minimizing seams is necessary to minimize “cold bridges”;
- the mixture should be made strictly according to the instructions and applied first to the horizontal part of the foam block, then to the vertical;
- all blocks must be aligned on both planes;
- the resulting rows are leveled horizontally with a special grater for grinding, and the resulting dust is swept away;
- every five rows in the corners of the extension, reinforcement is placed to help connect the structure and prevent cracks.
Windows and doors
Windows and doors can be installed with a width of up to 175cm. A larger clearance carries a significant load, for which the tensile strength of concrete is not enough. The height of the jumpers is determined taking into account the level of the future floor.
They are done as follows:
- With formwork. When removable formwork is welded reinforcement cages, on the sides
The beams are nailed, the formwork is placed on top of them, and panels are placed on the sides. Next, the foam blocks are sawn into several narrow blocks in order to place them in the inner area of the formwork, so that it looks like a trough.
Afterwards, the reinforcement frame is laid upward with the side where there are fewer rods, and secured with spacers. Then the foam blocks are moistened, filled with concrete mixture and compacted. The surface in the pouring area is leveled and smoothed.
- When using U-shaped foam blocks. IN in this case There is no need to arrange formwork, due to which the work time is significantly reduced. The algorithm for installing such blocks is as follows: a foam block with a cut out support of up to 250 mm is mounted on both sides of the opening, the horizontal plane of the supports is leveled using a hose level, and any identified deficiencies are corrected using a sanding float. The blocks are placed on the glue with the hole facing up. Next, a frame of reinforcement is installed with fewer rods up and firmly secured with spacers. The foam blocks are moistened, layers of concrete mixture are laid on top, compacted with a trowel.
A reinforced belt is installed to increase the stability of the extension to external factors and improve the load-bearing properties of the walls. Because The reinforced belt is heavy and is made on the wall.
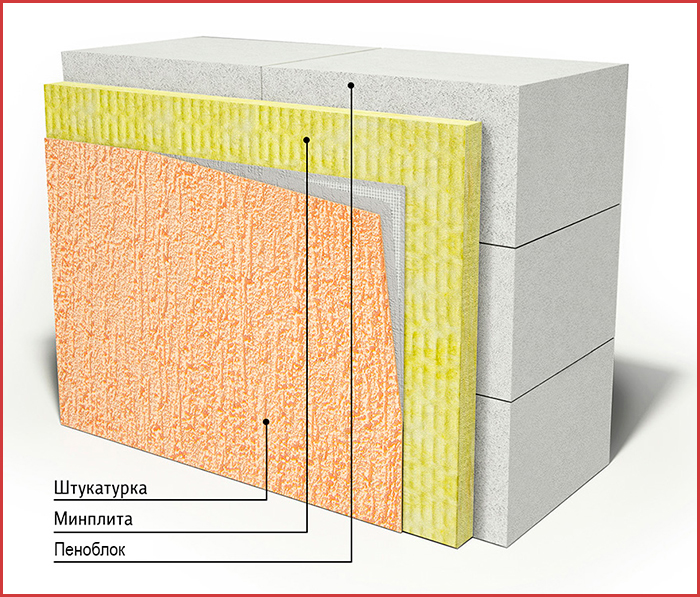
The pressing question about insulating an extension made of foam blocks has one answer: the materials used are the same as those used in the construction of the whole house. The main thing is that the materials best meet the installation conditions and technical properties of the house.
What are the main materials used for insulation:
- Mineral wool. Like the panels, it has high thermal conductivity and is excellent for insulating the outside. It does not have waterproofing, therefore an additional waterproofing layer is required, and its installation is recommended when covering walls with siding, clapboard or similar materials. Also mineral wool- an expensive material, and in combination with the cladding, the cost becomes unreasonably high. Therefore, experts say that the use of such insulation is appropriate only if it is impossible to place others.
- Expanded polystyrene. The advantage of polystyrene foam boards is that they can be installed using special mounting adhesive. It has increased thermal conductivity properties. For protection, it is enough to apply a thin layer of facade putty. The price for this type of insulation is the most appropriate.
- Polyurethane foam. It also has high thermal conductivity, sealing and waterproofing properties. But direct exposure to UV rays has a negative effect on this material; polyurethane foam requires additional protection, which involves the use of plaster or putty. But initially it will be impossible to obtain a perfectly even layer, so the consumption will increase for leveling.
- Liquid insulation. Experts predict that this type of insulation, which appeared relatively recently, will soon supplant all others. Both experts and beginners can apply it. The thickness of the insulation layer is only 3 mm, and according to experts, it practically replaces the wide bases of other types of insulation. It does not require additional protective manipulations and to some extent serves as a waterproofing material.
Finishing
External:
- to preserve natural vapor permeability and prevent contact of insulation with condensate, it is recommended to use ventilated siding;
- cladding with ventilated siding is somewhat more expensive than finishing with foam plastic, but such an extension will not be stuffy and damp, in addition, 4 tasks are solved at once: achieving the most aesthetic appearance, insulation, protection from natural influences and effective steam removal;
- if you fundamentally do not want to use polymers for exterior finishing, it is recommended to make the foundation 150 mm wider, purchase facing brick and install a curtain wall. Then a windproof film is installed on the insulation and an air gap of 50 to 80 mm is left, depending on the height of the extension;
- to connect the walls, anchors are used, installed in foam block masonry at 100-120 mm in increments of 500-700 mm;
- the next common style is the blockhouse, which is also a type of ventilated facade, mounted on a slatted or profile frame with a gap for steam removal;
- in warm regions of Russia, plastering is carried out with special mixtures or painting with vapor-permeable paints.
 B1 in English what level?
 Managing verbs in German - German online - Start Deutsch
 Conjugation of the verb haben (to have) in the present tense